Configuration
The Configuration module in the Kitchen365 Console v2.0.0 lets admin users manage store-level settings — tax classes, tier pricing rules, shipping methods, tax methods, payment methods, and timezone display preferences.
Use these settings to control how tax is calculated, how special pricing applies to customer groups, which delivery options appear on quotes/orders and your website, which tax provider calculates tax, which payment options customers can use, and how dates and times are shown across the Console.
Access
How to open Configuration
- Log in to the Kitchen365 Console.
- In the left sidebar, expand Configuration.
- Choose one of the sub-menu items:
| Sub-menu | Navigation Path | What You Can Do |
|---|---|---|
| Tax Classes | Configuration > Tax Classes | Create and manage tax classes for customers and products. |
| Tier Pricing | Configuration > Tier Pricing | Set special pricing rules by customer group and product conditions. |
| Shipping Methods | Configuration > Shipping Methods | Enable and configure delivery options for Console and website. |
| Tax Methods | Configuration > Tax Methods | Choose and configure the tax provider used to calculate tax. |
| Payment Methods | Configuration > Payment Methods | Add, configure, and restrict the payment options offered in the Console and on your website. |
| Timezone Changes | Configuration > Timezone Changes | Choose the time zone used for dates and times in the Console. |
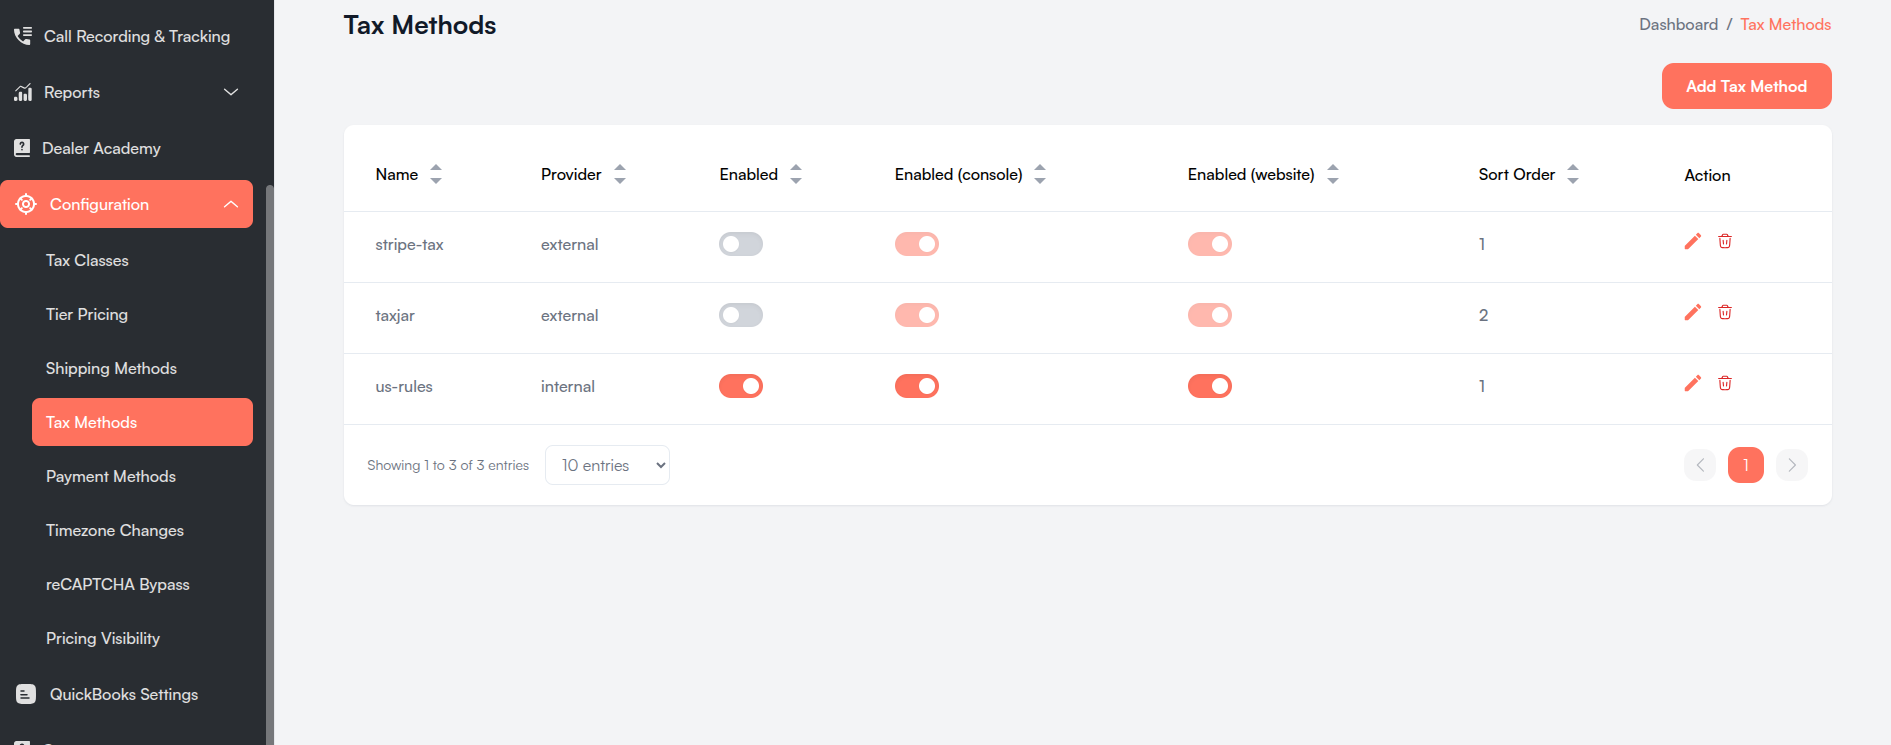
Tax Classes and Tier Pricing require view, create, update, and delete permissions on the tenant website. Shipping Methods, Tax Methods, Payment Methods, and Timezone Changes are available to authorized admin users. Tax Methods appears only for websites on Console v2.0.0. Contact your administrator if a menu item is missing.
a. Tax Classes
Tax classes define how tax is applied to customers and products. They are used when setting up customer groups, catalog products, and during quote or order tax calculations.
| Type | When to Use |
|---|---|
| Customer | Assign to customer groups or customers for tax rules. |
| Product | Assign to products in the catalog for tax rules. |
i. Tax Classes List
Open Configuration > Tax Classes to view all tax classes.
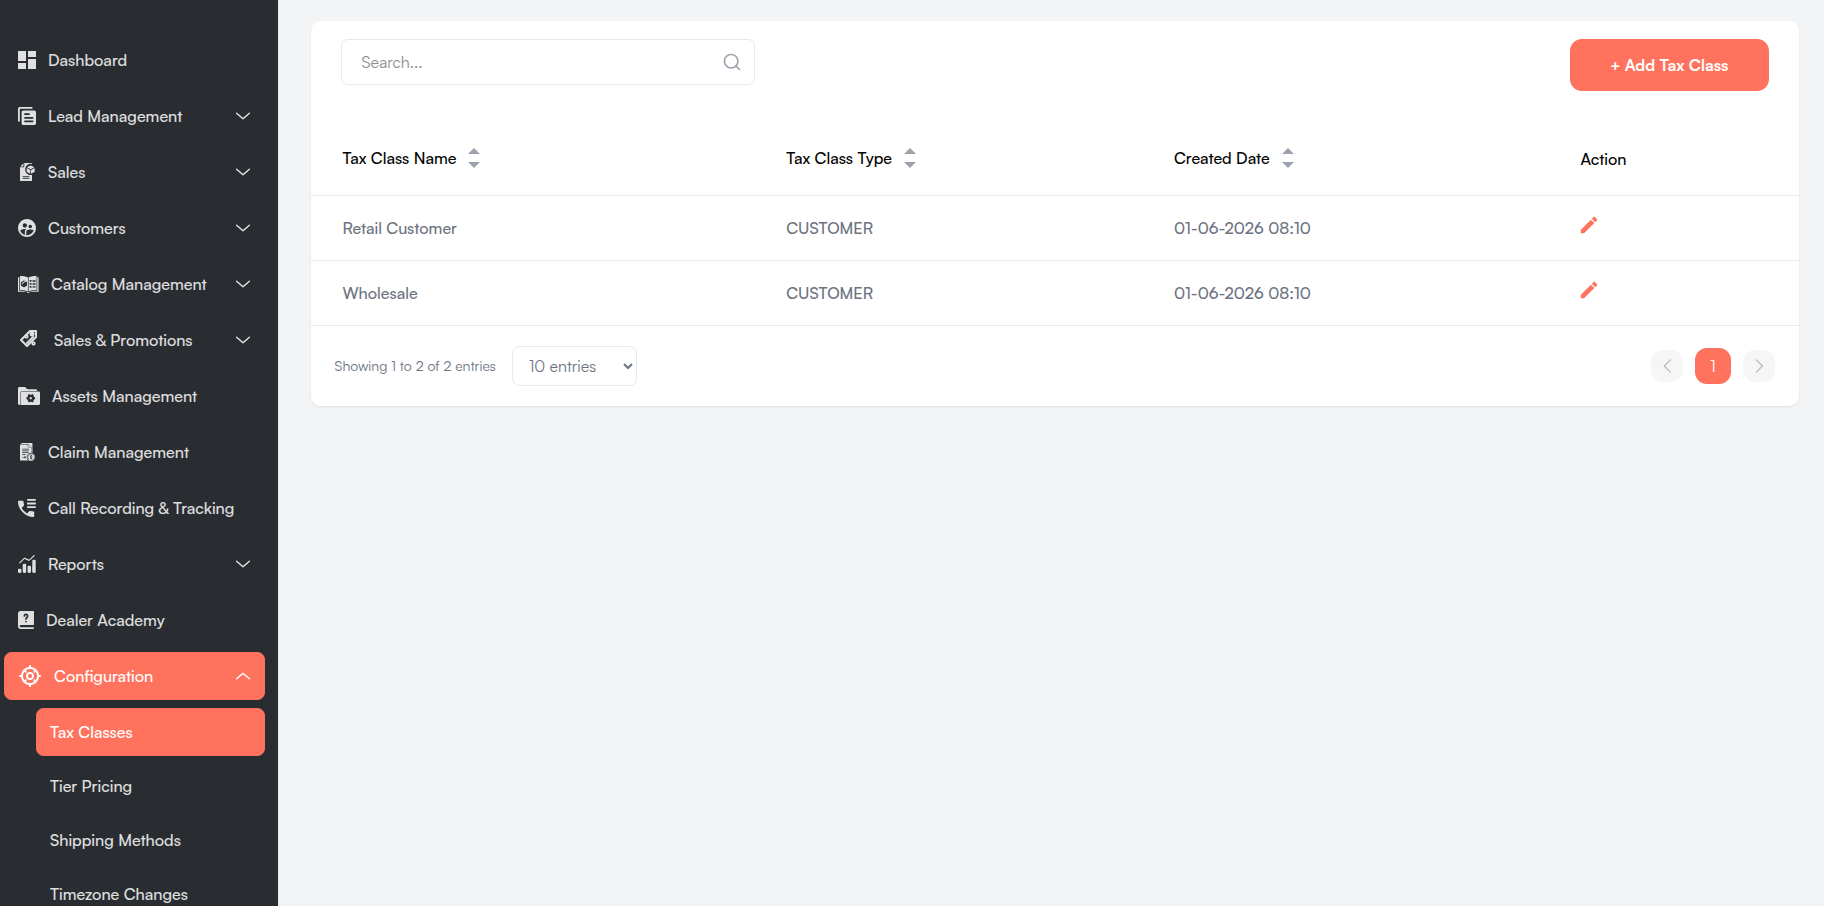
| Column | Description |
|---|---|
| Tax Class Name | Name of the tax class. |
| Tax Class Type | Customer or Product. |
| Created Date | When the tax class was created (shown in EST). |
| Action | Edit and Delete icons for each row. |
All columns except Action are sortable — click a column header to sort ascending or descending.
Search Bar
- Located at the top-left of the table.
- Placeholder: "Search..."
- Filters tax classes in real time.
Add Tax Class Button
- + Add Tax Class — Opens the Create Tax Class modal. Requires create permission.
- Located at the top-right of the table.
Pagination
- Located at the bottom of the table.
- Shows "Showing X to Y of Z entries".
- Page size options: 10 / 25 / 50 / 75 / 100 entries.
ii. Create Tax Class
- Go to Configuration > Tax Classes.
- Click + Add Tax Class.
- Fill in the fields below and click Save.
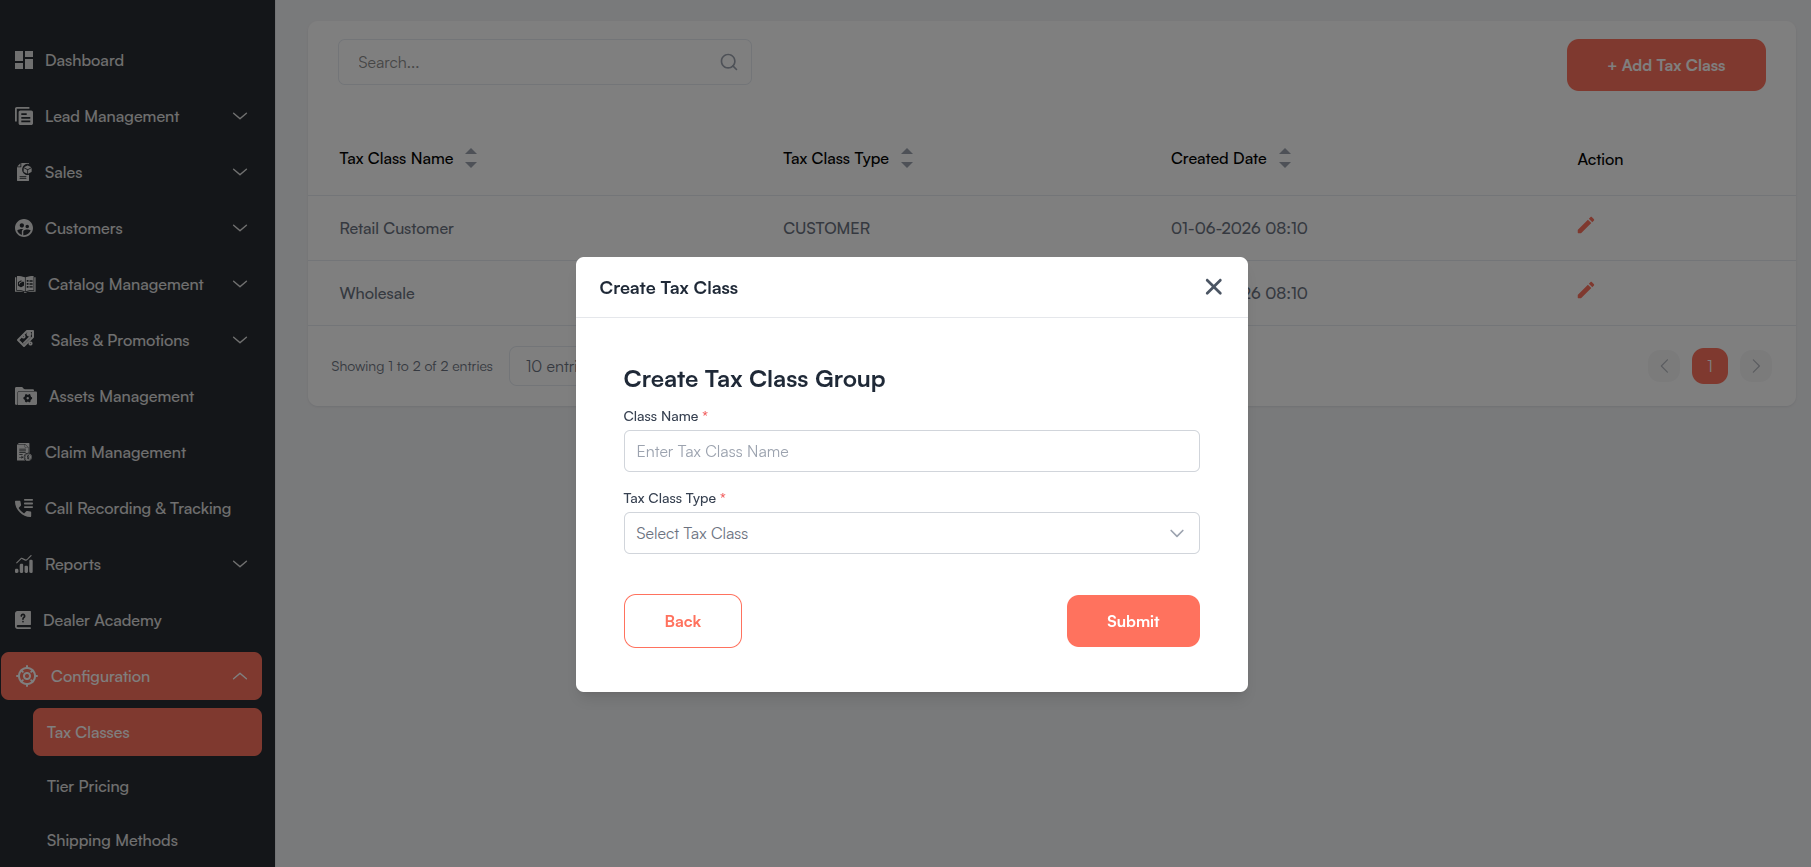
All fields marked with a red asterisk (*) are required.
| Field | Description |
|---|---|
| Class Name * | Name for the tax class (e.g., Taxable Goods, Exempt). |
| Tax Class Type * | Customer or Product — cannot be changed later. |
A success message appears when the tax class is saved and the list refreshes.
iii. Edit Tax Class
- Click the Edit icon on the tax class row.
- Update the Class Name if needed.
- Click Save.
The Edit Tax Class modal opens with the current values pre-filled.
Tax Class Type cannot be changed when editing. Only Class Name can be updated.
iv. Delete Tax Class
- Click the Delete icon on the tax class row.
- Review the confirmation modal — it shows the Class Name.
- Confirm to permanently delete the tax class.
Notes:
- The delete icon appears only when the tax class can be removed (not linked to other records).
- If the tax class is assigned to a customer group or product, remove those links first.
b. Tier Pricing
Tier Pricing lets you offer different prices to different customer groups — for example, a 10% dealer discount on cabinet categories.
When a rule is Active, within its date range, and its conditions match, product prices are adjusted automatically on quotes and orders.
i. Tier Pricing List
Open Configuration > Tier Pricing to view all pricing rules.
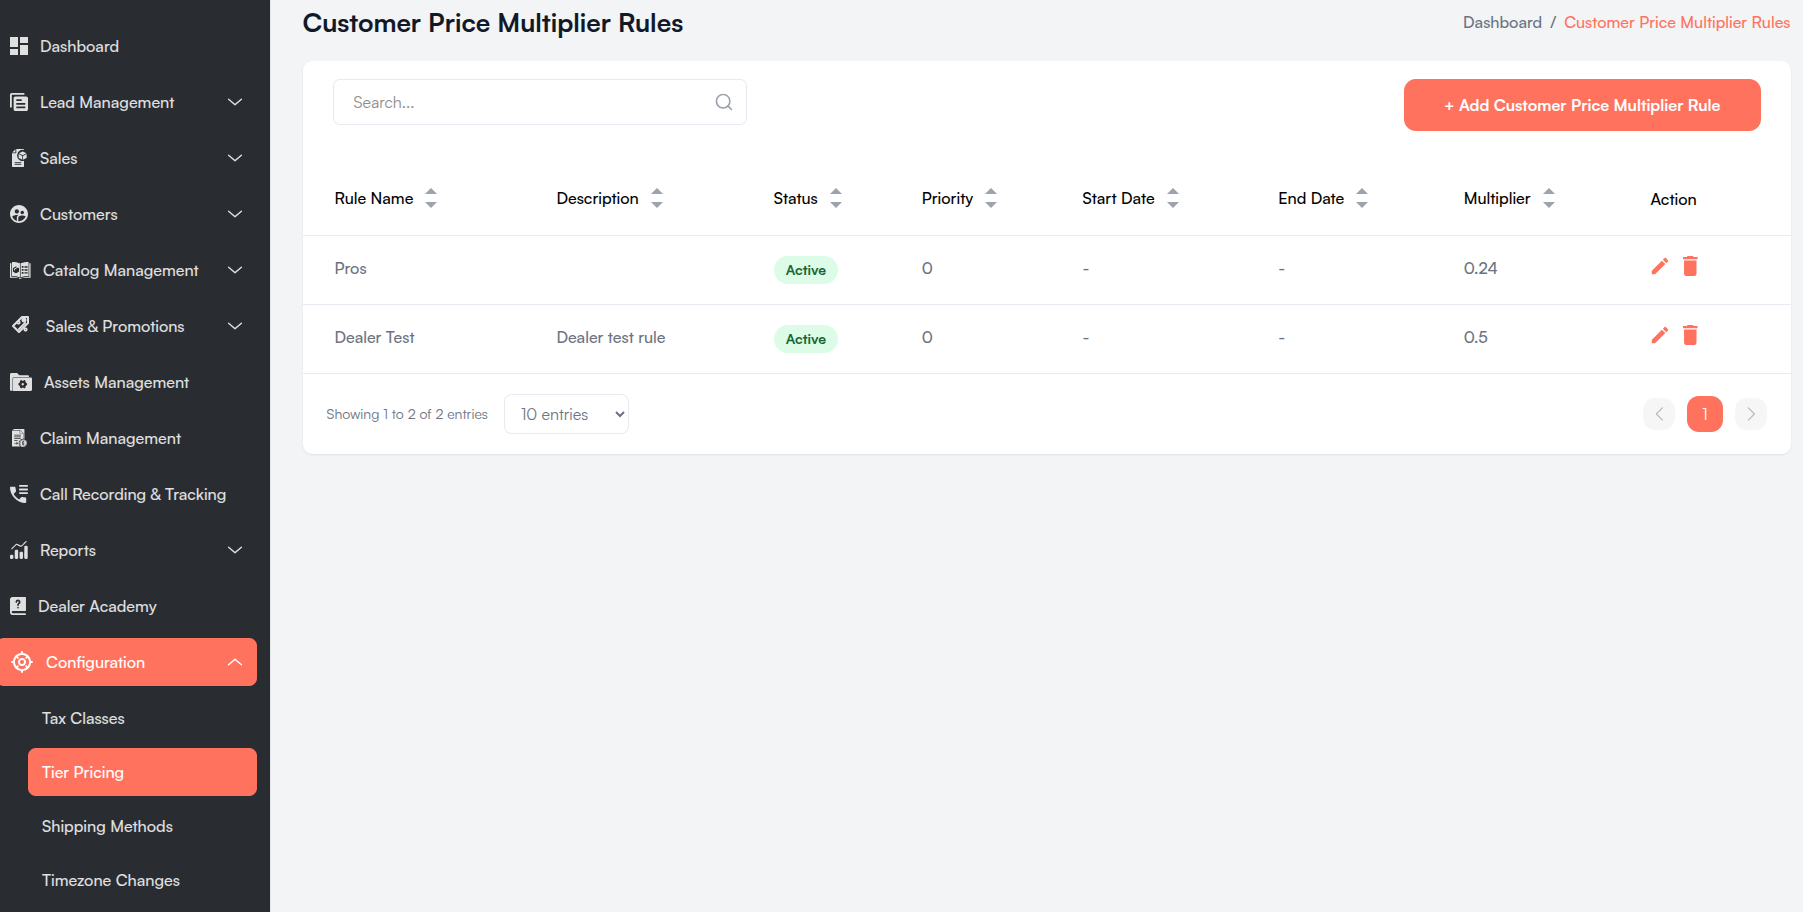
| Column | Description |
|---|---|
| Rule Name | Internal name for the rule. |
| Description | Optional notes about the rule. |
| Status | Active (green badge) or Inactive (red badge). |
| Priority | Lower number = evaluated first when multiple rules match. |
| Start Date | Date the rule becomes active. |
| End Date | Date the rule expires. |
| Multiplier | Price factor — e.g., 0.90 = 10% off, 1.00 = no change. |
| Action | Edit and Delete icons. |
Search Bar
- Placeholder: "Search..."
- Filters rules in real time.
Add Rule Button
- + Add Customer Price Multiplier Rule — Opens the create form. Requires create permission.
Pagination
- Page size options: 10 / 25 / 50 / 75 / 100 entries.
ii. Create Tier Pricing Rule
- Go to Configuration > Tier Pricing.
- Click + Add Customer Price Multiplier Rule.
- Complete Rule Information and Conditions.
- Click Save Rule.
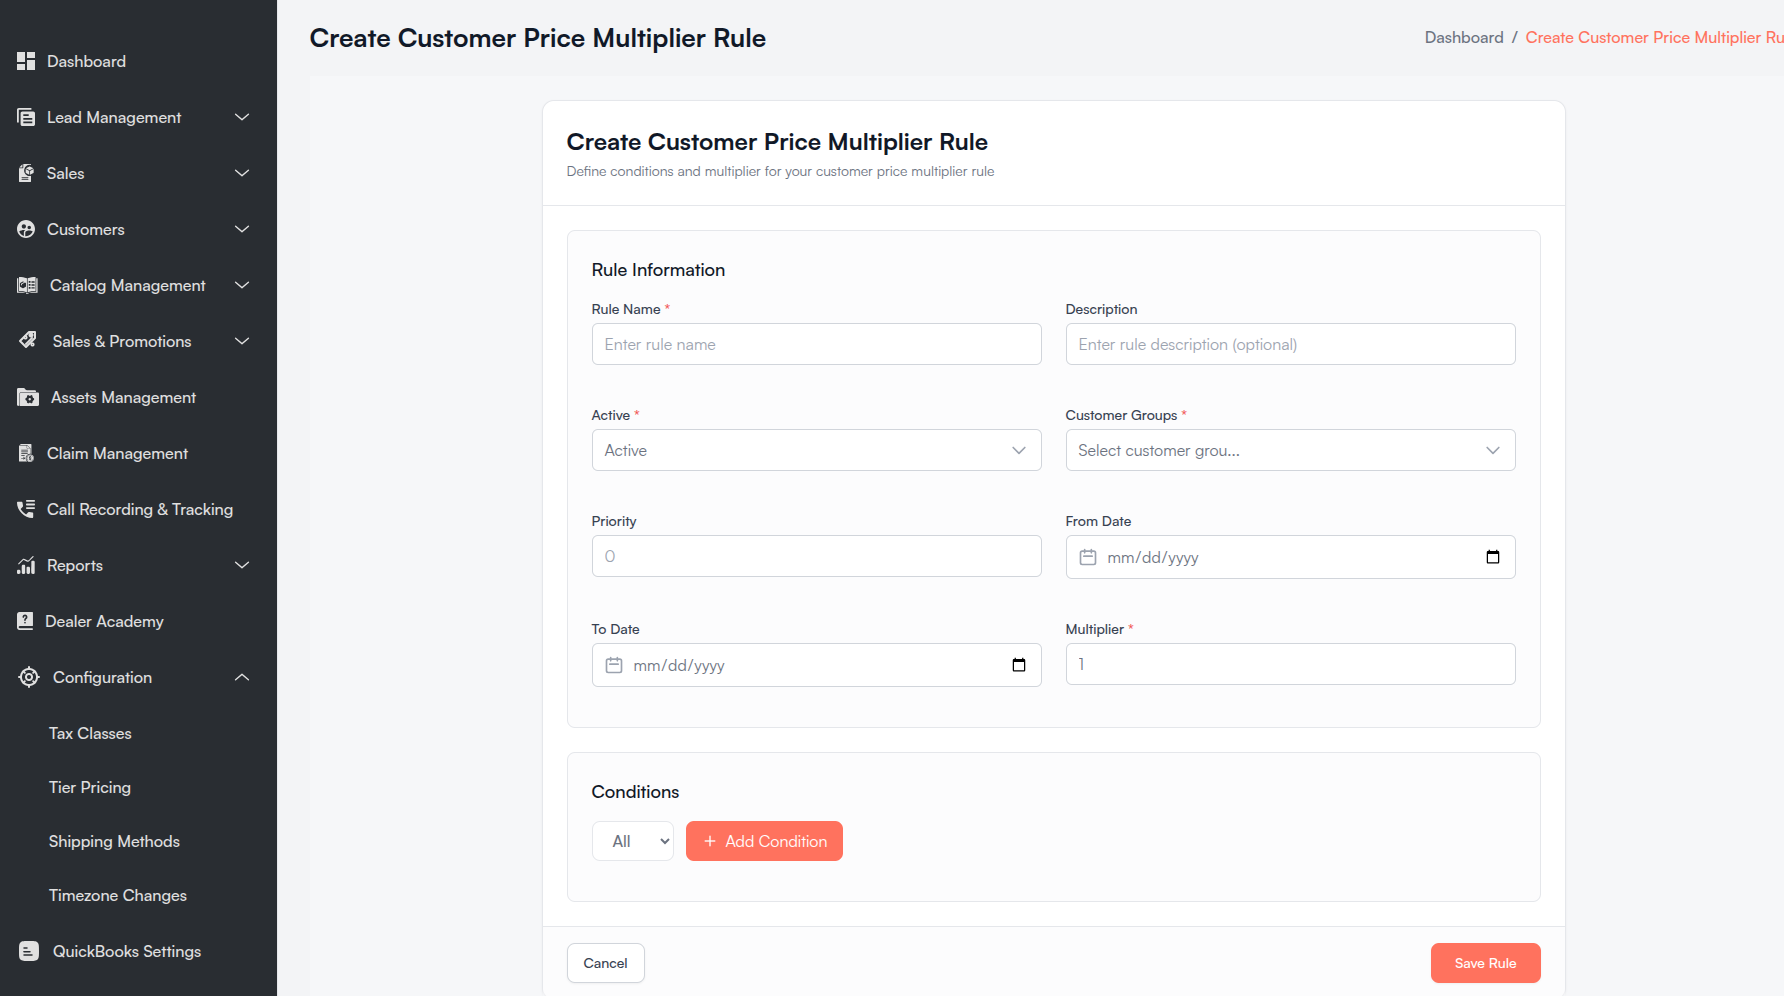
Rule Information
All fields marked with a red asterisk (*) are required.
| Field | Description |
|---|---|
| Rule Name * | Internal name (e.g., Dealer Cabinet Discount). |
| Description | Optional notes about the rule. |
| Active * | Active to apply the rule, Inactive to turn it off. |
| Customer Groups * | One or more groups this rule applies to. |
| Priority | Number ≥ 0. Lower values take precedence. Default: 0. |
| From Date | Optional start date. |
| To Date | Optional end date — must be after From Date. |
| Multiplier * | Must be greater than 0. 1.00 = full price, 0.85 = 15% off. |
Conditions
Use Conditions to control which products the multiplier applies to.
| Condition Type | Operators Available | Description |
|---|---|---|
| Product Category | Contains, Does Not Contain | Target specific catalog categories. Searchable dropdown. |
| Is Sample | Contains, Does Not Contain | Target sample or non-sample products (Yes / No). |
| Add Combination Conditions | — | Build nested rules with All or Any logic. |
- All — every condition in the group must match.
- Any — at least one condition in the group must match.
Click Save Rule to create the rule. On success, you are redirected to the Tier Pricing list.
Click Cancel to return to the list without saving.
iii. Edit Tier Pricing Rule
- Click the Edit icon on a rule row.
- The Edit Customer Price Multiplier Rule form opens with existing data pre-filled.
- Make your changes and click Update Rule.
The form matches the create form. Click Cancel to go back without saving.
iv. Delete Tier Pricing Rule
- Click the Delete icon on a rule row.
- Confirm in the delete modal (shows the rule name).
- The rule is permanently removed.
c. Shipping Methods
Shipping Methods controls how customers receive orders — on your B2C website and in the Console when creating quotes and orders.
This page shows only the shipping methods selected and assigned to your website during setup — not every method Kitchen365 supports. To add a new method, contact your Kitchen365 administrator.
Each method can be enabled separately:
| Channel | Used For |
|---|---|
| Console | Quotes and orders created in the Kitchen365 Console. |
| B2C Website | Customer checkout on the storefront. |
i. Available Shipping Method Types
Your website may include some or all of the following method types:
| Method Type | Description |
|---|---|
| Flat Rate Shipping | Fixed charge by order subtotal, per item, or weight — with optional handling fee. |
| Free Shipping | Zero-cost shipping when order conditions are met. |
| Commerce Pundit Free Shipping | Promotional free-shipping method with configurable rules. |
| Kitchen365 Flat Shipping | Flat rates by order amount, min/max order value, and location. |
| Local Pickup | Customer pickup — no delivery charge. |
| Custom Flat Shipping | Flexible rates with dynamic min/max ranges and location-based pricing. |
| UPS | Live UPS rates using package weight, dimensions, and service codes. |
| FedEx | Live FedEx rates using carrier credentials and product data. |
| Freight (Navisphere) | Live freight quotes via C.H. Robinson Navisphere for heavy/large shipments. |
The Edit form fields differ by method type. Flat-rate methods use price tables and location rules; carrier methods include API credentials, ship-from settings, and weight limits.
ii. Shipping Methods List
Open Configuration > Shipping Methods to view and manage your methods.
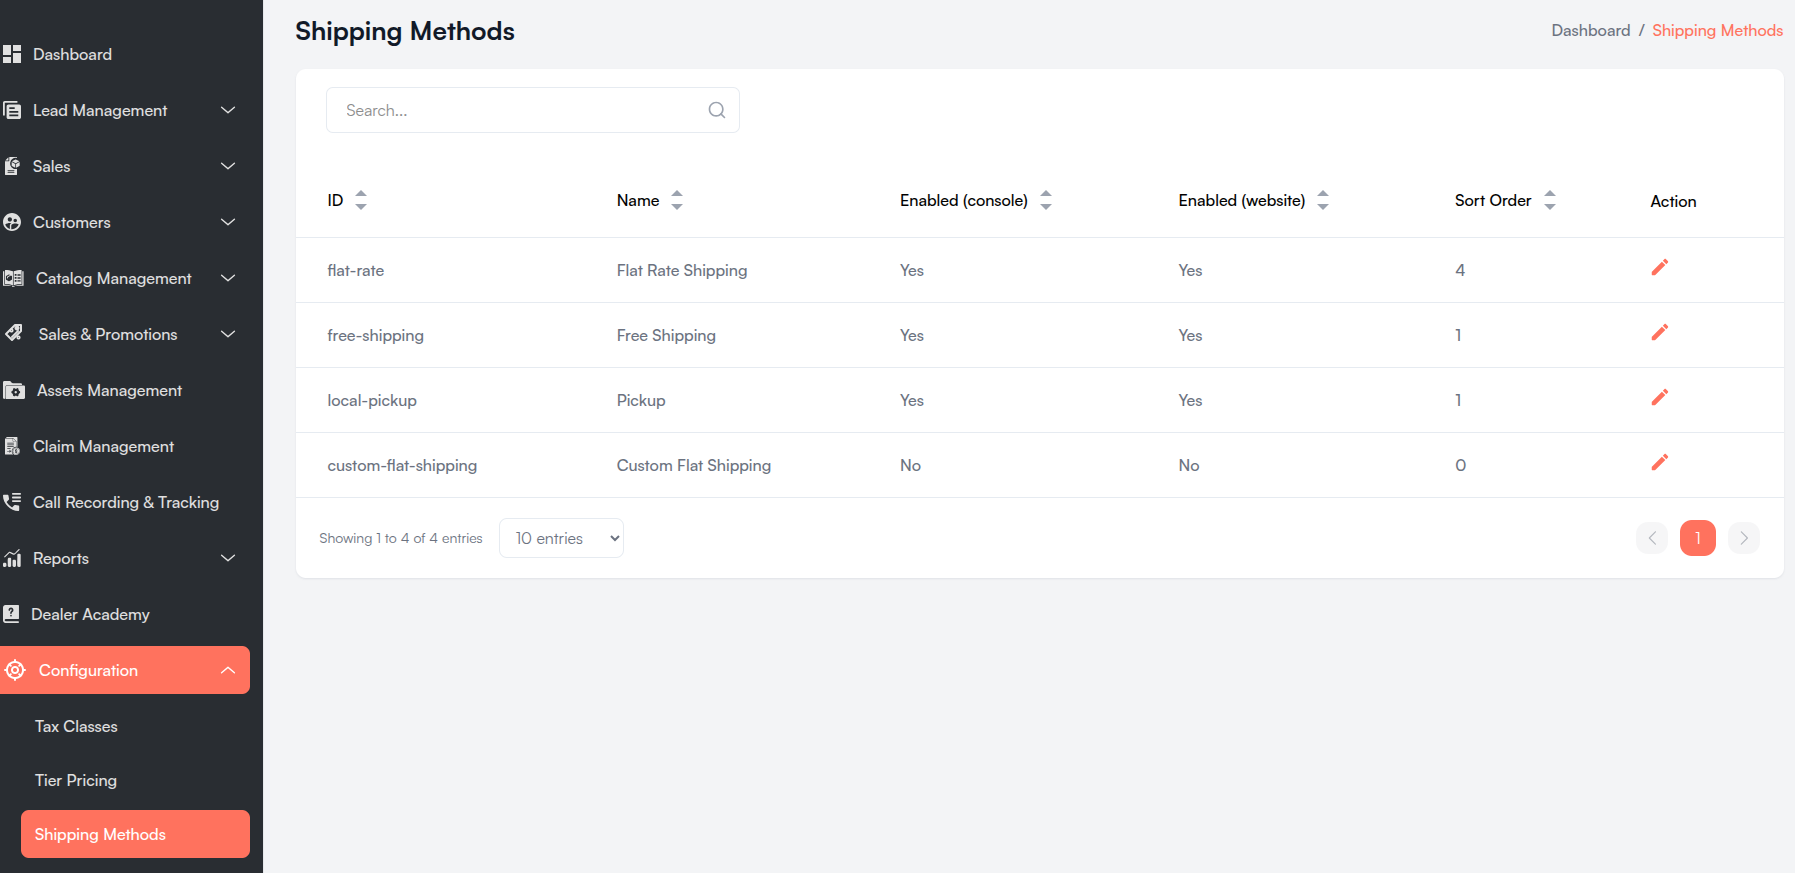
| Column | Description |
|---|---|
| ID | Internal identifier for the shipping method. |
| Name | Display name shown to customers and staff. |
| Enabled (console) | Yes or No — available in quotes and orders. |
| Enabled (website) | Yes or No — available at website checkout. |
| Sort Order | Display order — lower numbers appear first. |
| Action | Edit icon to open configuration. |
Click the Edit icon on a row to configure that method.
How Methods Appear on Quotes and Orders
When creating a quote or order, the Shipping Method dropdown shows methods that are:
- Console Enabled = Yes
- Eligible for the customer's shipping address
- Compatible with the products in the cart
Each option shows the method name and calculated rate (e.g., Pickup ($55.00)).
| Situation | What Happens |
|---|---|
| Rates are recalculating | Message: "Recalculating shipping rates..." |
| No method qualifies | Error message from method settings may appear. |
| Custom Shipping Rate enabled | Allows manually entering a shipping charge. |
See Quote Management and Order Management for shipping selection during quote and order creation.
iii. Edit Shipping Method
- Click the Edit icon on the method row.
- Update settings for your store.
- Click Save.
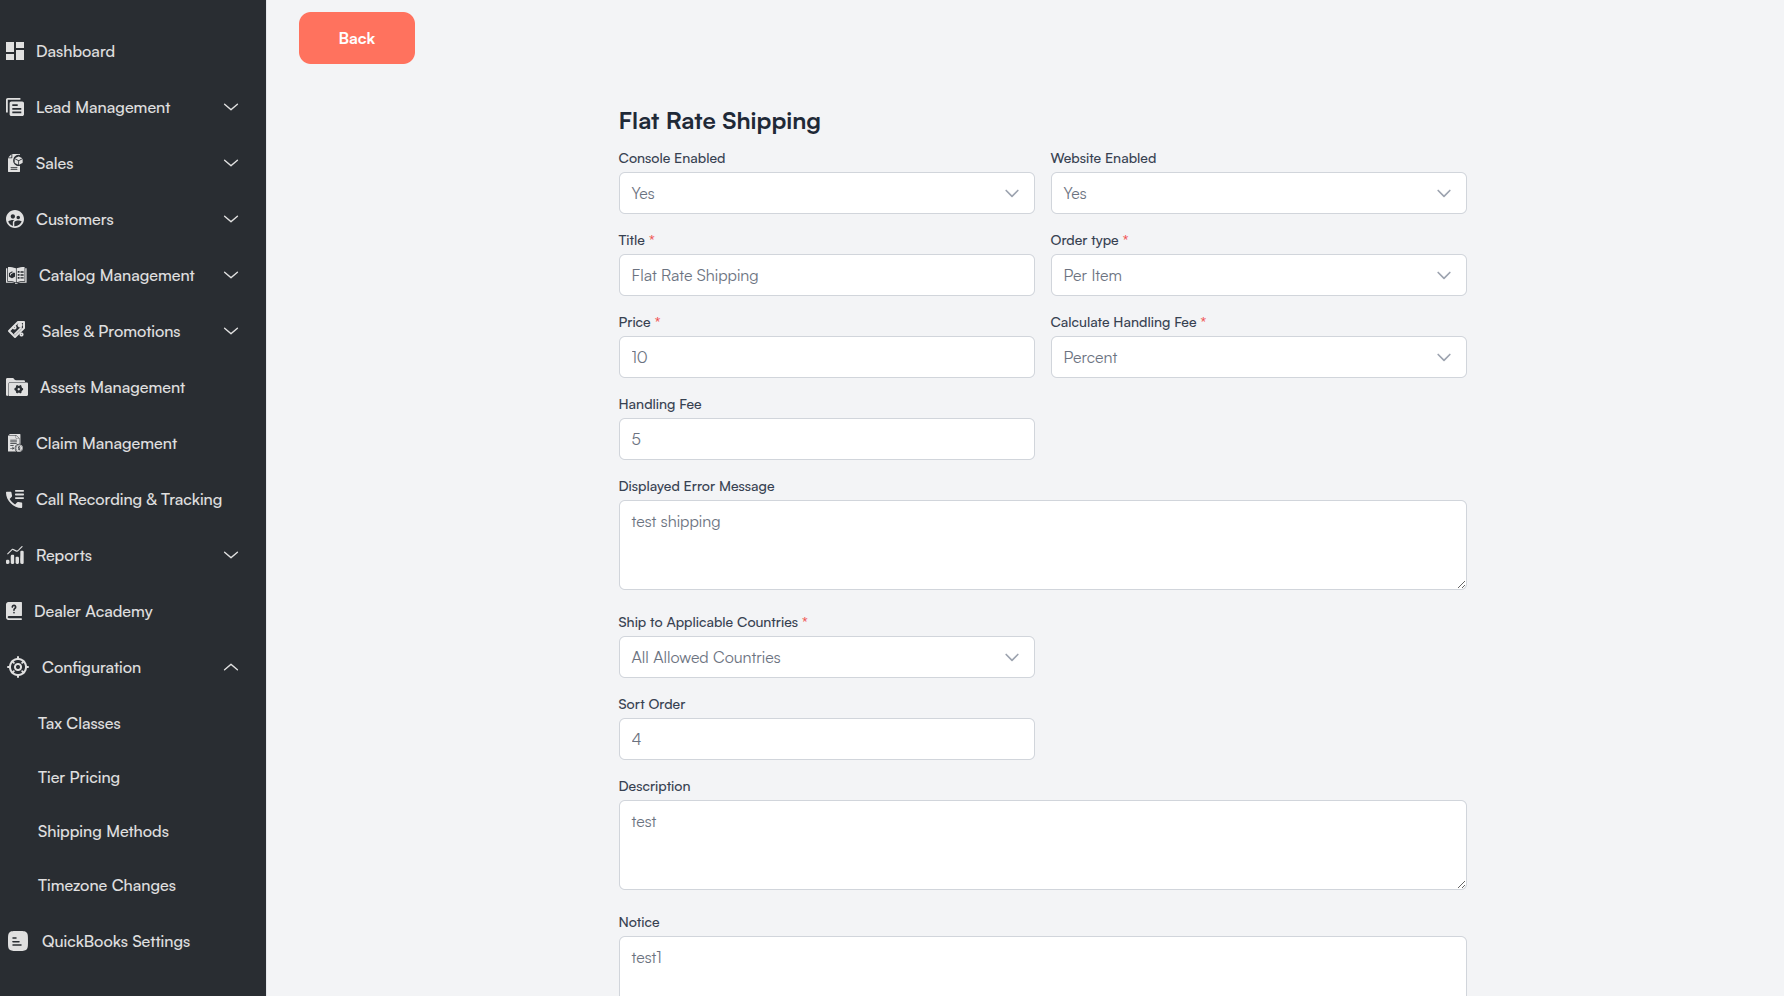
Basic Settings (common to most methods)
| Field | Description |
|---|---|
| Console Enabled | Yes or No — show in quotes and orders. |
| Website Enabled | Yes or No — show at website checkout. |
| Title | Label shown when selecting shipping (required on most methods). |
| Display Name / Method Name | Customer-facing name for the method. |
| Sort Order | Controls display order in shipping lists. |
| Displayed Error Message | Message when this method is unavailable for the cart or address. |
Flat Rate Shipping — Additional Fields
| Field | Description |
|---|---|
| Order Type | Per Item or Per Order — how the rate is calculated. |
| Price | Base shipping price. |
| Calculate Handling Fee | Fixed or Percent. |
| Handling Fee | Extra fee added to the shipping charge. |
| Ship to Applicable Countries | All Allowed Countries or Specific Countries. |
| Ship to Specific Countries | Select countries when using specific countries mode. |
Custom Flat Shipping — Additional Fields
| Field | Description |
|---|---|
| Dynamic Rate (Min/Max/Price) | Rate ranges by order value — add one or more rows. |
| Min Rate | Minimum order value for the range. |
| Max Rate | Maximum order value for the range. |
| Rate Type | Fixed (dollar amount) or Percent. |
| Location-Based Rates | Set Country, State, Zipcode, and Price per location. |
| Base Price | Default price when no location rate matches. |
| % shipping apply? | Apply percentage-based shipping when enabled. |
| % shipping apply if cart value greater than | Cart total threshold for percent shipping. |
Zipcode tips: Enter a single zip, a range with a dash (e.g., 111111-999999), or leave empty to match all zip codes in the selected state.
Door & Sample Shipping Options
Available on flat-rate methods for cabinet and sample products:
| Field | Description |
|---|---|
| Full Door Shipping Setting Enabled | Apply per-quantity charges for full-door sample products. |
| Full Door Shipping Price Per Qty | Price per full-door sample unit. |
| Quarter Door Shipping Setting Enabled | Apply per-quantity charges for quarter-door samples. |
| Quarter Door Shipping Price Per Qty | Price per quarter-door sample unit. |
| Enable Sample Door Shipping | Enable sample-door shipping rules at the location level. |
Kitchen365 Flat Shipping — Additional Fields
| Field | Description |
|---|---|
| Minimum Order Amount | Minimum cart value for this method. |
| Maximum Order Amount | Maximum cart value for this method. |
| Calculate Rate By | How rates are calculated (order, item, etc.). |
Local Pickup — Additional Fields
| Field | Description |
|---|---|
| Notice | Pickup instructions shown to the customer. |
| Description | Additional details about the pickup option. |
Carrier Methods — UPS, FedEx, Freight (Navisphere)
| Setting Area | Description |
|---|---|
| API Credentials | Client ID, Client Secret, and carrier account settings. |
| Ship-From Location | Origin state, postal code, and country for rate requests. |
| Weight Limits | Minimum and maximum package/order weight (lbs). |
| Service Codes | Allowed carrier services (e.g., UPS Ground). |
| Package Dimensions | Default length, width, height used in rate requests. |
| Product Attribute Mapping | Product attribute that controls method eligibility. |
| Destination Options | Residential, commercial, lift gate, and limited access settings (Navisphere/FedEx). |
Click Save to update the shipping method. The Confirm changes dialog shows what will change before anything is saved — see Confirm Changes Dialog. A success message confirms the save.
iv. Products and Shipping
The Shipping Methods page defines which delivery options are available. Products carry the data those methods use to calculate rates.
| Product / Cart Data | How It Affects Shipping |
|---|---|
| Weight & dimensions | Required for UPS, FedEx, and Navisphere live rates. |
| Free shipping flag | Product or bundle item excluded from shipping charges. |
| Sample / door product types | Full-door, quarter-door, and sample SKUs trigger special per-qty charges. |
| Product attributes | Methods can use Select Product Attribute to filter eligible products. |
| Cart quantity & subtotal | Flat-rate and table-rate methods pick the correct price tier. |
| Customer address type | Residential or Commercial affects carrier and freight rates. |
| Shipping address | Country, state, and zip code determine location-based rates. |
Configure shipping methods here in Configuration and ensure product weight and details are set in Catalog Management. Both are needed for correct rates on quotes, orders, and website checkout.
d. Tax Methods
Tax Methods controls how tax is calculated on quotes, orders, and website checkout — either by an external tax provider or by tax rules you enter yourself.
Tax Methods appears in the sidebar only for websites on Console v2.0.0. If your website was just upgraded, log out and log back in to see it.
| Tax Method | Provider | How Tax Is Calculated |
|---|---|---|
| Stripe Tax | external | Live tax rates from Stripe Tax, based on the customer's address. |
| TaxJar | external | Live tax rates from TaxJar, with optional nexus locations. |
| US Rules (Internal) | internal | Rates by country, state, and zip code from rules you enter in the Console. |
Only one tax method can be enabled at a time. Enabling a tax method automatically turns off all other tax methods, including their Console and website channels.
i. Tax Methods List
Open Configuration > Tax Methods to view the tax methods added to your website.
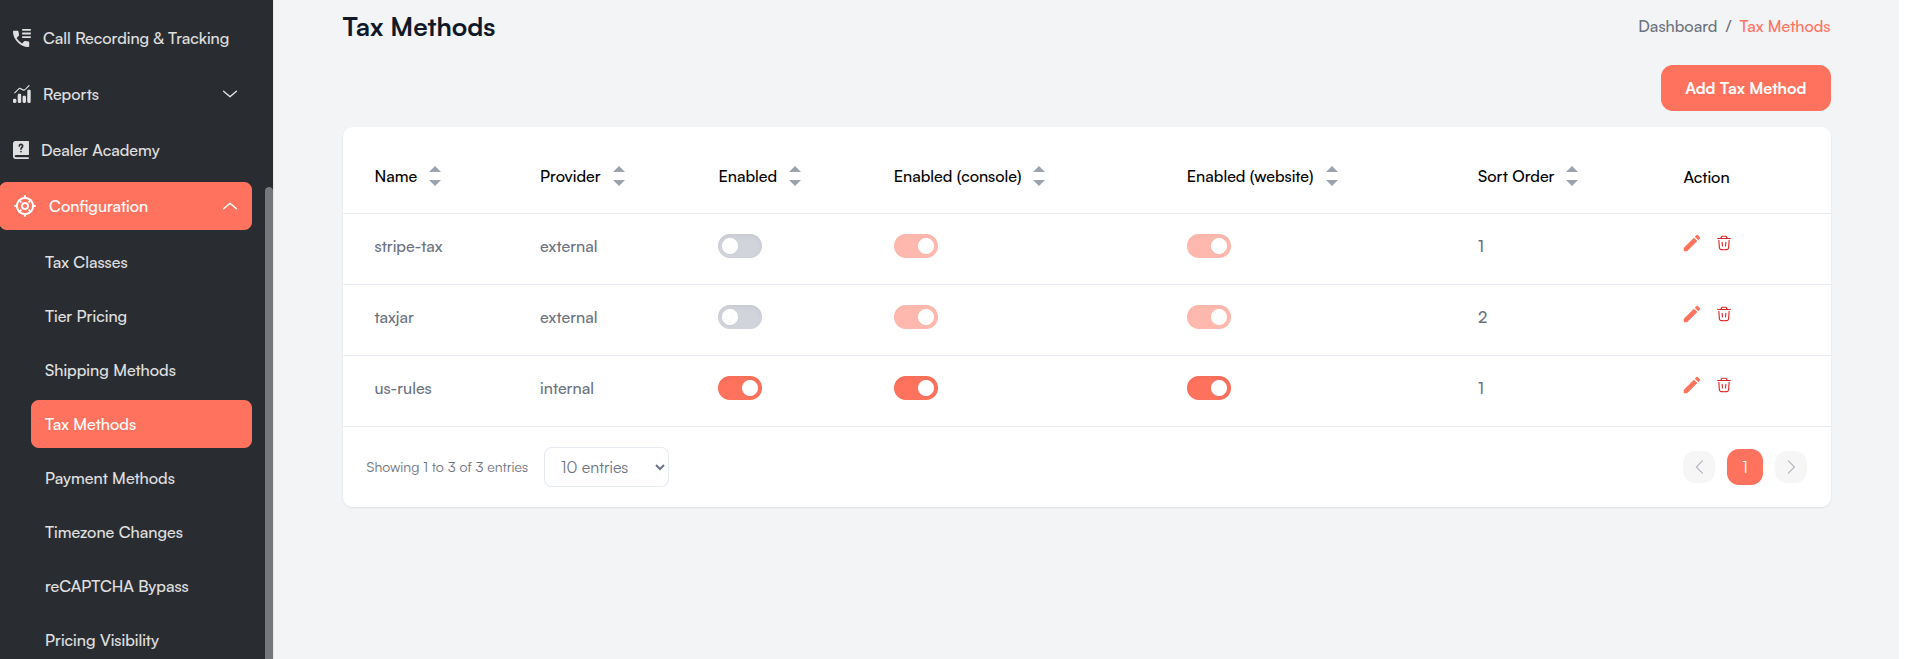
| Column | Description |
|---|---|
| Name | Identifier of the tax method (e.g., stripe-tax). |
| Provider | external (tax provider service) or internal (rules in the Console). |
| Enabled | Main switch — turns the tax method on or off. |
| Enabled (console) | Use this method for quotes and orders in the Console. |
| Enabled (website) | Use this method at website checkout. |
| Sort Order | Display order — lower numbers appear first. |
| Action | Edit (pencil) and Remove (trash) icons. |
- The Enabled (console) and Enabled (website) switches are locked while Enabled is off.
- A message confirms each change (e.g., "stripe-tax enabled for console").
ii. Add a Tax Method
- Go to Configuration > Tax Methods.
- Click Add Tax Method.
- In the Add Tax Method dialog, select one tax method. Use "Search tax methods..." to filter the list.
- Click Add & Configure.
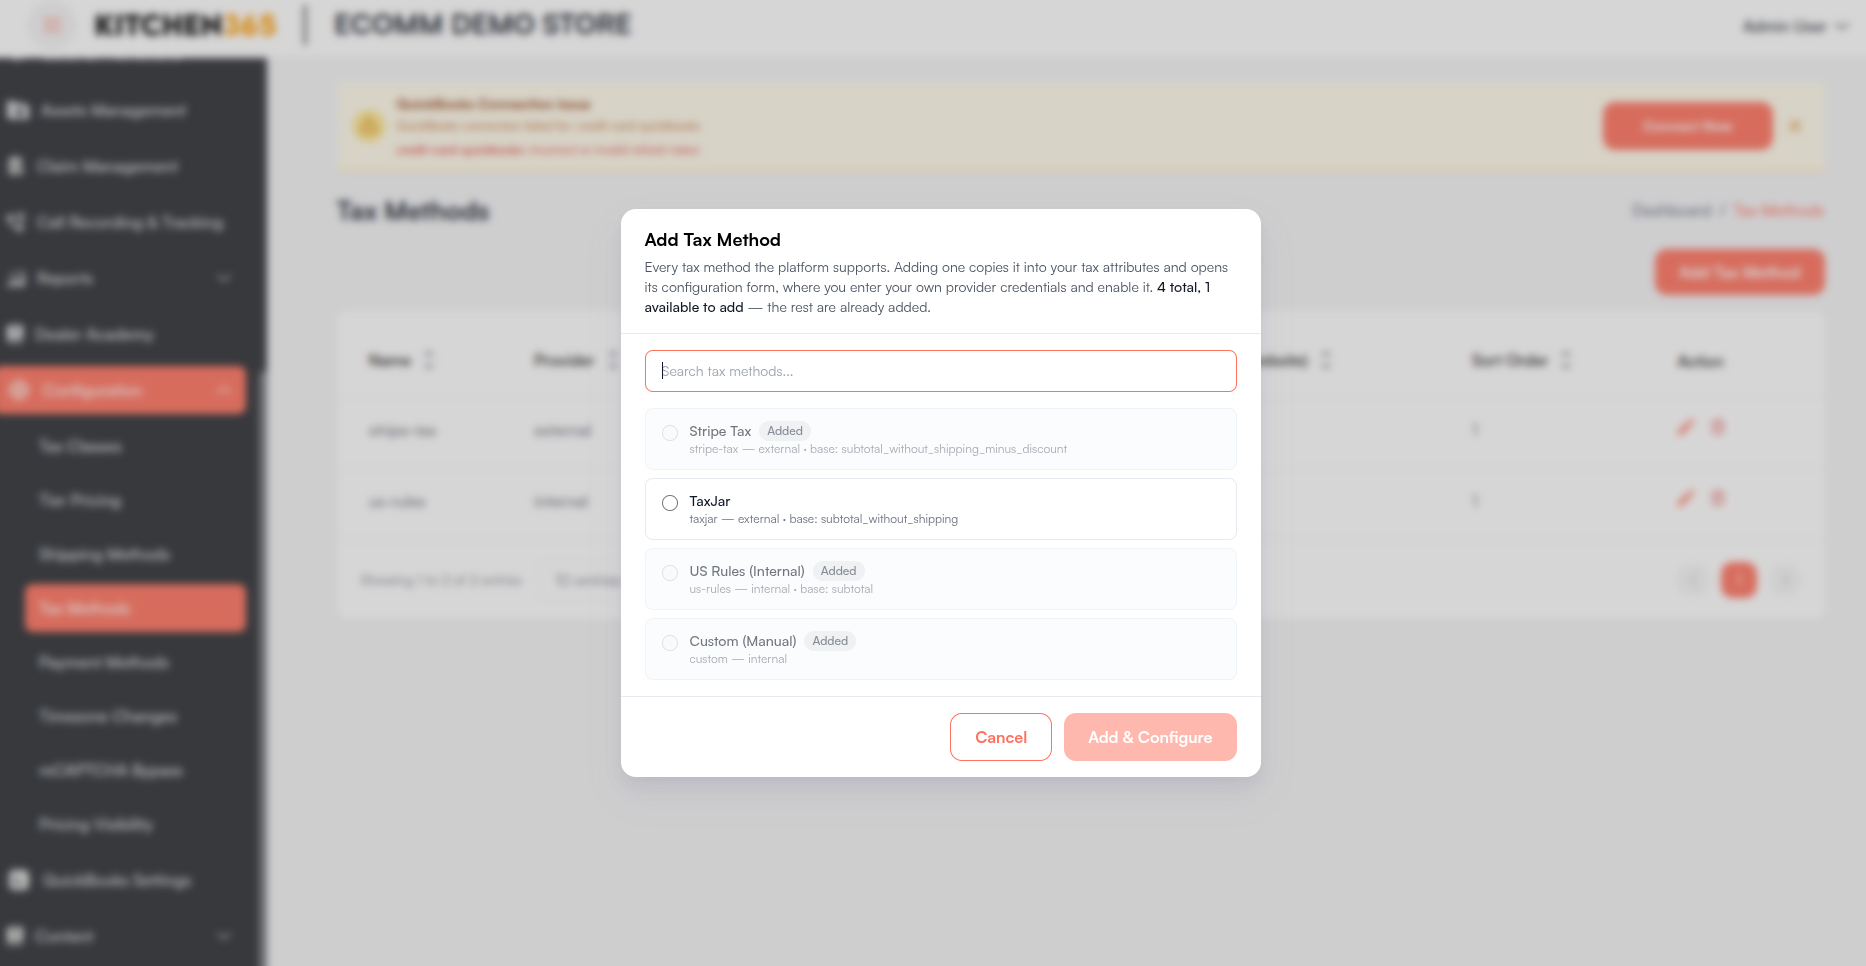
- The dialog lists every tax method Kitchen365 supports, with each method's provider and default tax base mode. Methods already on your website show an Added badge and cannot be selected.
- Custom (Manual) may appear in the dialog with an Added badge. It is managed by Kitchen365 and is not shown in the Tax Methods list.
- After adding, the message "Method name added — enter its details to enable it" appears and the Edit Tax Method form opens.
- A newly added tax method is disabled until you turn it on — see Turn On a Tax Method.
iii. Edit Tax Method
- Click the Edit icon on the tax method row.
- Complete the sections for your provider. Click a section heading to expand or collapse it.
- Click Submit, review the Confirm Changes Dialog, and click Yes, save changes.
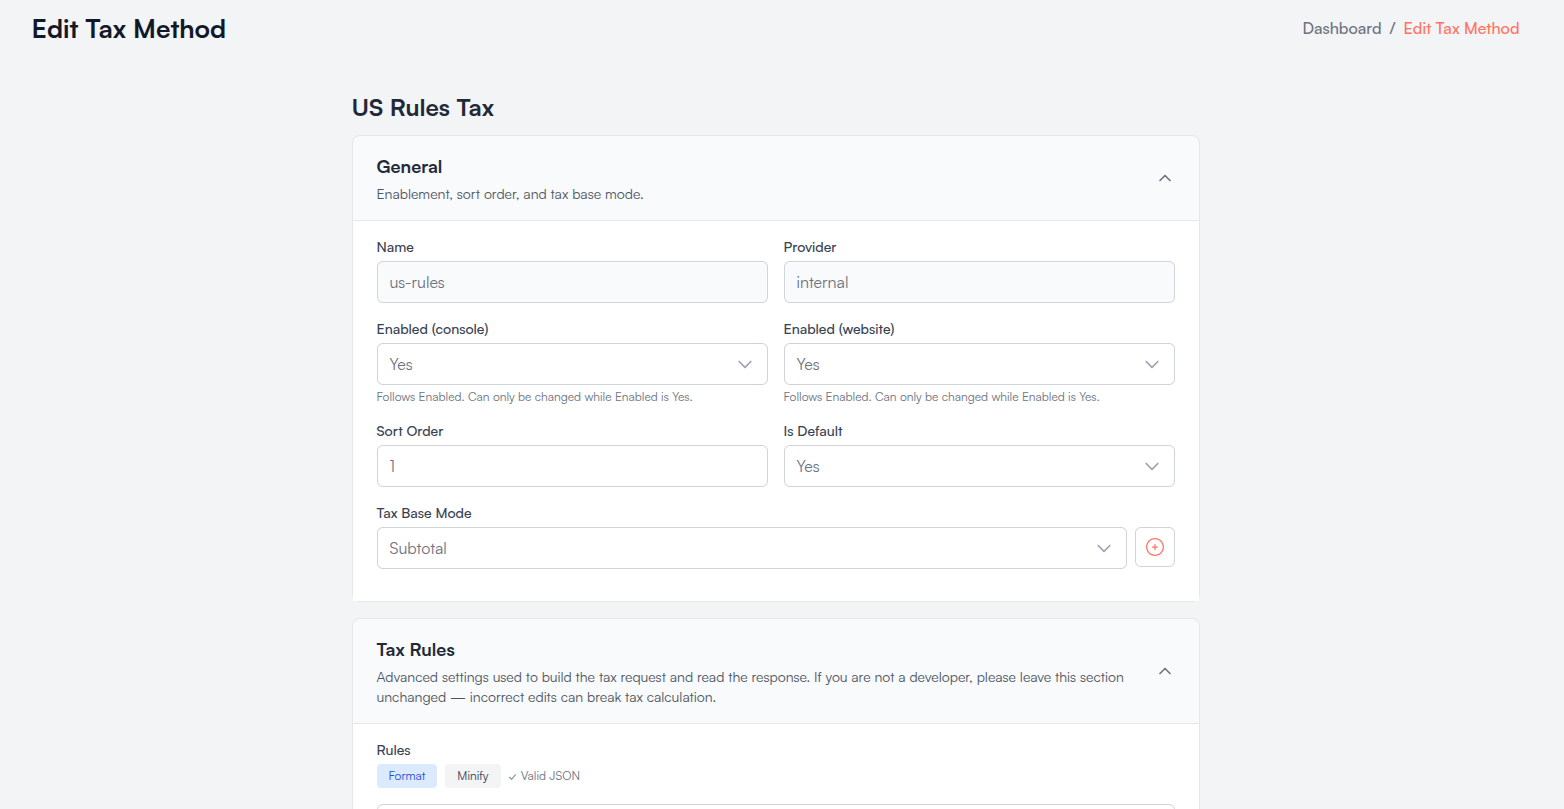
On success, the message "Tax method updated" appears and you return to the list. Fields marked with a red asterisk (*) are required.
General (all tax methods)
| Field | Description |
|---|---|
| Name | Tax method identifier — read-only. |
| Provider | external or internal — read-only. |
| Enabled (console) | Yes or No. Follows Enabled and can only be changed while the method is enabled. |
| Enabled (website) | Yes or No. Follows Enabled and can only be changed while the method is enabled. |
| Sort Order | Display order in the list. |
| Is Default | Yes marks this as your default tax method. |
| Tax Base Mode | The formula for the taxable amount, shown by its label (e.g., Subtotal). Click the + (Add new mode) button next to it to create a new one — see Tax Base Modes. |
Stripe Tax — Provider Config
| Field | Description |
|---|---|
| Secret Key * | Your Stripe secret key. Stored encrypted. |
| Publishable Key * | Your Stripe publishable key (e.g., pk_test_...). |
| Endpoint * | Stripe Tax API URL (e.g., https://api.stripe.com/v1/tax/calculations). |
| Currency * | 3-letter currency code (e.g., usd, cad). Must match your Stripe account currency. |
| Amounts In Cents * | Yes if amounts are sent in cents, No for dollars. |
| Tax Behavior * | Exclusive — tax is added on top of the price. Inclusive — tax is already included in the price. |
| Address Source * | Shipping or Billing — which customer address is used to find tax rates. |
| Product Tax Code * | Stripe tax code for products (e.g., txcd_99999999 for general tangible goods). |
| Shipping Tax Code * | Stripe tax code for shipping charges (e.g., txcd_92010001). |
| Taxability Override * | Use none unless you need a special Stripe taxability setting. |
TaxJar — Provider Config
| Field | Description |
|---|---|
| API Token * | Your TaxJar API token. Stored encrypted. |
| Endpoint * | TaxJar API URL. |
| Line ID * / Line Quantity * | Default values used for cart lines. |
| Amounts In Cents * | Yes if amounts are sent in cents, No for dollars. |
| Exemption Type * | Customer exemption type. If you are not sure, leave it as non_exempt. |
| Product Tax Code * | TaxJar product tax code. |
| Nexus ID * | Your TaxJar nexus identifier. |
Nexus Addresses (TaxJar, optional) — click Add Nexus Address to add a location where you collect tax. Each address needs Nexus ID, Street, City, State, Zip, and Country. Click Remove on a card to delete it.
Origin / Ship-From Address (Stripe Tax and TaxJar)
Your warehouse or head-office address, used as the ship-from location for tax calculations.
| Field | Rules |
|---|---|
| From Street * | Street address. |
| From City * | City. |
| From State * | Letters only (e.g., NY). |
| From Zip * | Numbers only, at least 5 digits. |
| From Country * | Letters only (e.g., US). |
Cart Line Defaults (Stripe Tax)
| Field | Description |
|---|---|
| Line Quantity * | Default quantity when a cart line has no quantity. |
| Line Reference * | Default reference when a cart line has no SKU or ID. |
US Rules — Tax Rules
The Tax Rules section has one Rules field, holding your tax rates by country and state, with an optional default rate and zip code overrides. Use * as the fallback for any state not listed. The help text under the field shows the format with examples.
- Click Format to make the rules easier to read, or Minify to compact them.
- Valid JSON appears under the field label when the rules are correctly formatted.
- As the section description says, if you are not a developer, leave this section unchanged — incorrect edits can break tax calculation.
Stripe Tax and TaxJar include a collapsed Custom Mappings section. It contains advanced settings used to build the tax request. If you are not a developer, leave this section unchanged — incorrect edits can break tax calculation.
iv. Turn On a Tax Method
Stripe Tax, TaxJar, and US Rules do not have an Enabled field on the edit form. After entering the details:
- Go back to Configuration > Tax Methods.
- Switch Enabled on for the tax method.
- Check Enabled (console) and Enabled (website), and switch them as needed.
Turning on a tax method turns off any other tax method that was enabled. Confirm that your provider details are complete before enabling, so that tax is not interrupted on quotes, orders, and checkout.
v. Remove a Tax Method
- Click the Remove (trash) icon on the tax method row.
- Review the Remove tax method dialog — it shows the method's name, provider, and enabled settings.
- Click Remove.
- Removing a method deletes its provider credentials and origin address from your website. Adding it again later starts from the default settings.
- If the method is your default tax method, or the only tax method enabled for your website, the dialog warns that orders would calculate no tax. The button changes to Remove anyway — click it only if you are sure.
vi. Tax Base Modes
A Tax Base Mode is a formula that defines the taxable amount of an order — for example, subtotal only, or subtotal plus shipping minus discount.
How to open: on the Edit Tax Method form, click the + (Add new mode) button next to Tax Base Mode. Click Back on the Tax Base Modes page to return to the edit form.
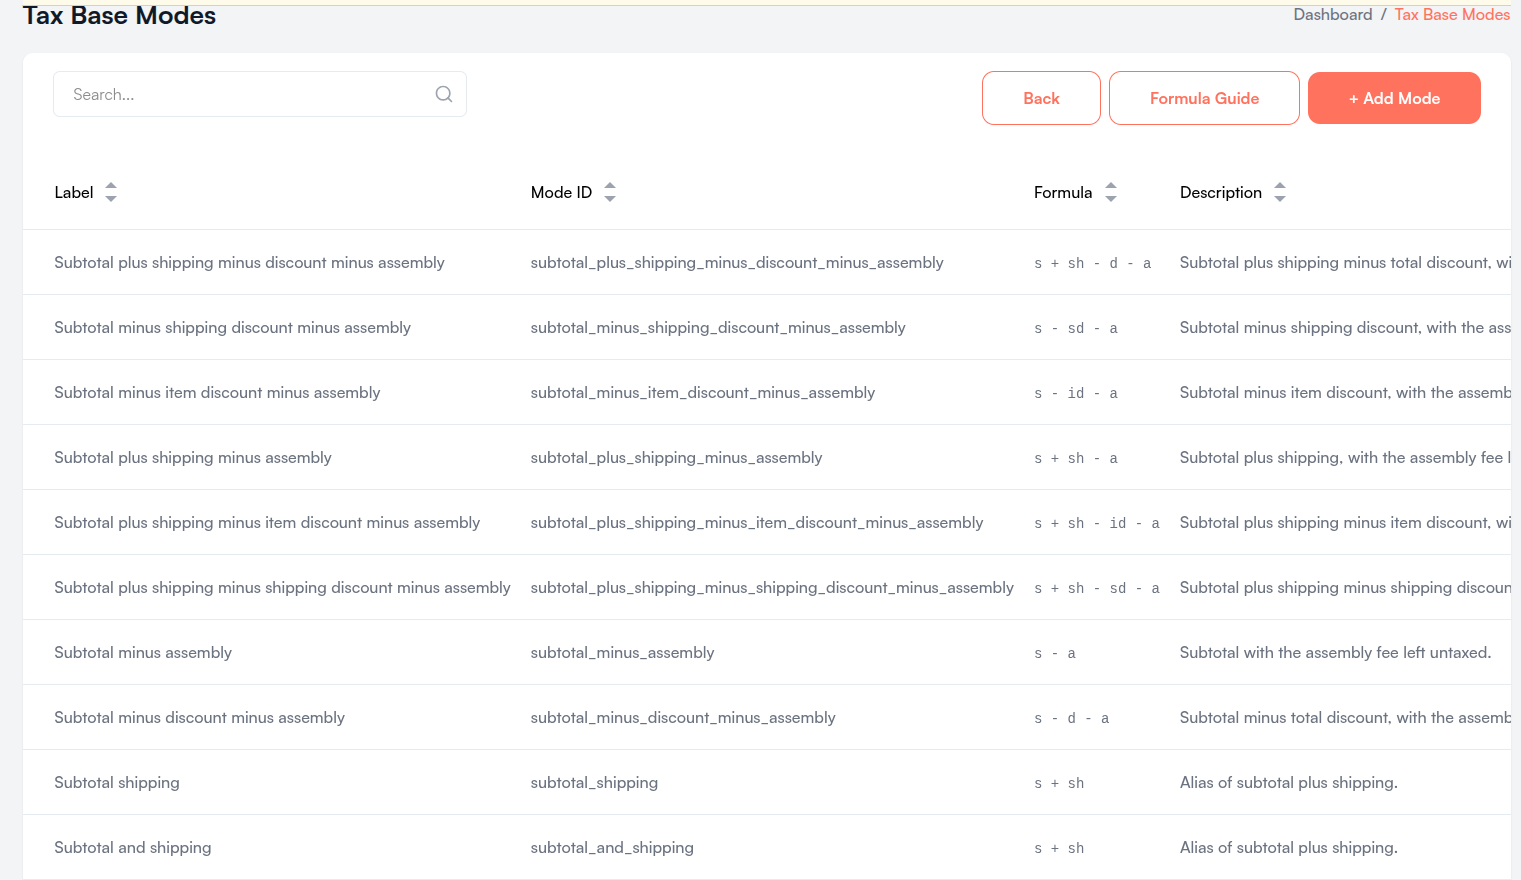
| Column | Description |
|---|---|
| Label | Name shown in the Tax Base Mode dropdown. |
| Mode ID | Unique identifier (e.g., subtotal_plus_shipping). |
| Formula | The taxable-amount formula (e.g., s + sh - d). |
| Description | Optional notes. |
| Active | Yes or No — only active modes can be selected on a tax method. |
Use "Search..." to filter by label, mode ID, or formula.
Formula Guide
Click Formula Guide to open the Formula Combination Guide.
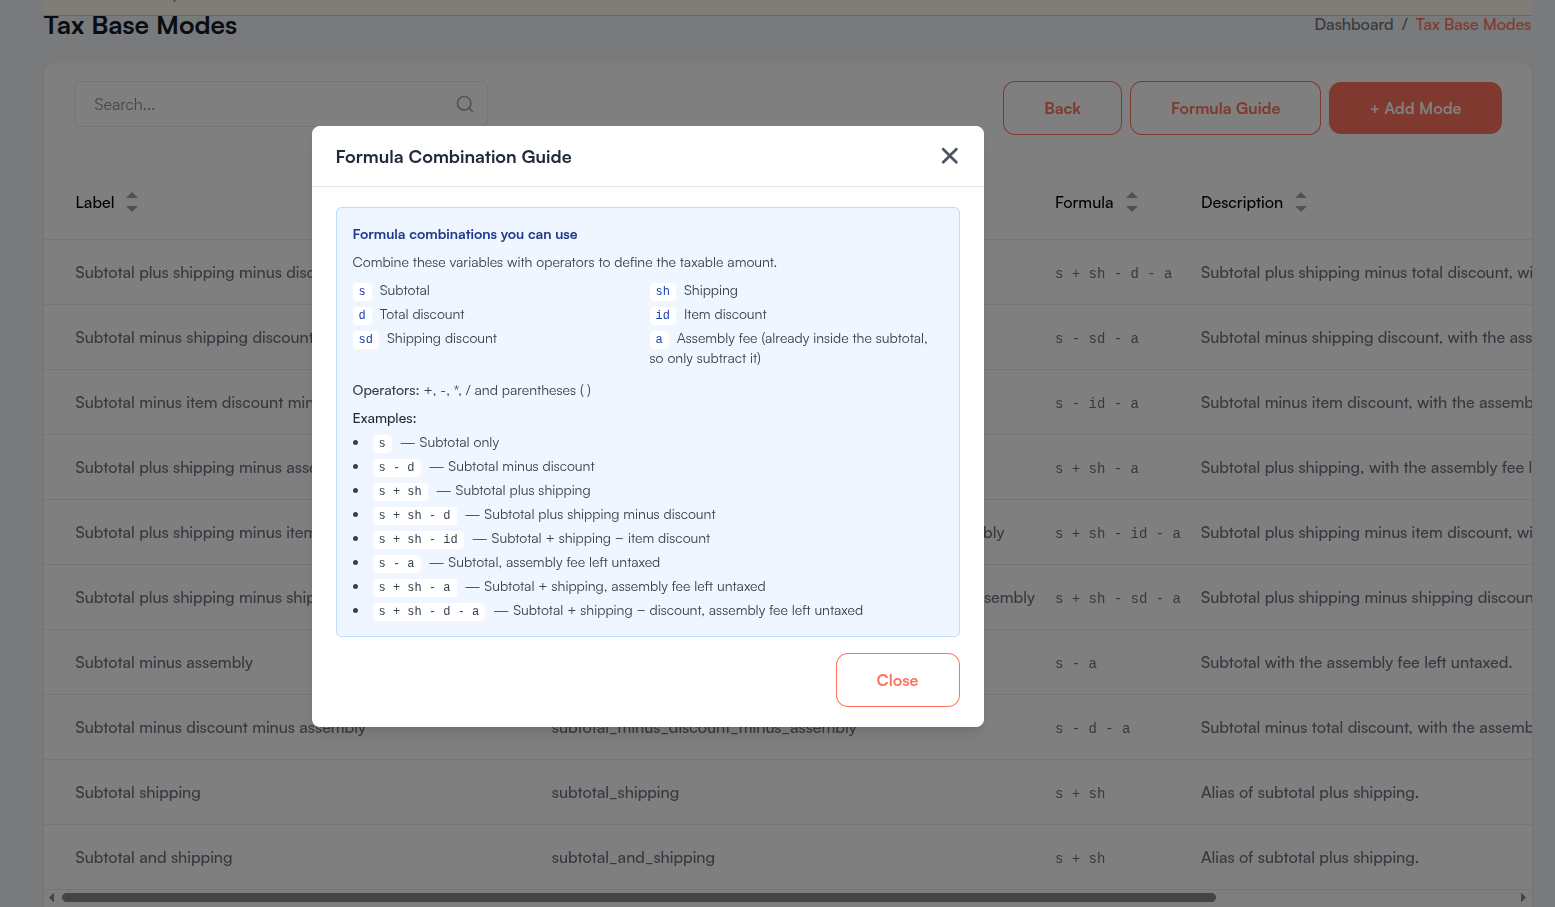
| Variable | Meaning |
|---|---|
s | Subtotal |
sh | Shipping |
d | Total discount |
id | Item discount |
sd | Shipping discount |
a | Assembly fee — already inside the subtotal, so only subtract it |
Operators: +, -, *, / and parentheses ( ).
| Example | Taxable Amount |
|---|---|
s | Subtotal only |
s - d | Subtotal minus discount |
s + sh | Subtotal plus shipping |
s + sh - d | Subtotal plus shipping minus discount |
s + sh - id | Subtotal plus shipping minus item discount |
s - a | Subtotal, assembly fee left untaxed |
s + sh - a | Subtotal plus shipping, assembly fee left untaxed |
s + sh - d - a | Subtotal plus shipping minus discount, assembly fee left untaxed |
Create a Tax Base Mode
- Click + Add Mode.
- Read the warning — "Please read the formula guide before performing any actions."
- Fill in the fields and click Submit.
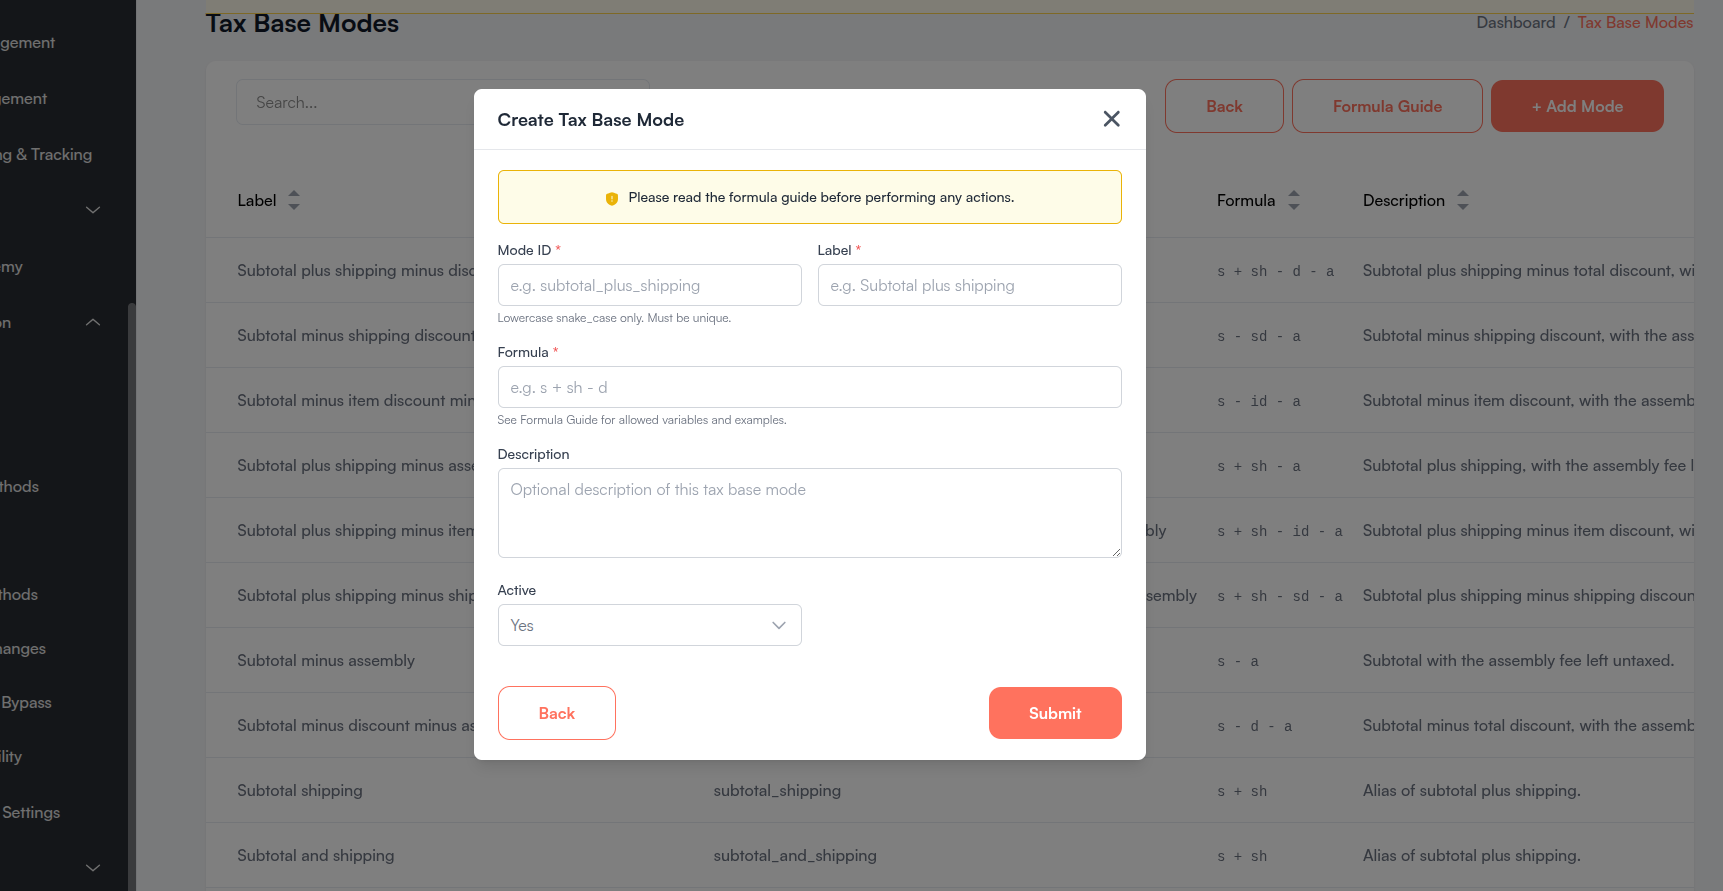
| Field | Description |
|---|---|
| Mode ID * | Lowercase snake_case, unique (e.g., subtotal_plus_shipping). |
| Label * | Name shown in the dropdown (e.g., Subtotal plus shipping). Must be unique. |
| Formula * | Uses only s, sh, d, id, sd, a with +, -, *, / and parentheses (e.g., s + sh - d). |
| Description | Optional notes about the mode. |
| Active | Yes (default) or No. |
On success, "Tax base mode created successfully" appears. If the formula is invalid, a message explains the problem — for example, an unknown variable or unbalanced parentheses.
Tax base modes cannot be edited or deleted from this page after they are created. Check the Formula carefully before clicking Submit.
vii. Tax Breakdown on Orders
On order details, and on the Tax field when adding products to a quote or order, an (i) icon appears next to the tax amount. Hover over it to see how tax was calculated.
| Row | What It Shows |
|---|---|
| Item tax | Tax rate (%), tax amount, and the taxable item amount. |
| Shipping tax | Tax rate (%), tax amount, and the shipping amount — or not taxed. |
The icon is not shown when tax is entered manually.
e. Payment Methods
Payment Methods controls how customers pay — at website checkout and when staff take payment on quotes and orders in the Console. You can add payment gateways, enter your own gateway credentials, add a payment fee, and limit a method to specific customers.
Each method can be enabled separately for each channel:
| Channel | Used For |
|---|---|
| Console | Quotes and orders in the Kitchen365 Console. |
| B2C Website | Customer checkout on the storefront. |
i. Payment Methods List
Open Configuration > Payment Methods to view the payment methods added to your website.
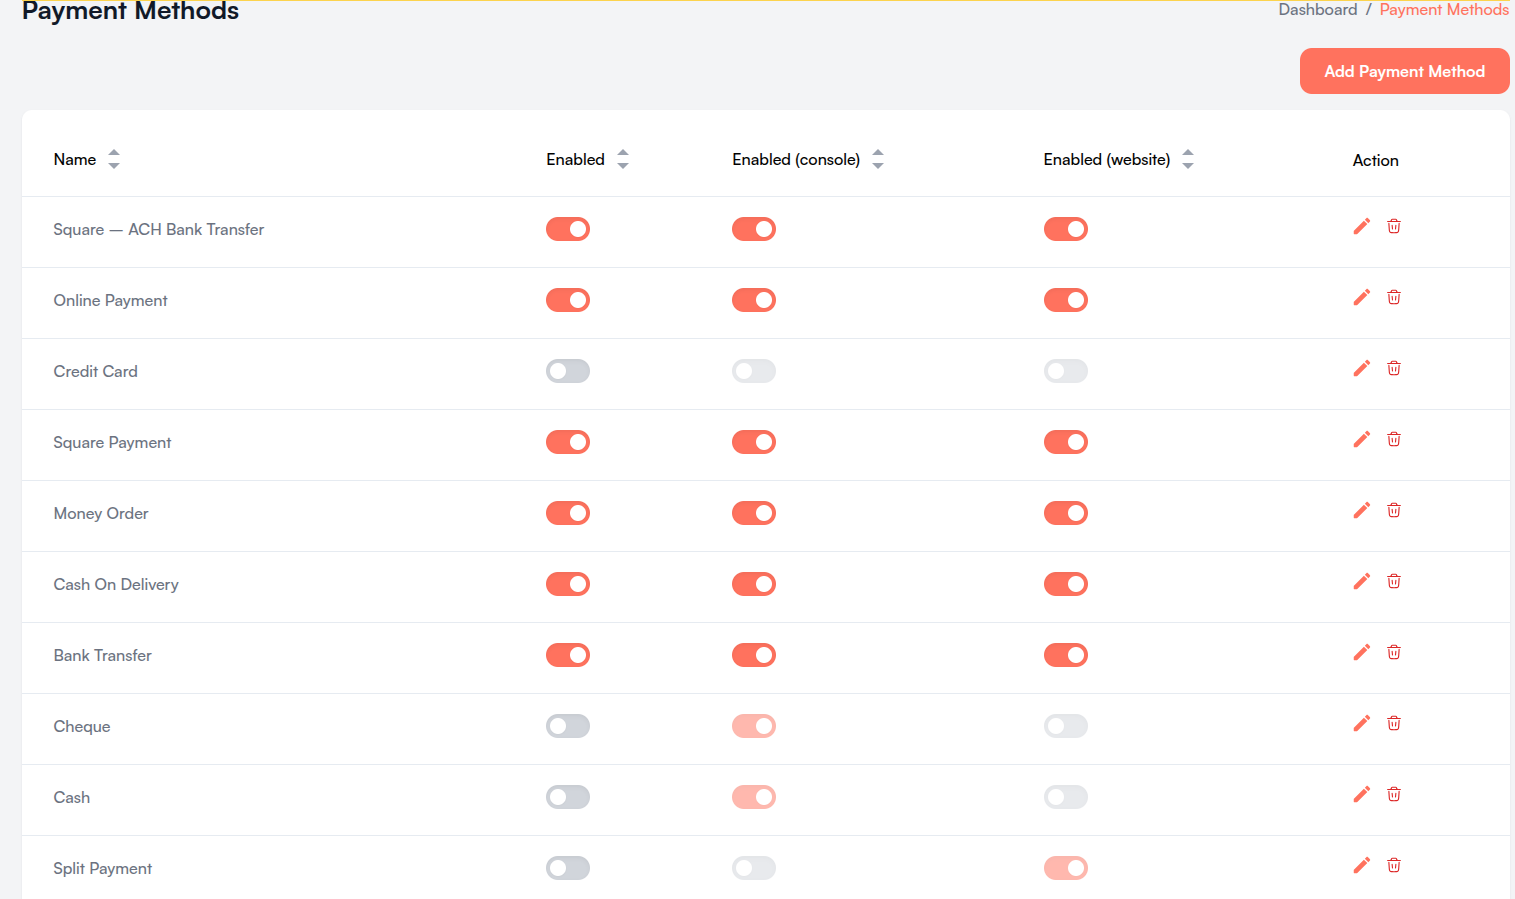
| Column | Description |
|---|---|
| Name | Method title shown to customers and staff. |
| Enabled | Main switch — turns the method and all its channels on or off. |
| Enabled (console) | Offer this method on quotes and orders in the Console. |
| Enabled (website) | Offer this method at website checkout. |
| Action | Edit (pencil) and Remove (trash) icons. |
- The channel switches are locked while Enabled is off. A - means the method is not available on that channel.
- Your list may also include payment methods set up earlier for your website (for example Cheque or Cash). They are managed the same way.
- A Restricted badge (e.g., "Restricted · 2 groups, 1 customer") means the method is offered only to selected customers — see Customer Apply. "Restricted · nobody selected" means the method is hidden from everyone.
If you try to turn off the only payment method enabled for your website, a confirmation appears because checkout would have no payment option. Click OK to turn it off anyway, or Cancel to leave it on and enable another method first.
ii. Add a Payment Method
- Go to Configuration > Payment Methods.
- Click Add Payment Method.
- In the Add Payment Method dialog, select one method. Use "Search payment methods..." to filter by name or gateway.
- Click Add & Configure.
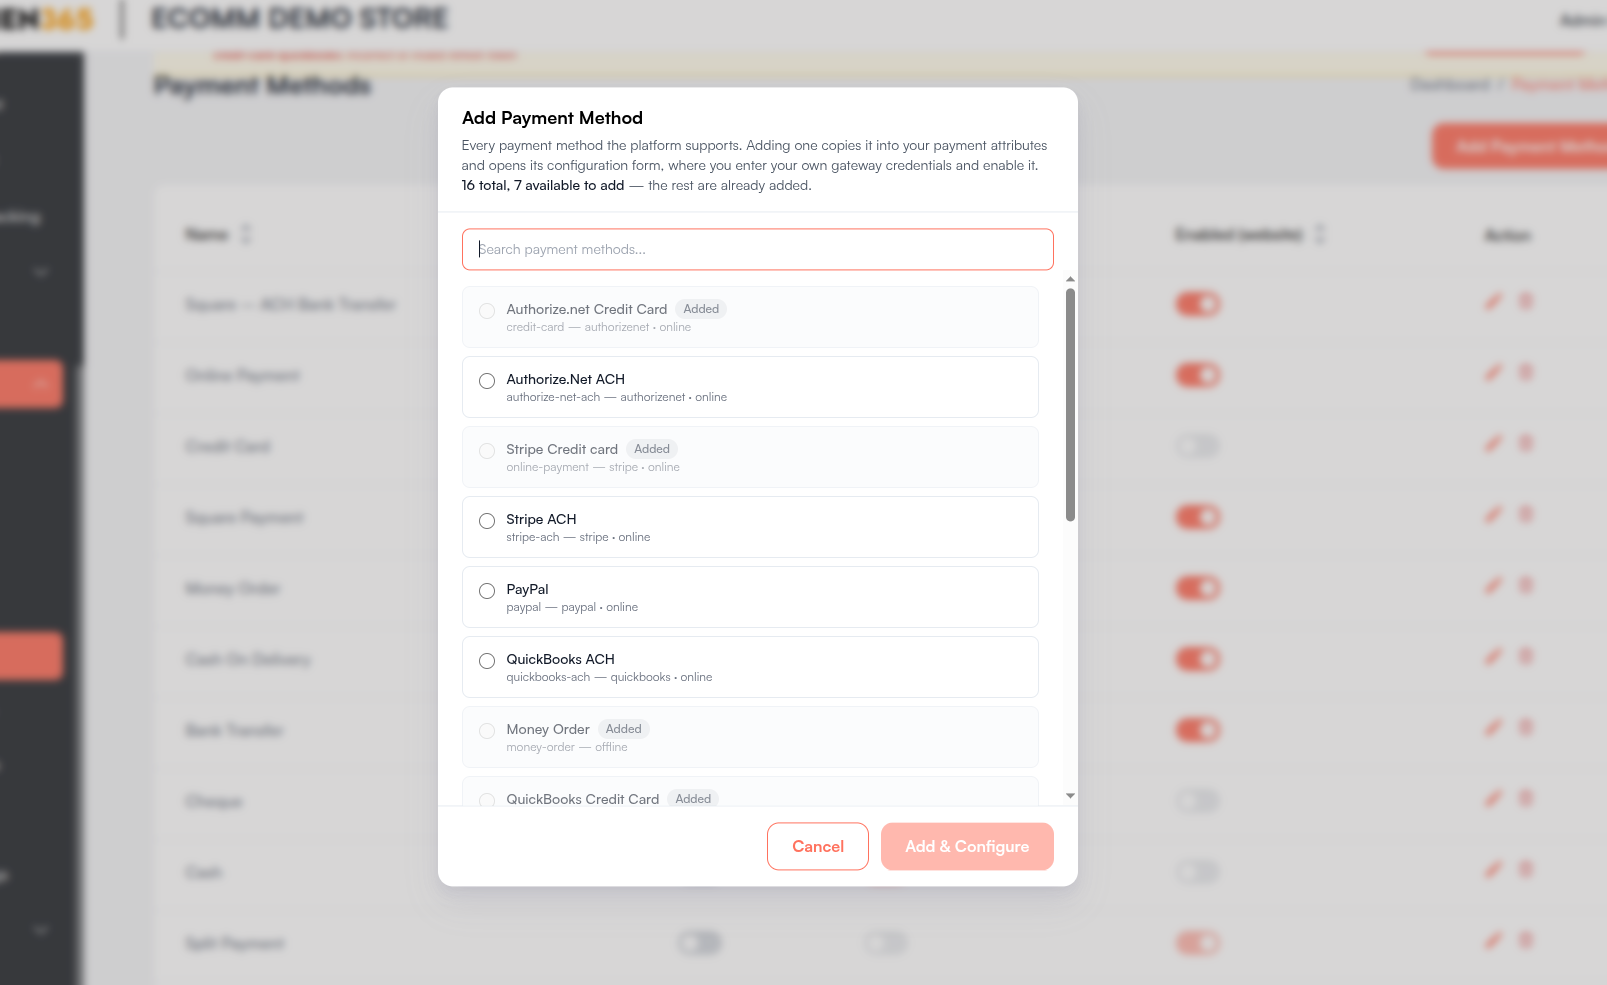
- Methods already on your website show an Added badge and cannot be selected.
- After adding, the message "Method name added — enter its details to enable it" appears and the Edit Payment Method form opens, where you enter your own gateway credentials.
- A newly added method is disabled, on every channel, until you enable it.
Available Payment Methods
| Gateway | Payment Methods |
|---|---|
| Authorize.Net | Authorize.net Credit Card, Authorize.Net ACH |
| Stripe | Stripe Credit card, Stripe ACH |
| PayPal | PayPal |
| QuickBooks | QuickBooks Credit Card, QuickBooks ACH |
| Square | Square Payment, Square ACH Payment |
| NMI | NMI Credit Card, NMI ACH |
| Clover | Credit Card (Clover) |
| Offline | Cash On Delivery, Money Order, Bank Transfer, Split Payment |
iii. Edit Payment Method
- Click the Edit icon on the method row.
- Expand each section and complete the fields.
- Click Submit, review the Confirm Changes Dialog, and click Yes, save changes.
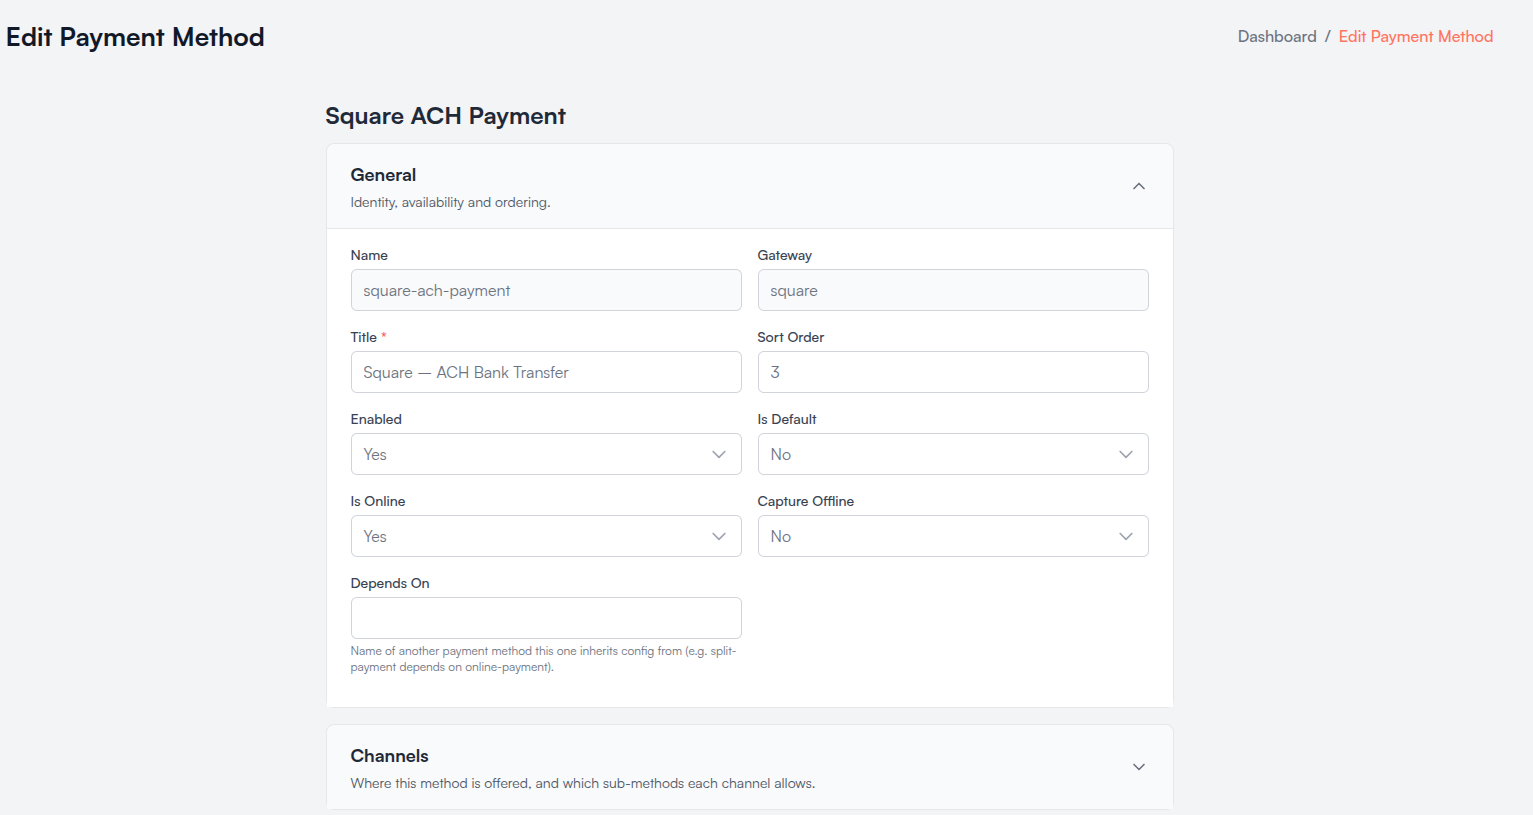
On success, the message "Payment method updated" appears and you return to the list. Fields marked with a red asterisk (*) are required.
| Section | What It Contains |
|---|---|
| General | Identity, availability, and ordering. |
| Channels | Where the method is offered. |
| Customer Apply | Limit the method to specific customer groups or customers. |
| Display | How the method is presented at checkout. |
| Payment Fee | Surcharge added when this method is chosen. |
| Provider Config | Gateway credentials — online methods only. |
If the form cannot be saved, a list of fields to fix appears at the top. A field may sit inside a collapsed section — expand the sections to reach it.
General
| Field | Description |
|---|---|
| Name | Method identifier — read-only. |
| Gateway | Payment gateway — read-only. |
| Title * | Name shown to customers and staff (100 characters max). |
| Sort Order | Display order — 0 or greater. |
| Enabled | Yes or No — main switch for the method. |
| Is Default | Yes pre-selects this method. |
| Is Online | Yes for online gateway payments. |
| Capture Offline | Yes if payment is collected outside the gateway. |
| Depends On | Another method this one takes its settings from (e.g., Split Payment depends on online-payment). |
Channels
| Field | Description |
|---|---|
| Enabled (console) | Yes or No. Follows Enabled and can only be changed while Enabled is Yes. |
| Enabled (website) | Yes or No. Follows Enabled and can only be changed while Enabled is Yes. |
| Console Methods / Website Methods / Website Flags | Advanced settings for the gateway (e.g., card or bank account). Leave unchanged unless advised by Kitchen365. |
Display
| Field | Description |
|---|---|
| Description | Short text shown with the method (500 characters max). |
| Notice | Instructions shown to the customer (1000 characters max). |
| Method Icon | Icon path (e.g., /icons/cod.svg) or full URL. |
| Payment Type | Payment type label (100 characters max). |
| Icon Width / Icon Height | Icon size in pixels, 0–512. |
| Extra Checkout Fields | Extra fields the customer fills in for offline methods (e.g., a Transaction ID). |
Provider Config
Enter the credentials from your gateway account. Offline methods (Cash On Delivery, Money Order, Bank Transfer, Split Payment) do not have this section.
| Gateway | Fields (* = required) |
|---|---|
| Authorize.Net | API Login ID *, Transaction Key *, Client Key *, Accept.js URL *, API Endpoint *, Environment |
| Stripe | Secret Key *, Publishable Key *, Webhook Secret |
| PayPal | Client ID *, Client Secret *, Base URL * |
| QuickBooks | Client ID *, Client Secret *, Base URL *, REST API URL *, Auth URL, Redirect URI, Setting Key, Environment |
| Square | Access Token *, Application ID *, Location ID *, SDK URL *, Setting Key, Environment |
| NMI | Secret Key *, Transact URL *, Public ID *, Collect.js URL *, Environment, Sandbox Receipt Email |
| Clover | Base URL *, Setting Key *, App ID *, Merchant ID, API Access Key |
Secret fields (keys, tokens, secrets) are stored encrypted. Leave them as they are to keep the current value.
iv. Customer Apply
Use Customer Apply to offer a payment method only to specific customer groups or customers — for example, Money Order only for wholesale customers.
| Field | Description |
|---|---|
| Customer Apply | No (default) — offered to every customer. Yes — offered only to the groups and customers selected below. |
| Apply on Customer Group Level | Yes to offer the method to every customer in the selected groups. |
| Customer Groups | Searchable list of customer groups (shown by group code). |
| Apply on Customer Level | Yes to offer the method to individually selected customers. |
| Customers | Searchable list of customers (name, email, and group). |
How it works:
- A customer sees the method if they are in a selected group or are a selected customer.
- Restricted methods are offered in addition to your unrestricted methods — they never hide other methods.
- Turning a switch to No clears the selections under it. The cleared values are listed in the confirm dialog before saving.
- On a quote or order in the Console, restricted methods appear only after a customer is chosen.
If Customer Apply is Yes but no group or customer is selected, the method cannot be saved — it would be hidden from every customer.
v. Payment Fee
Add a surcharge when the customer chooses this method.
| Field | Description |
|---|---|
| Fee Title | Label for the fee shown on the order (100 characters max). |
| Fee Amount | Fee value — 0 or greater. Decimals allowed. |
| Fee Calculation | Fixed, Percent on Subtotal, or Percent on Grand Total. Required when Fee Amount is above 0. |
vi. Remove a Payment Method
- Click the Remove (trash) icon on the method row.
- Review the Remove payment method dialog — it shows the method's name, enabled settings, and any customer restrictions.
- Click Remove.
- Removing a method deletes its configuration, credentials, and customer restrictions from your website. Adding it again later starts from the default settings.
- If it is the only payment method enabled for your website, the dialog warns that checkout would have no payment option. The button changes to Remove anyway — click it only if you are sure.
If a message says the storefront's cached methods did not refresh, your change is saved. The website picks it up on its next refresh.
vii. Confirm Changes Dialog
When you save a Payment Method, Tax Method, or Shipping Method, a confirmation dialog opens first so you can review your edits.
| Column | What It Shows |
|---|---|
| Field | The setting you changed. |
| Current | The saved value. |
| New | The value that will be saved. |
- Secret values show as ••••••. Empty values show as — (empty).
- Click Yes, save changes to save, or Cancel to go back and keep editing.
- If nothing was changed, the dialog shows "No changes to save." with a Close button.
f. Timezone Changes
Timezone Changes controls how dates and times are displayed across the Console — in list columns, detail pages, and reports.
i. Timezone Settings Page
Open Configuration > Timezone Changes.
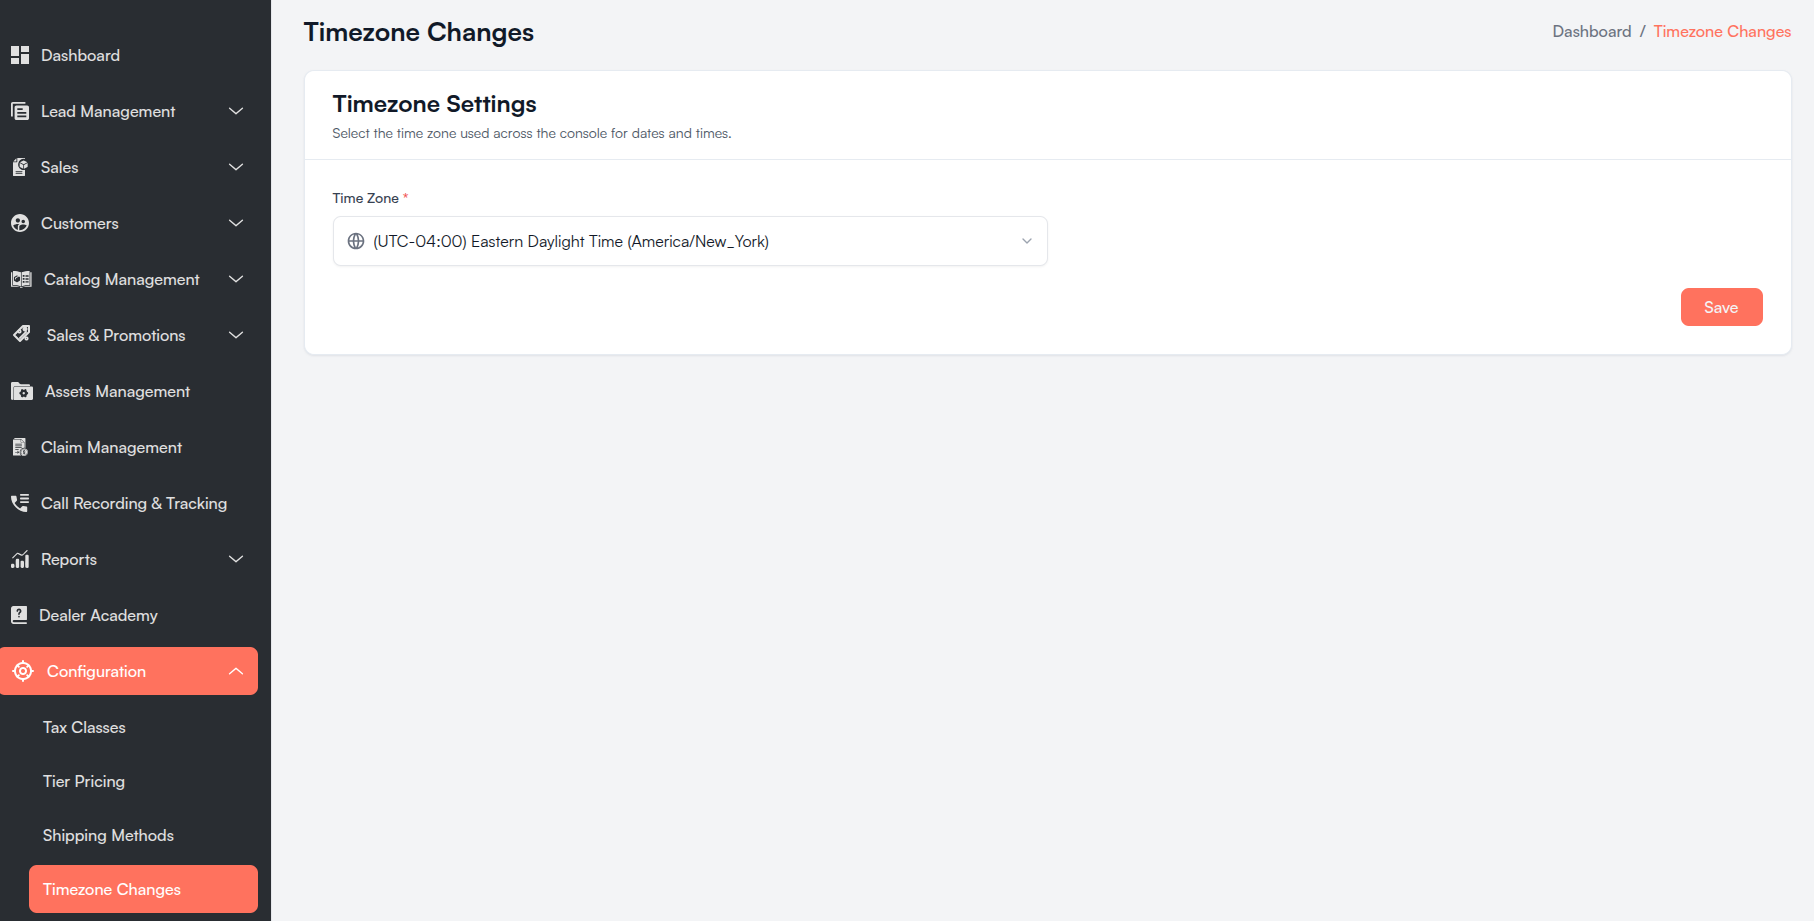
| Element | Description |
|---|---|
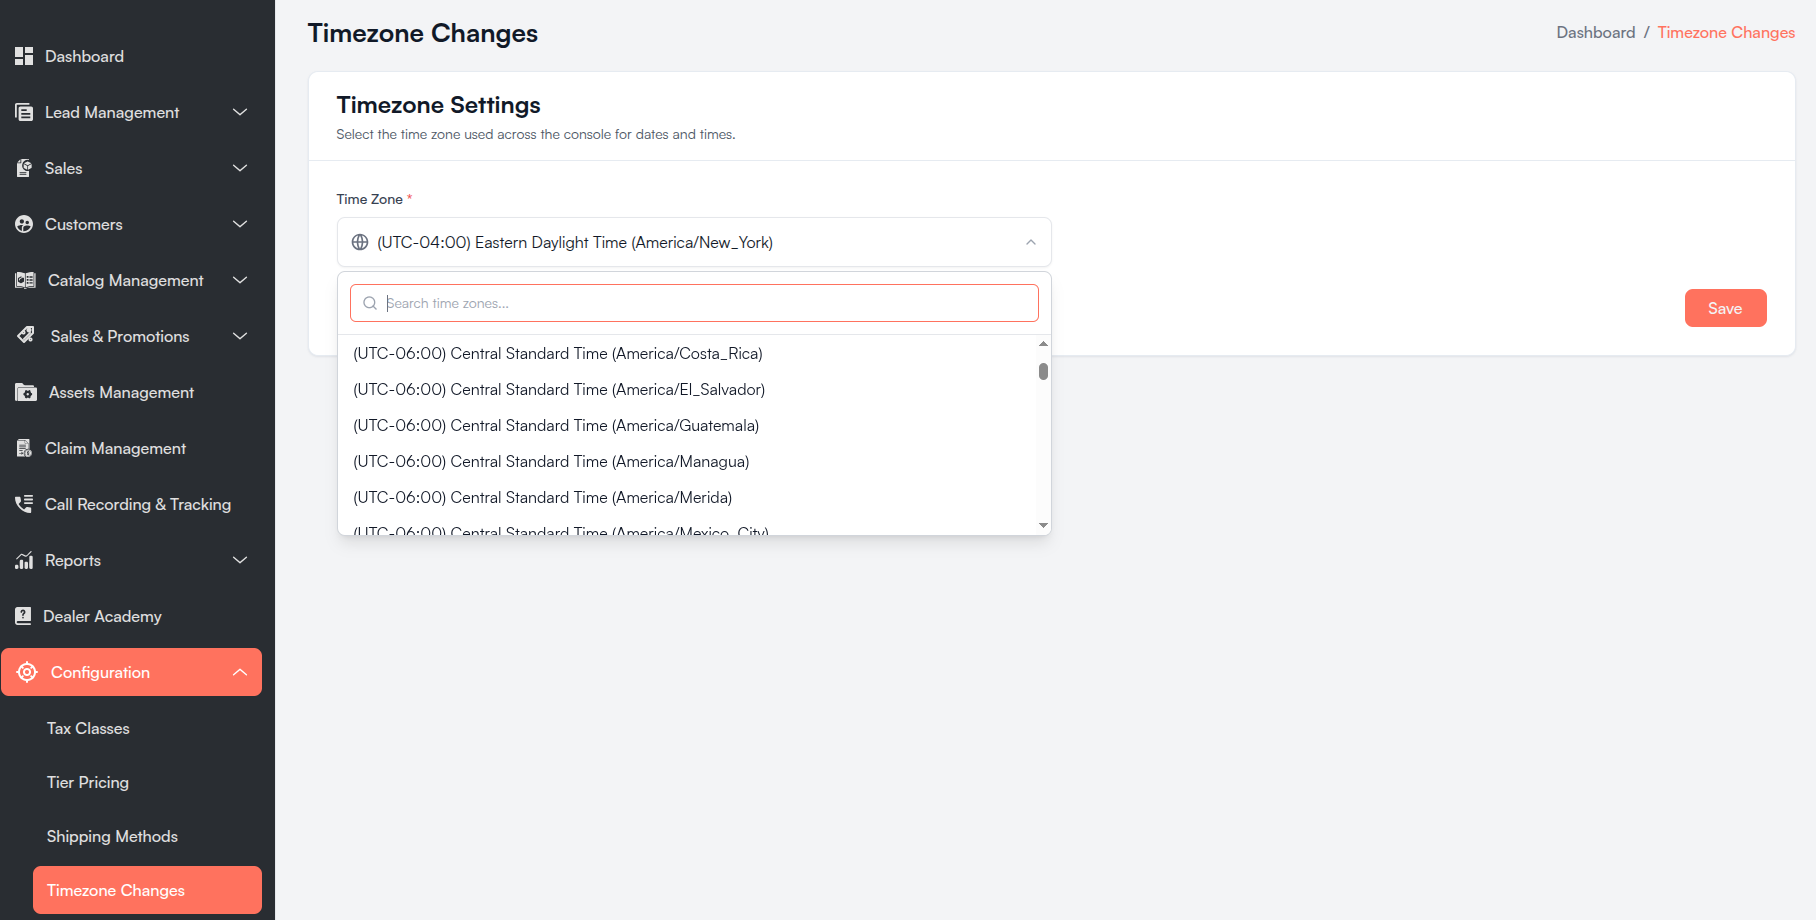
| Time Zone * | Searchable dropdown of all supported time zones (e.g., (UTC-05:00) Eastern Standard Time (America/New_York)). |
| Save | Saves the selected time zone after confirmation. |
While the page loads, a spinner appears. When loaded:
- The currently saved time zone is pre-selected.
- If no time zone was saved, your browser's local time zone is used.
ii. Confirm Timezone Change
When you click Save with a new time zone selected, a confirmation modal appears.
The modal shows a side-by-side preview:
| Panel | What It Shows |
|---|---|
| Current | Current offset, display name, and time zone identifier. |
| New | New offset, display name, and time zone identifier. |
| Button | Action |
|---|---|
| Cancel | Close the modal without saving. |
| Confirm & Save | Apply the new time zone. |
Changing the time zone updates how dates and times display across the Console. You are automatically logged out after confirming so your session reflects the new settings. Sign in again to continue.
If you select the same time zone already saved, the page shows "No changes to save" and the confirmation modal does not open.
g. Quick Reference
| Setting | Where It Applies |
|---|---|
| Tax Classes | Customer groups, products, quote/order tax calculation. |
| Tier Pricing | Quote and order product pricing by customer group. |
| Shipping Methods | Quote/order shipping dropdown, website checkout. |
| Tax Methods | Tax on quotes, orders, and website checkout. |
| Tax Base Modes | Which amounts are taxed (subtotal, shipping, discounts). |
| Payment Methods | Payment options on quotes, orders, and website checkout. |
| Timezone | All dates and times shown in the Console. |
Troubleshooting
| Problem | What to Do |
|---|---|
| Configuration menu not visible | Confirm you have Tax Classes or Tier Pricing permissions. Contact your administrator. |
| Cannot delete a tax class | It is linked to a customer group or product — remove the link first. |
| Tier pricing rule not applying | Check Active status, valid dates, matching customer group, and conditions. |
| Multiplier seems wrong | Remember: 0.90 = 10% off, 1.00 = no change, 1.10 = 10% markup. |
| Shipping method not on quote/order | Set Console Enabled to Yes. Verify address and products match method rules. |
| "Recalculating shipping rates..." stuck | Confirm products have weight/dimensions (for carriers). Check method configuration. |
| Custom Shipping Rate not available | Ask your administrator to enable custom shipping for your tenant. |
| UPS/FedEx/Navisphere rate error | Verify API credentials. Check weight limits and product data. |
| Timezone change did not take effect | Sign in again after automatic logout. Refresh the page. |
| "No changes to save" on timezone | You selected the same time zone already in use — pick a different one. |
| Tax Methods menu not visible | Available only on Console v2.0.0. Log out and log back in after an upgrade. |
| "Permission denied. Log out and log back in to refresh permissions." | Your permissions changed after you signed in — log out and log back in. |
| Tax not calculating after adding a tax method | New tax methods are disabled — switch Enabled on in the Tax Methods list. |
| Another tax method turned off | Only one tax method can be enabled at a time — enabling one turns the others off. |
| Tax base mode formula rejected | Use only s, sh, d, id, sd, a with +, -, *, / and balanced parentheses. See the Formula Guide. |
| Payment method missing at checkout | Check Enabled and Enabled (website). If it shows a Restricted badge, it is offered only to selected customers. |
| Payment method shows for nobody | Customer Apply is Yes but the customer's group or the customer is not selected — add them, or set Customer Apply to No. |
| Payment method missing on a quote/order | Check Enabled (console). Restricted methods appear only after a customer is chosen. |
| Cannot save a payment method | Fix the fields listed at the top of the form — expand collapsed sections to find them. |
| Website still shows old payment settings | Your change is saved — the website picks it up on its next refresh. |
Security Notes
- Only authorized Console users can manage Configuration settings.
- Carrier API credentials are stored securely on the shipping method.
- Payment gateway and tax provider secrets are stored encrypted and shown as ••••••.
- Timezone changes require confirmation and automatically end your session.