Supported Payment
This page lists every payment method Kitchen365 supports, what you need from each payment provider before you start, and what every field on the Edit Payment Method form means.
For how to use the Payment Methods screen itself (list, toggles, remove), see Configuration › Payment Methods.
Where in the Console: Configuration > Payment Methods.
Overview
| Payment Method | Gateway | Type | Needs provider credentials? |
|---|---|---|---|
| Authorize.net Credit Card | Authorize.Net | Card | Yes |
| Authorize.Net ACH | Authorize.Net | Bank (ACH) | Yes |
| Stripe Credit card | Stripe | Card | Yes |
| Stripe ACH | Stripe | Bank (ACH) | Yes |
| PayPal | PayPal | Wallet | Yes |
| QuickBooks Credit Card | QuickBooks Payments | Card | Yes |
| QuickBooks ACH | QuickBooks Payments | Bank (ACH) | Yes |
| Square Payment | Square | Card | Yes |
| Square ACH Payment | Square | Bank (ACH) | Yes |
| NMI Credit Card | NMI | Card | Yes |
| NMI ACH | NMI | Bank (ACH) | Yes |
| Credit Card (Clover) | Clover | Card | Yes |
| Cash On Delivery | — | Offline | No |
| Money Order | — | Offline | No |
| Bank Transfer | — | Offline | No |
| Split Payment | Uses another method | Installments | No (uses the method it depends on) |
Every method can be offered in the Console (quotes and orders), on the Website (checkout), or both.
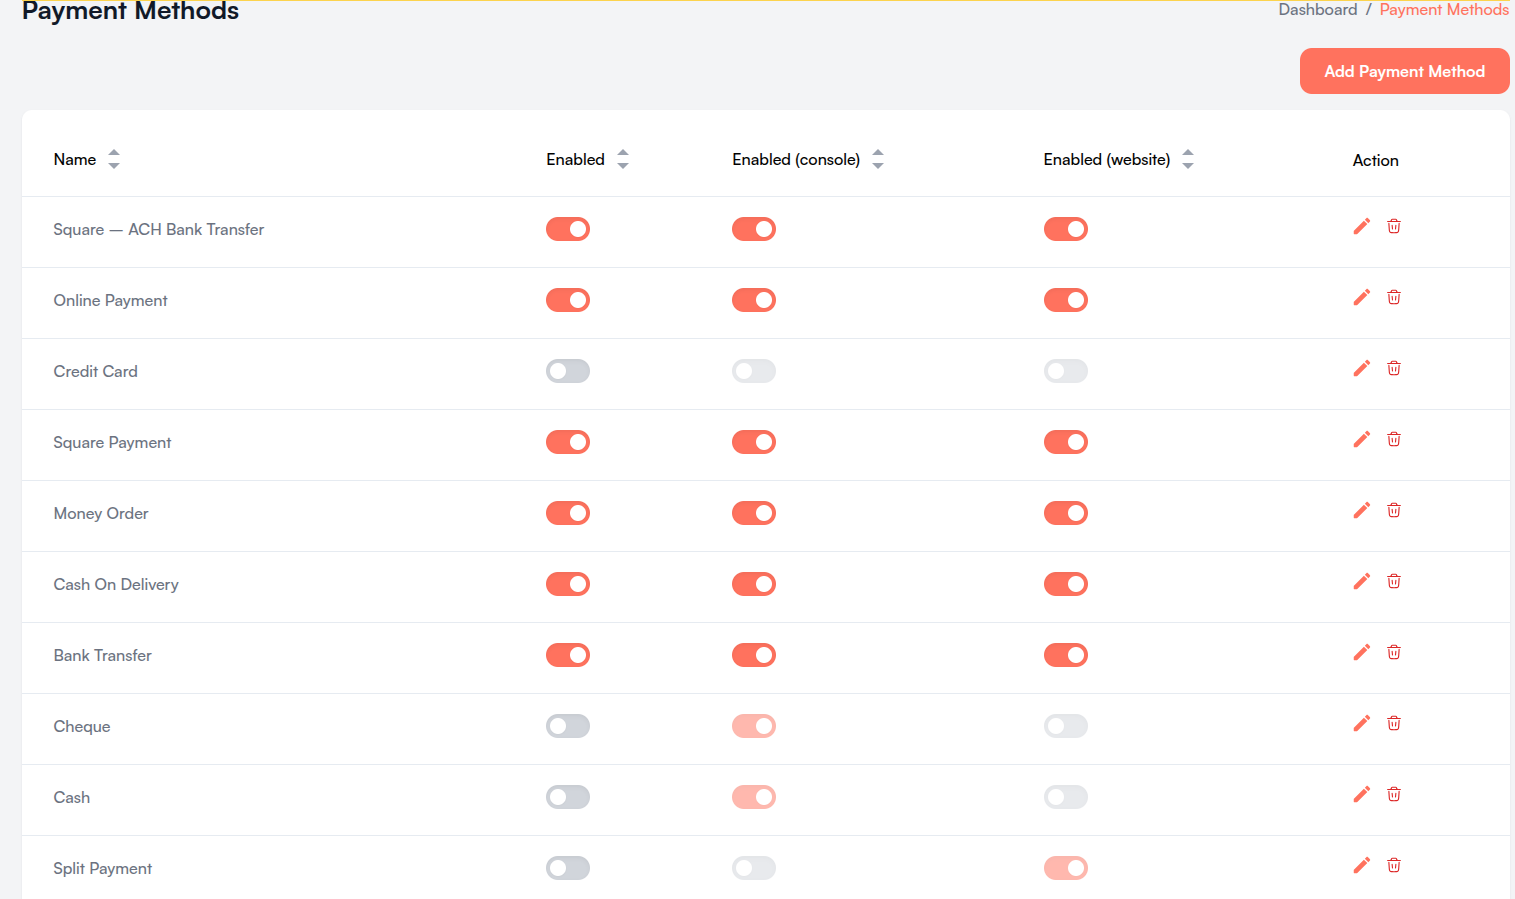
Your list may also contain older methods set up for your website (for example Cheque or Cash). They are not in the catalog above but are managed the same way.
Configuration Steps (all methods)
-
Go to Configuration > Payment Methods and click Add Payment Method.
-
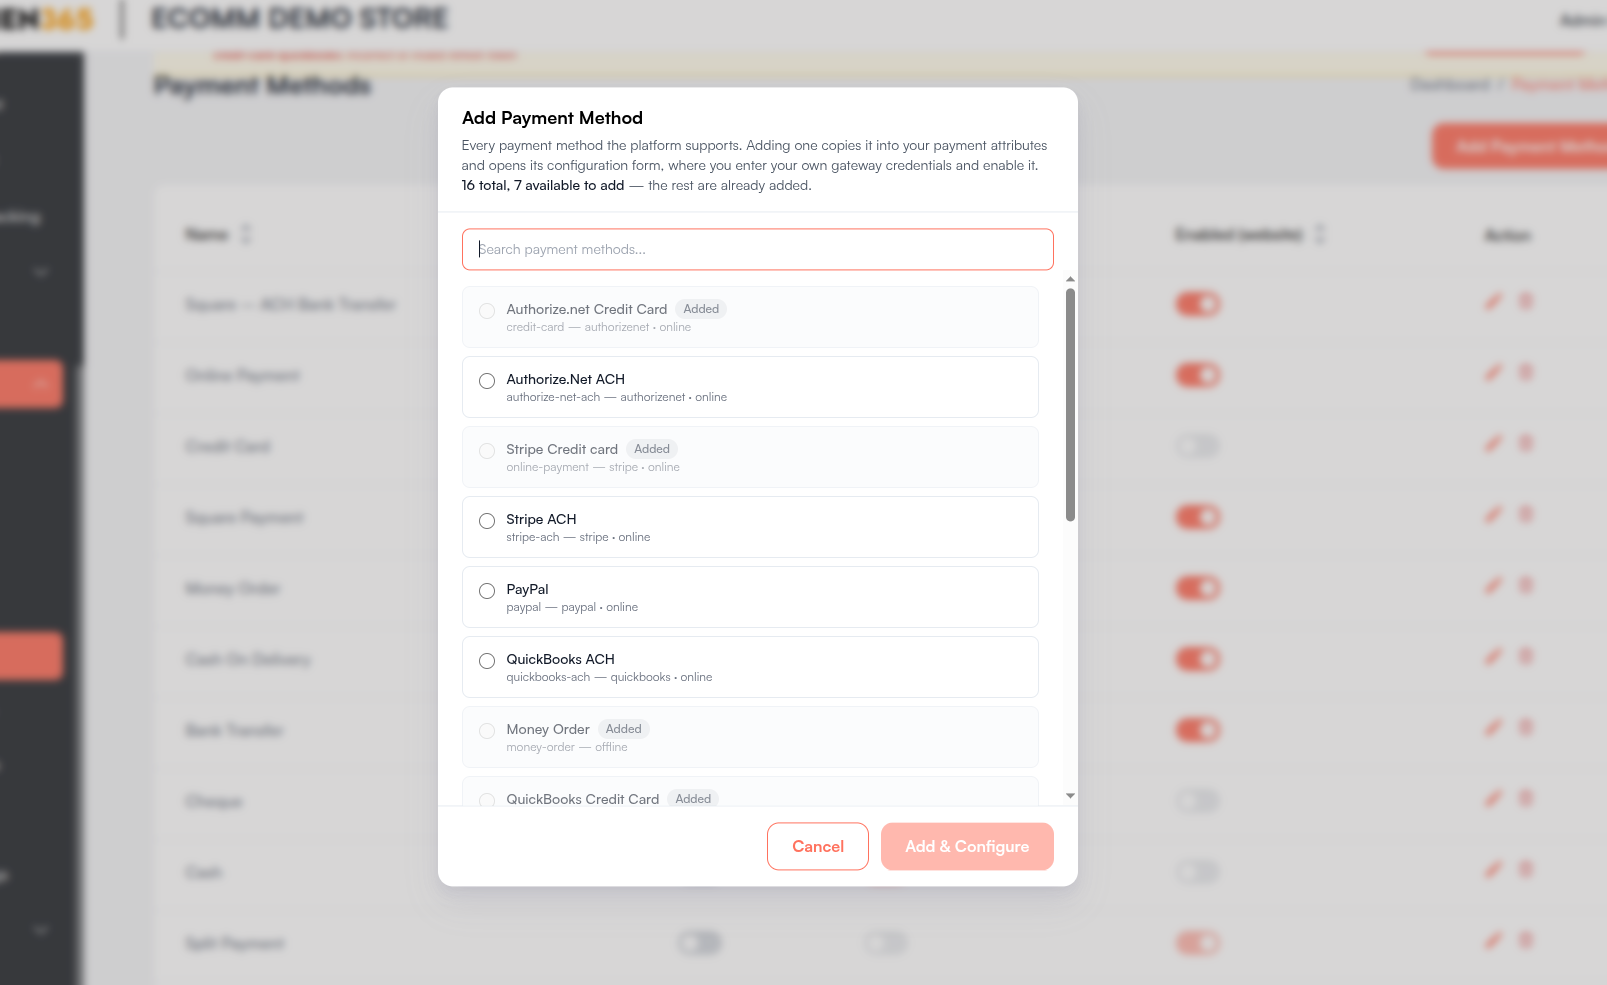
Select the method and click Add & Configure. Methods already on your website show an Added badge.
-
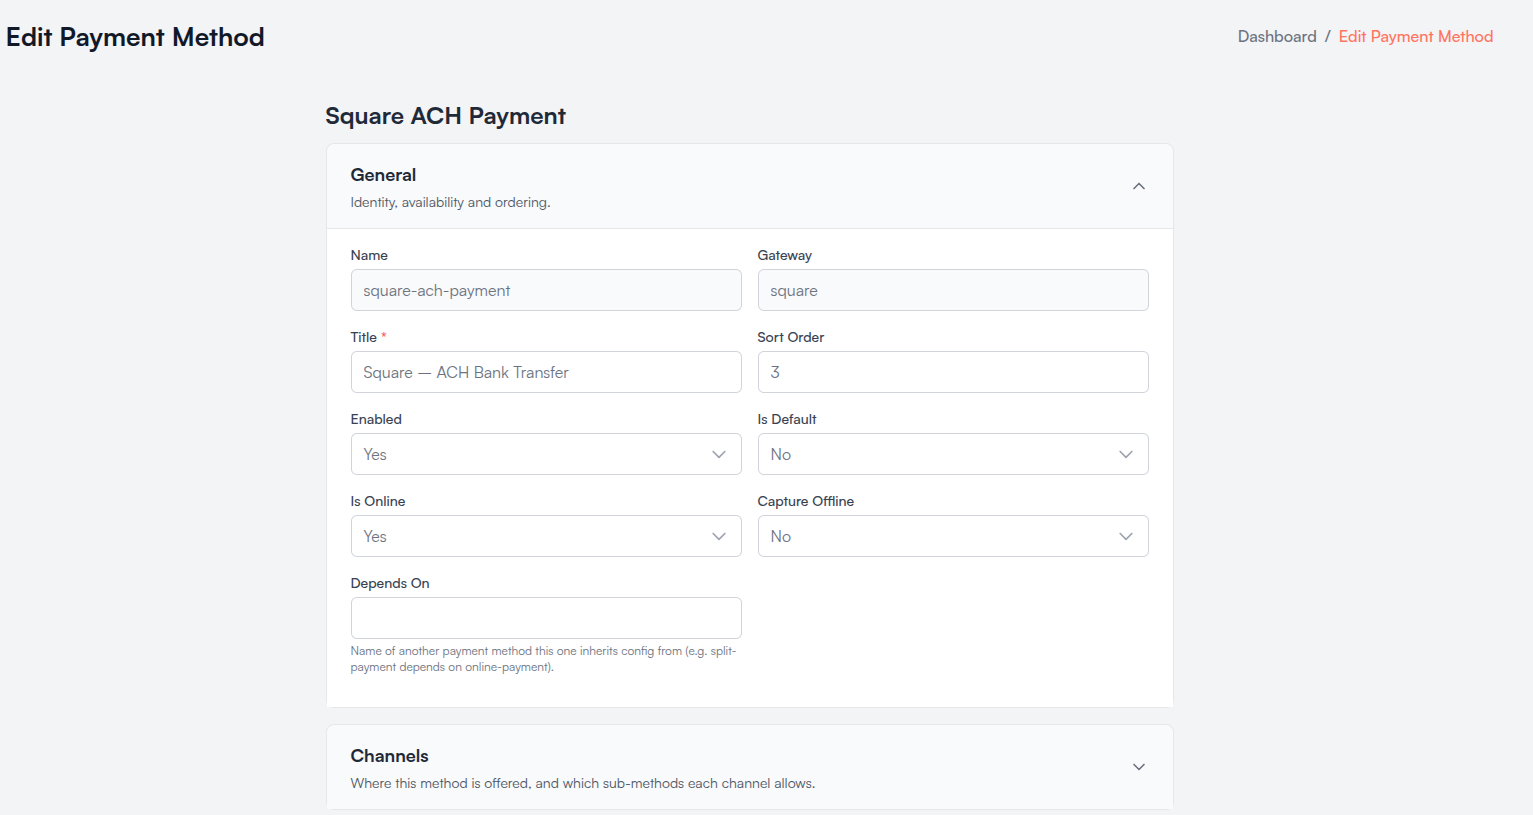
The Edit Payment Method form opens. The new method starts disabled.
-
Fill in General (at least Title) and, for online methods, every required field in Provider Config.
-
Optionally set Customer Apply, Display and Payment Fee. For ACH methods (and anywhere you want automatic payment updates), also set up the gateway webhook.
-
Set Enabled to Yes, then Enabled (console) and/or Enabled (website).
-
Click Submit, review the Confirm Changes dialog, and click Yes, save changes.
-
Test with a small order. Use the provider's sandbox credentials and URLs first, then switch to live ones.
New methods come with the provider's sandbox (test) URLs filled in. Before taking real payments, replace both the credentials and the URLs with the live ones, as listed for each gateway below. Mixing test URLs with live keys (or the reverse) makes every payment fail.
Common Settings
These sections are the same on every payment method.
General
| Field | Required | Options | What it means |
|---|---|---|---|
| Name | — | — | Method identifier. Read-only. |
| Gateway | — | — | Payment provider. Read-only. |
| Title | Yes | — | Name shown to customers and staff, e.g. Credit Card. |
| Sort Order | — | — | Position in the payment list. Lower numbers appear first. |
| Enabled | — | Yes / No | Main switch. While No, the channel switches are locked off. |
| Is Default | — | Yes / No | Yes pre-selects this method at checkout. |
| Is Online | — | Yes / No | Yes for methods charged through a gateway (card, ACH, PayPal). No for offline methods. |
| Capture Offline | — | Yes / No | Yes if the money is collected outside the gateway (cash, money order, bank transfer). |
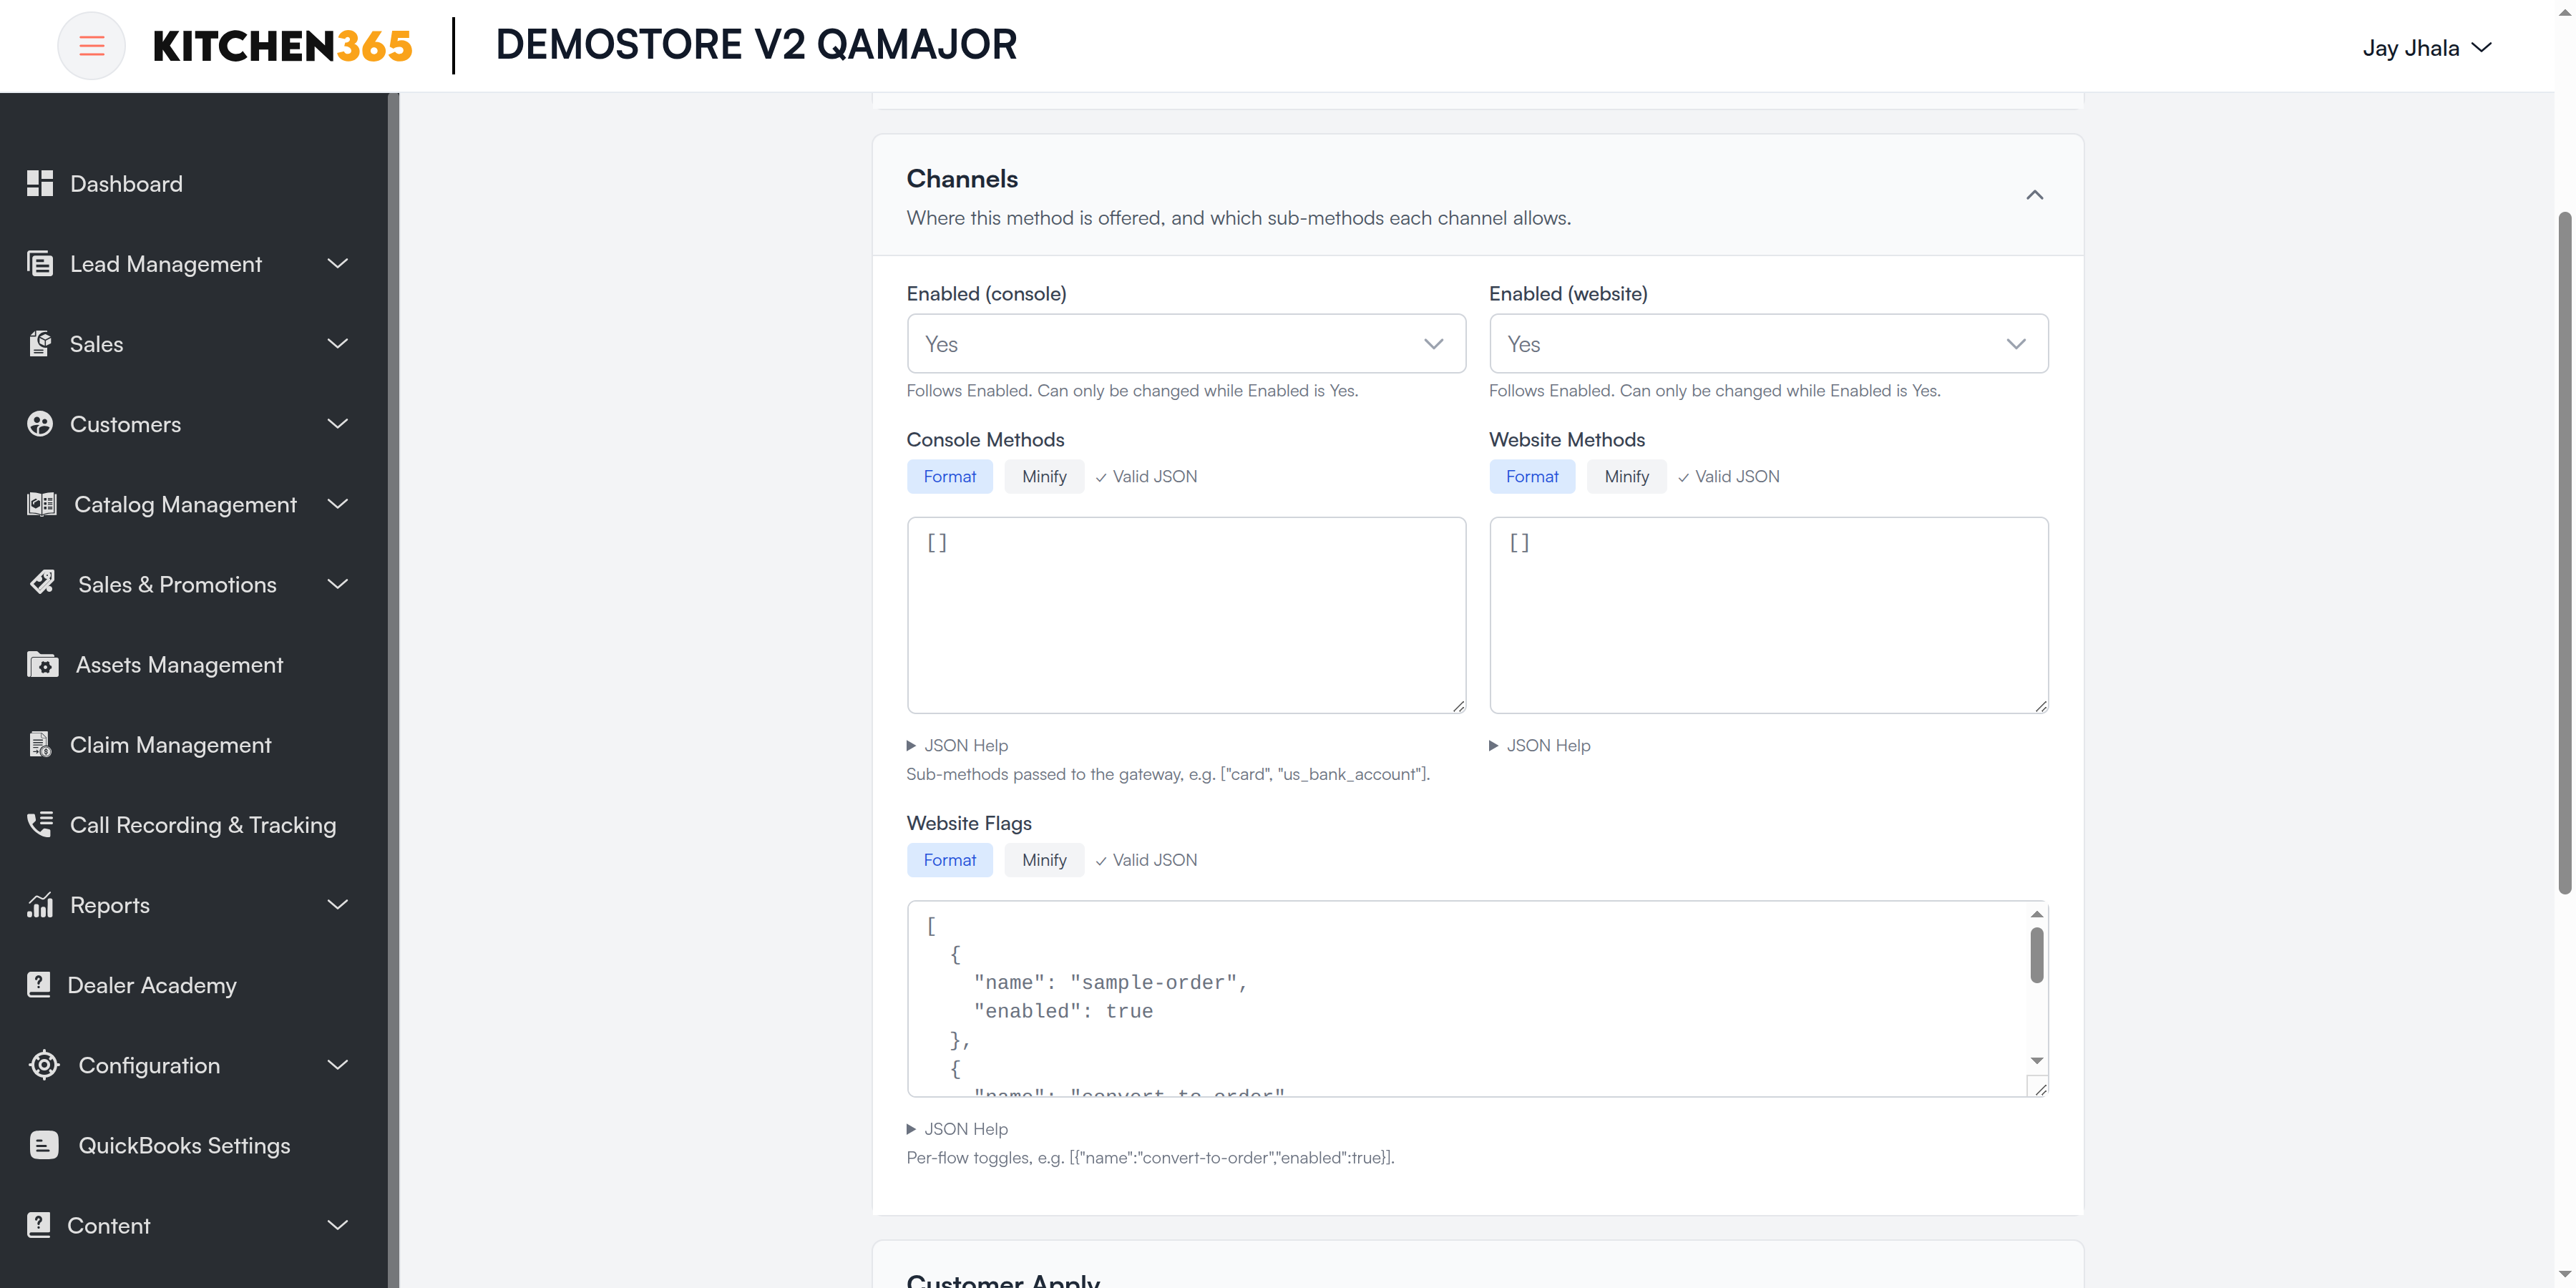
Channels
| Field | Options | What it means |
|---|---|---|
| Enabled (console) | Yes / No | Offer this method on quotes and orders in the Console. |
| Enabled (website) | Yes / No | Offer this method at website checkout. |
| Console Methods | — | Advanced: payment types passed to the gateway for Console payments, e.g. card or bank account. Leave unchanged unless Kitchen365 advises. |
| Website Methods | — | Advanced: the same for website checkout. |
| Website Flags | — | Advanced: turns the method on or off for particular website flows (e.g. sample orders, converting a quote to an order). Leave unchanged unless Kitchen365 advises. |
Customer Apply
Offer the method only to certain customer groups or customers, for example Money Order only for wholesale customers.
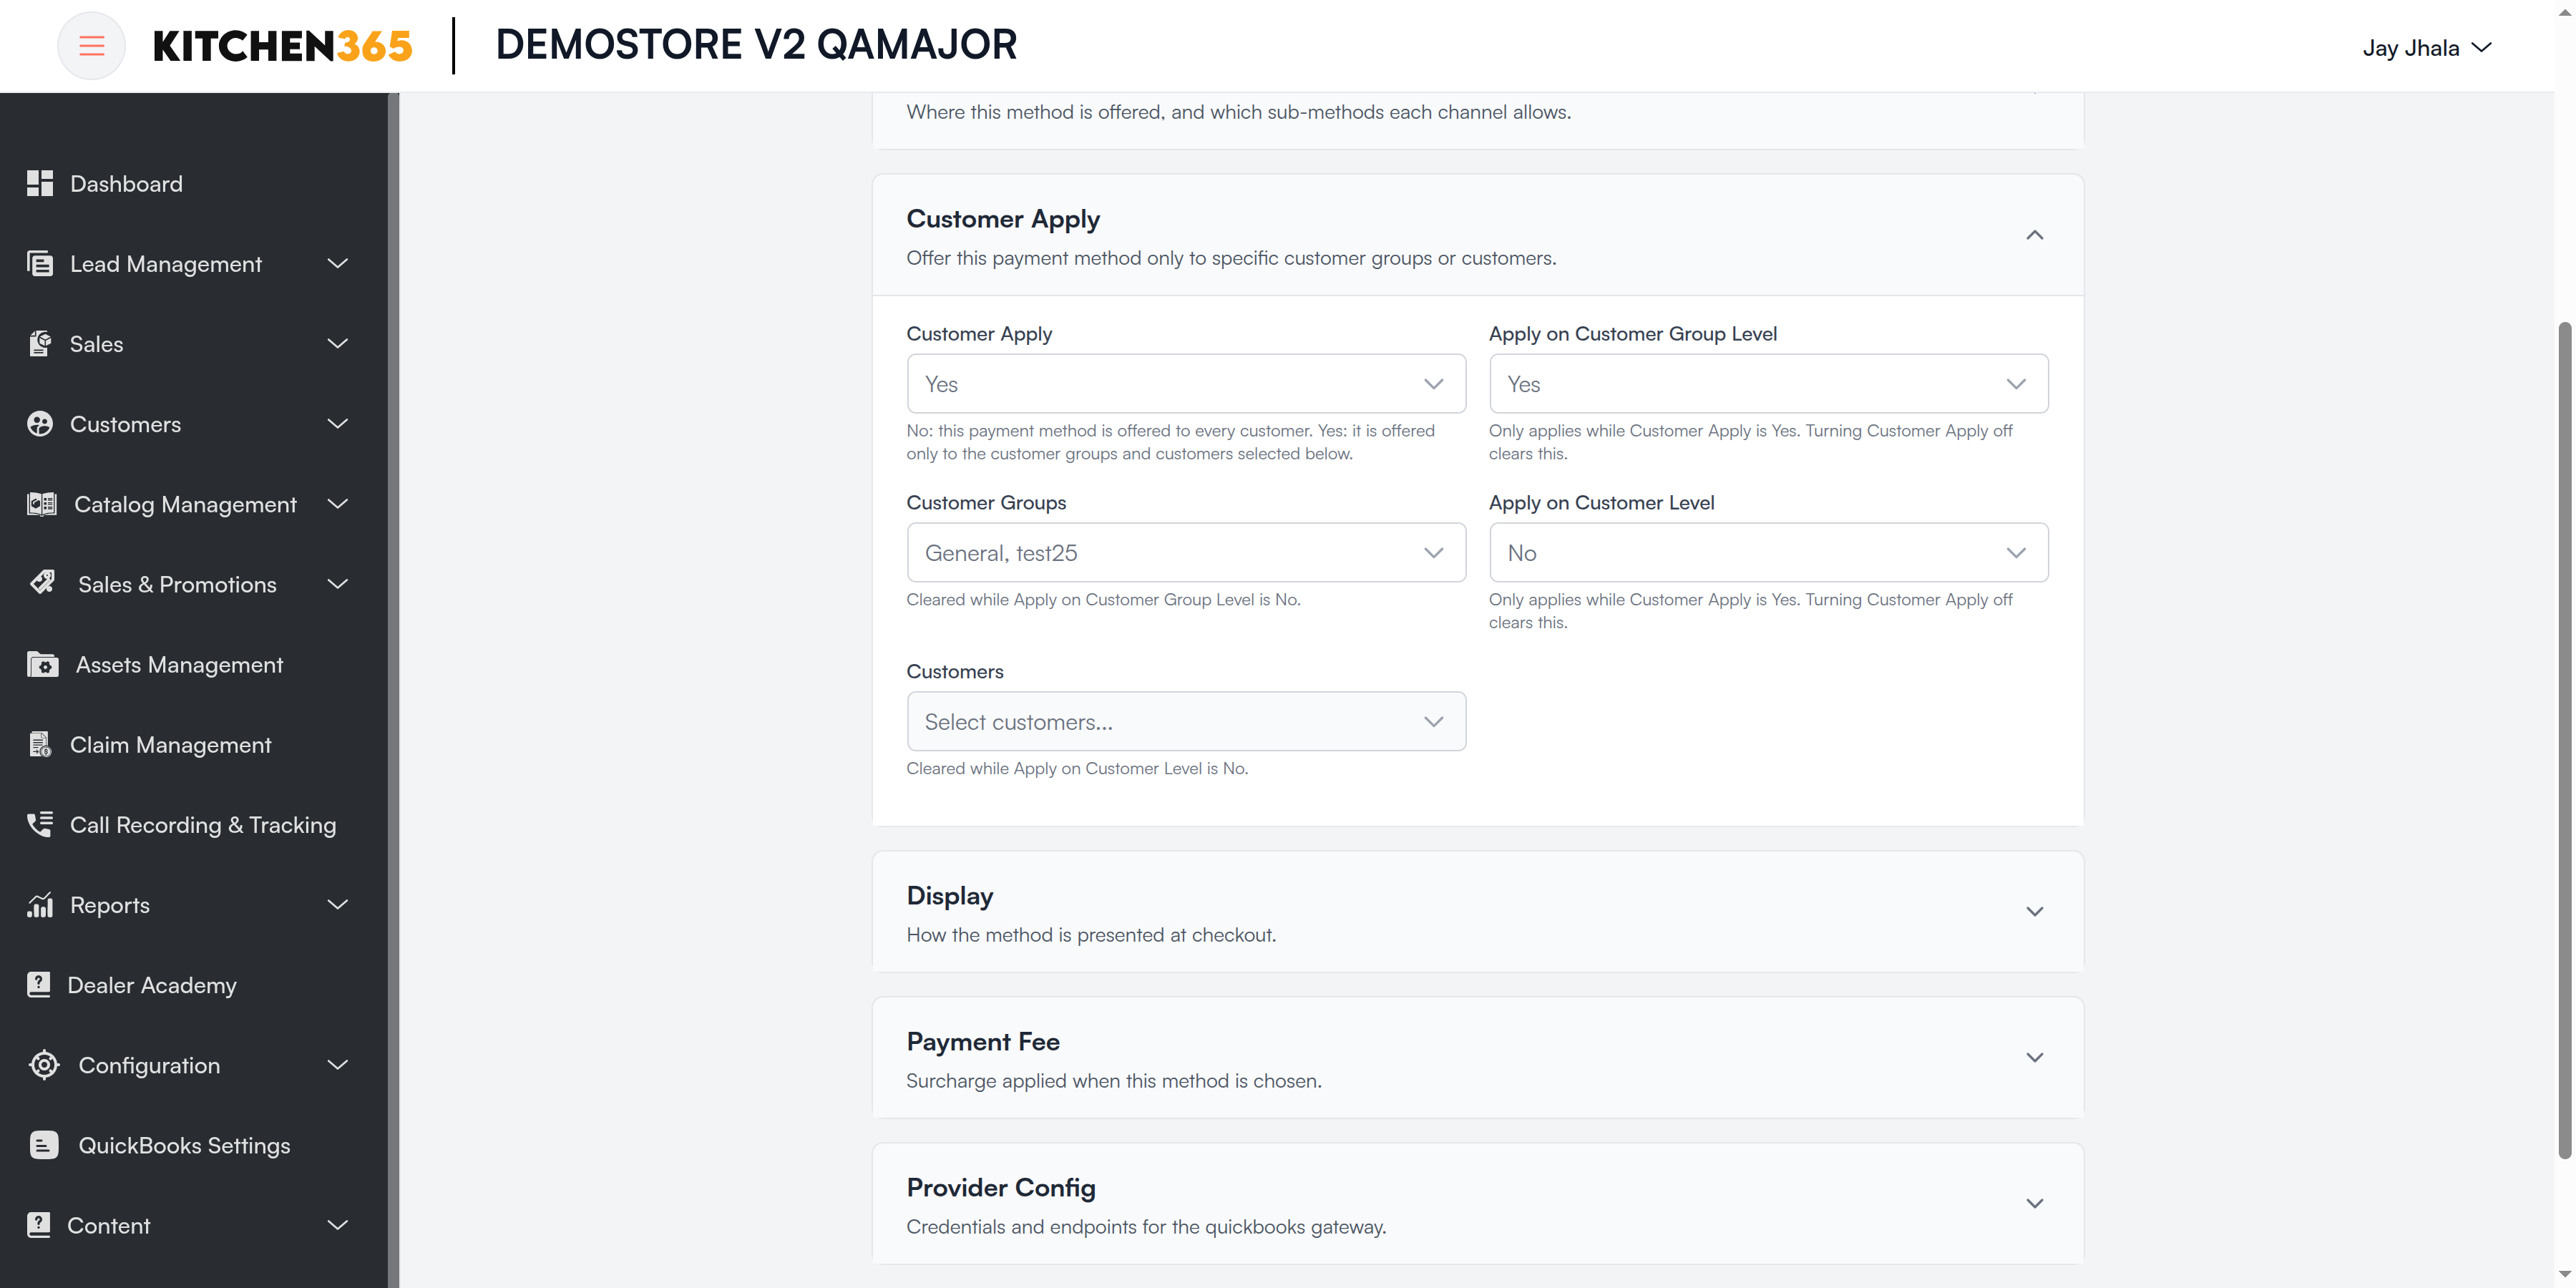
| Field | Default | What it means |
|---|---|---|
| Customer Apply | No | No: every customer sees the method. Yes: only the groups and customers selected below. |
| Apply on Customer Group Level | No | Yes: every customer in the selected groups sees the method. Works only when the customer is signed in. |
| Customer Groups | — | The groups that see the method. |
| Apply on Customer Level | No | Yes: the selected customers see the method, whatever their group. |
| Customers | — | Individual customers. Each option shows the customer's group. |
- A customer sees the method if they are in a selected group or are a selected customer.
- Restricted methods are shown in addition to your unrestricted ones; they never hide other methods.
- If Customer Apply is Yes with nothing selected, the form cannot be saved, because nobody would see the method.
Display
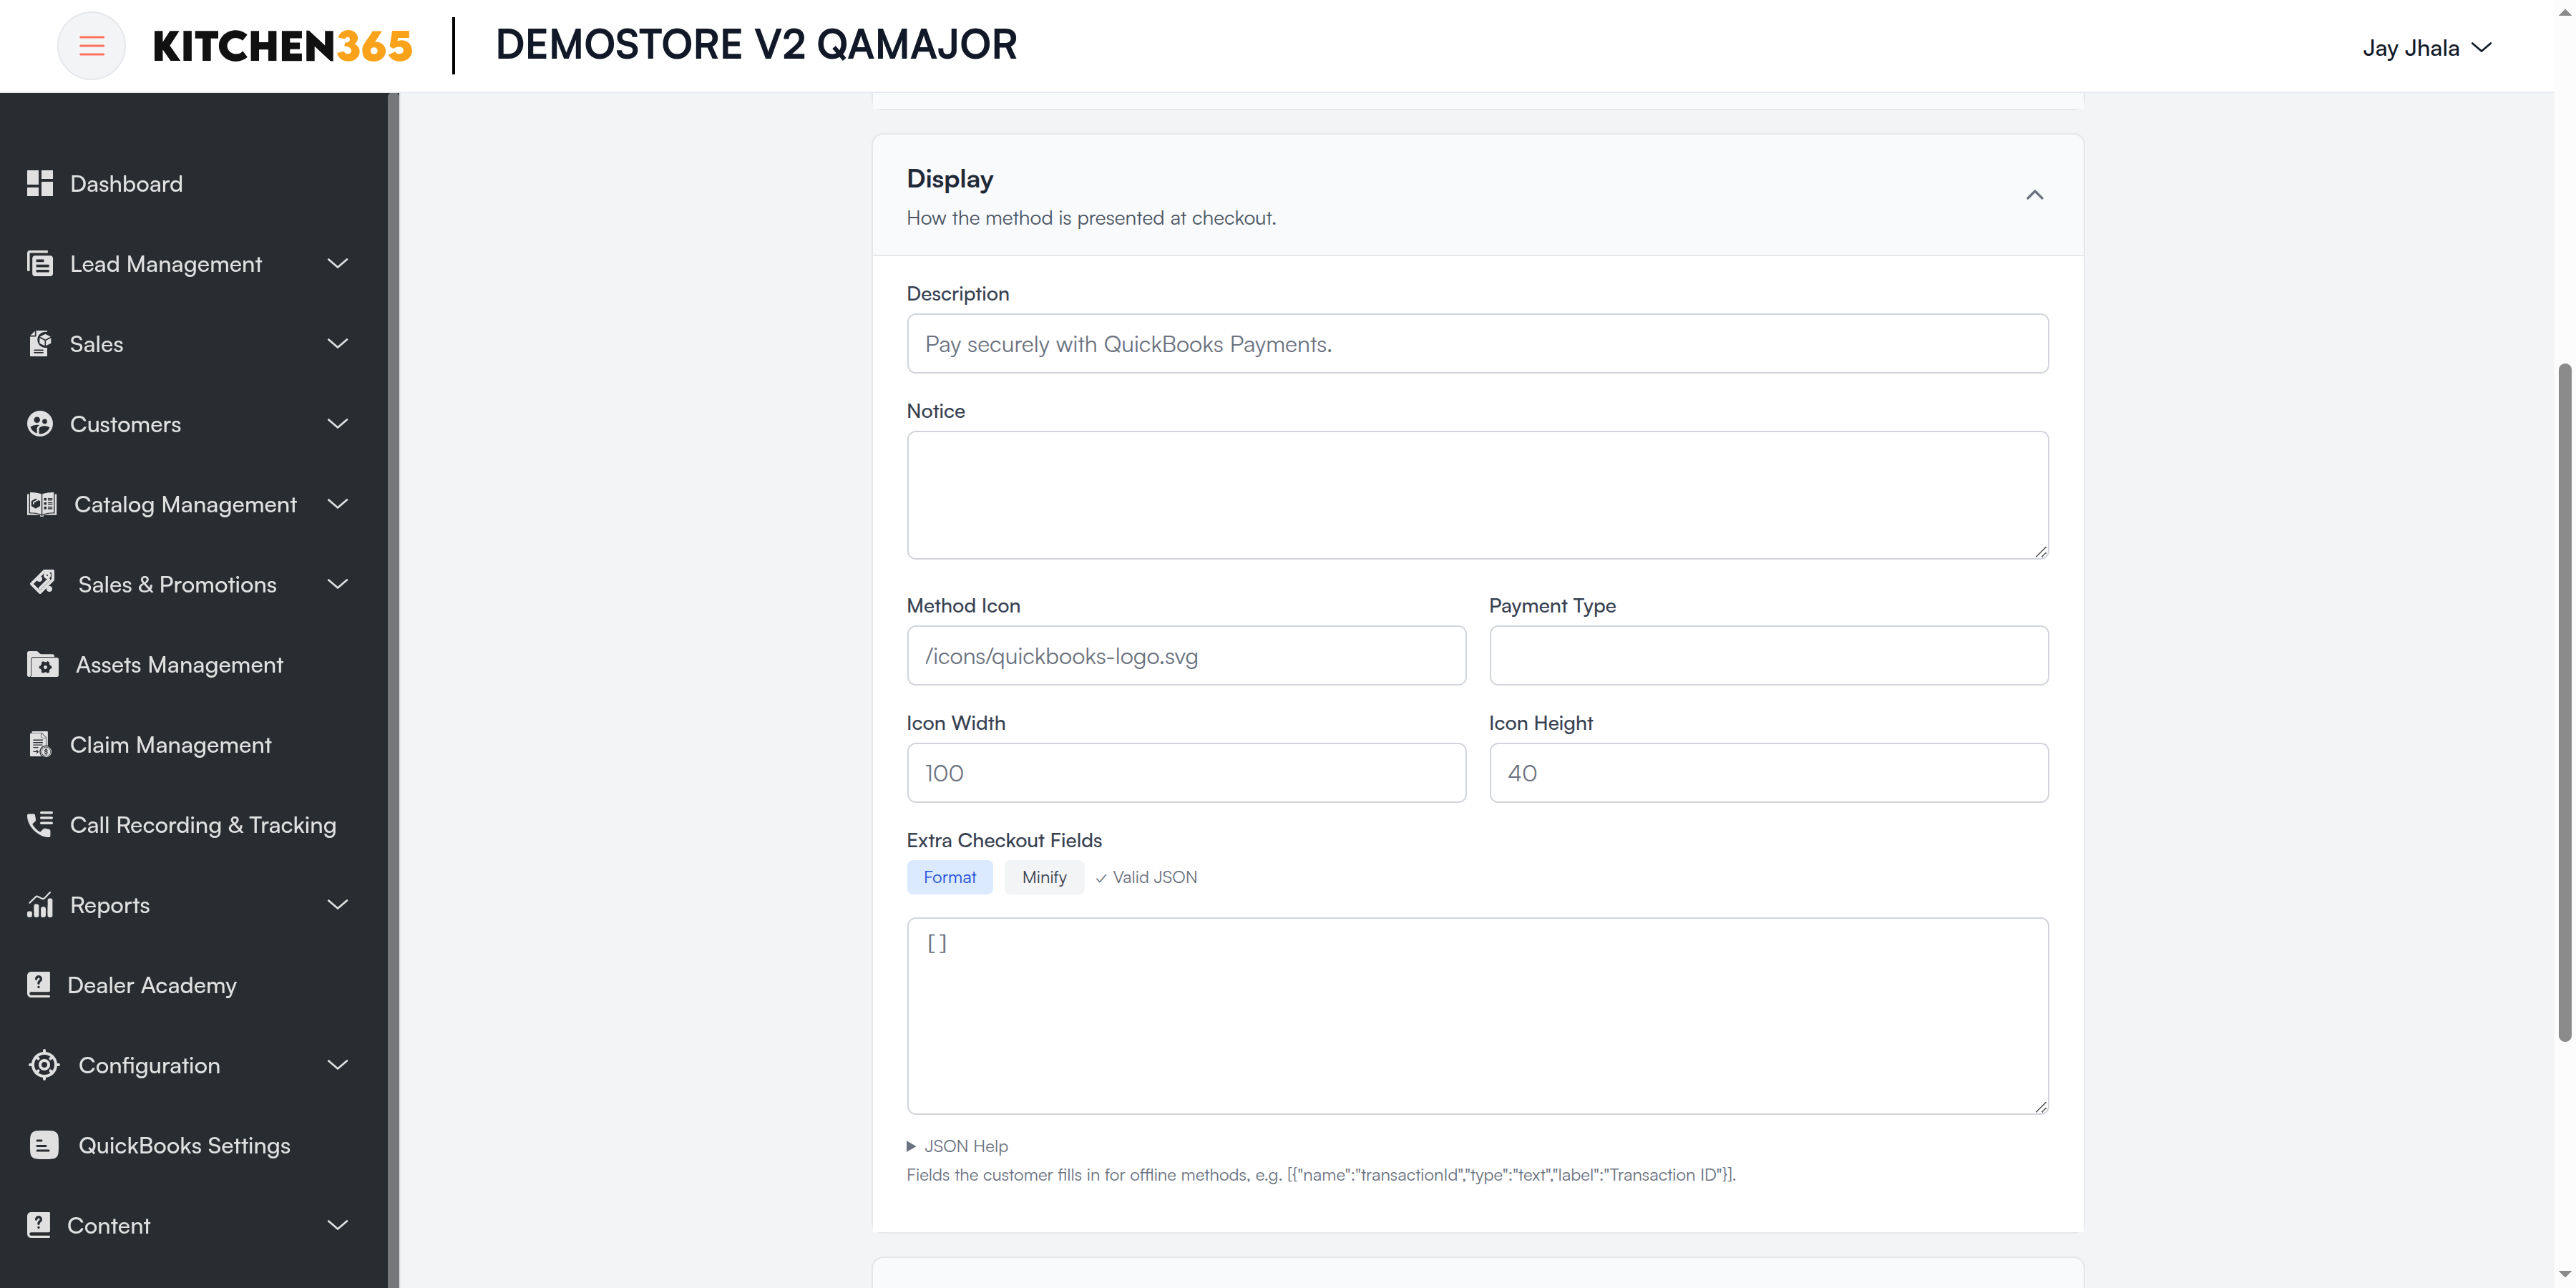
| Field | What it means |
|---|---|
| Description | Short text shown under the method name at checkout. |
| Notice | Longer instructions for the customer, e.g. where to send a money order. |
| Method Icon | Icon path (e.g. /icons/cod.svg) or a full image URL. |
| Payment Type | Payment type label shown on the order. |
| Icon Width / Icon Height | Icon size in pixels. |
| Extra Checkout Fields | Extra boxes the customer fills in, mainly for offline methods, e.g. Transaction ID or Money Order Number. Leave unchanged unless you need a new field. |
Payment Fee
A surcharge added when the customer picks this method, for example a card processing fee.
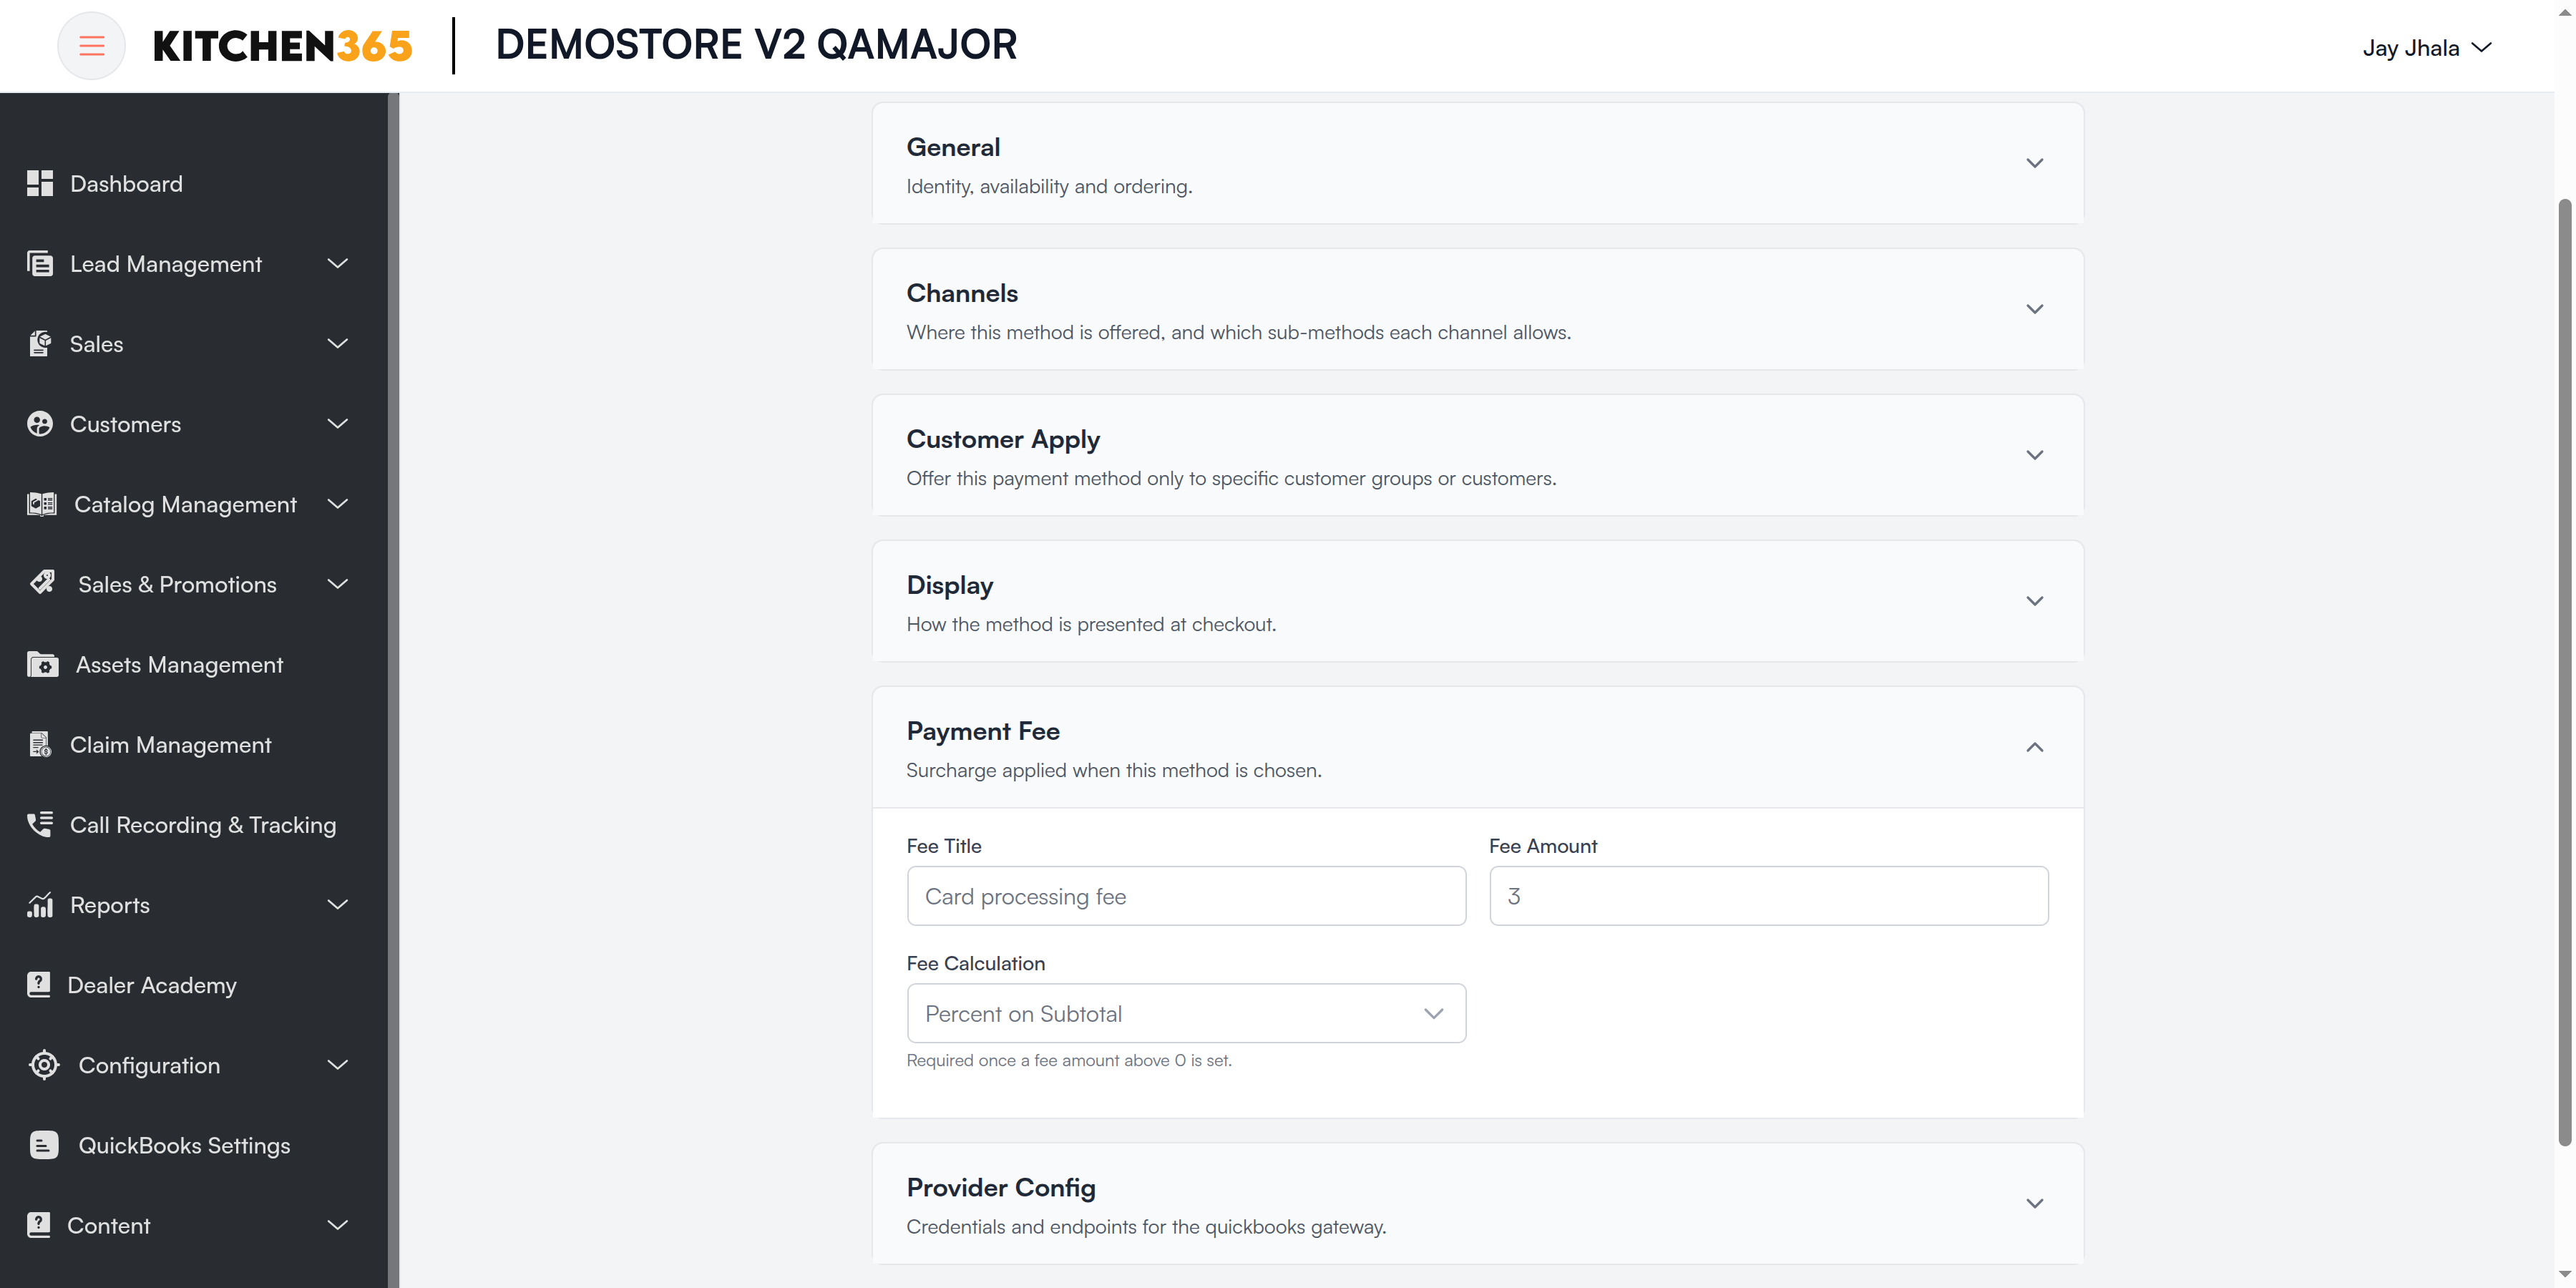
| Field | What it means |
|---|---|
| Fee Title | Label shown for the fee on the order, e.g. Card processing fee. |
| Fee Amount | The fee value. 0 = no fee. |
| Fee Calculation | Fixed (an amount), Percent on Subtotal, or Percent on Grand Total. Required once Fee Amount is above 0. |
Webhook
Every online gateway has a Webhook field (Yes / No) in Provider Config. Yes means the gateway sends payment status updates back to Kitchen365. It is Yes by default for ACH methods, because bank payments settle a few days later. Turning it on also needs a webhook set up at the gateway and its secret saved in the Console. See Webhooks for the full flow.
Fields such as keys, tokens and secrets are stored encrypted and shown masked. To keep the saved value, leave the field as it is.
Card & Bank Gateways
Authorize.Net
Methods: Authorize.net Credit Card, Authorize.Net ACH (eCheck). Both use the same Authorize.Net account and the same Provider Config fields.
Before you start, from your Authorize.Net merchant account (Account > Settings > Security Settings):
- API Login ID and Transaction Key (from API Credentials & Keys)
- Public Client Key (from Manage Public Client Key)
- For ACH: eCheck must be enabled on your Authorize.Net account
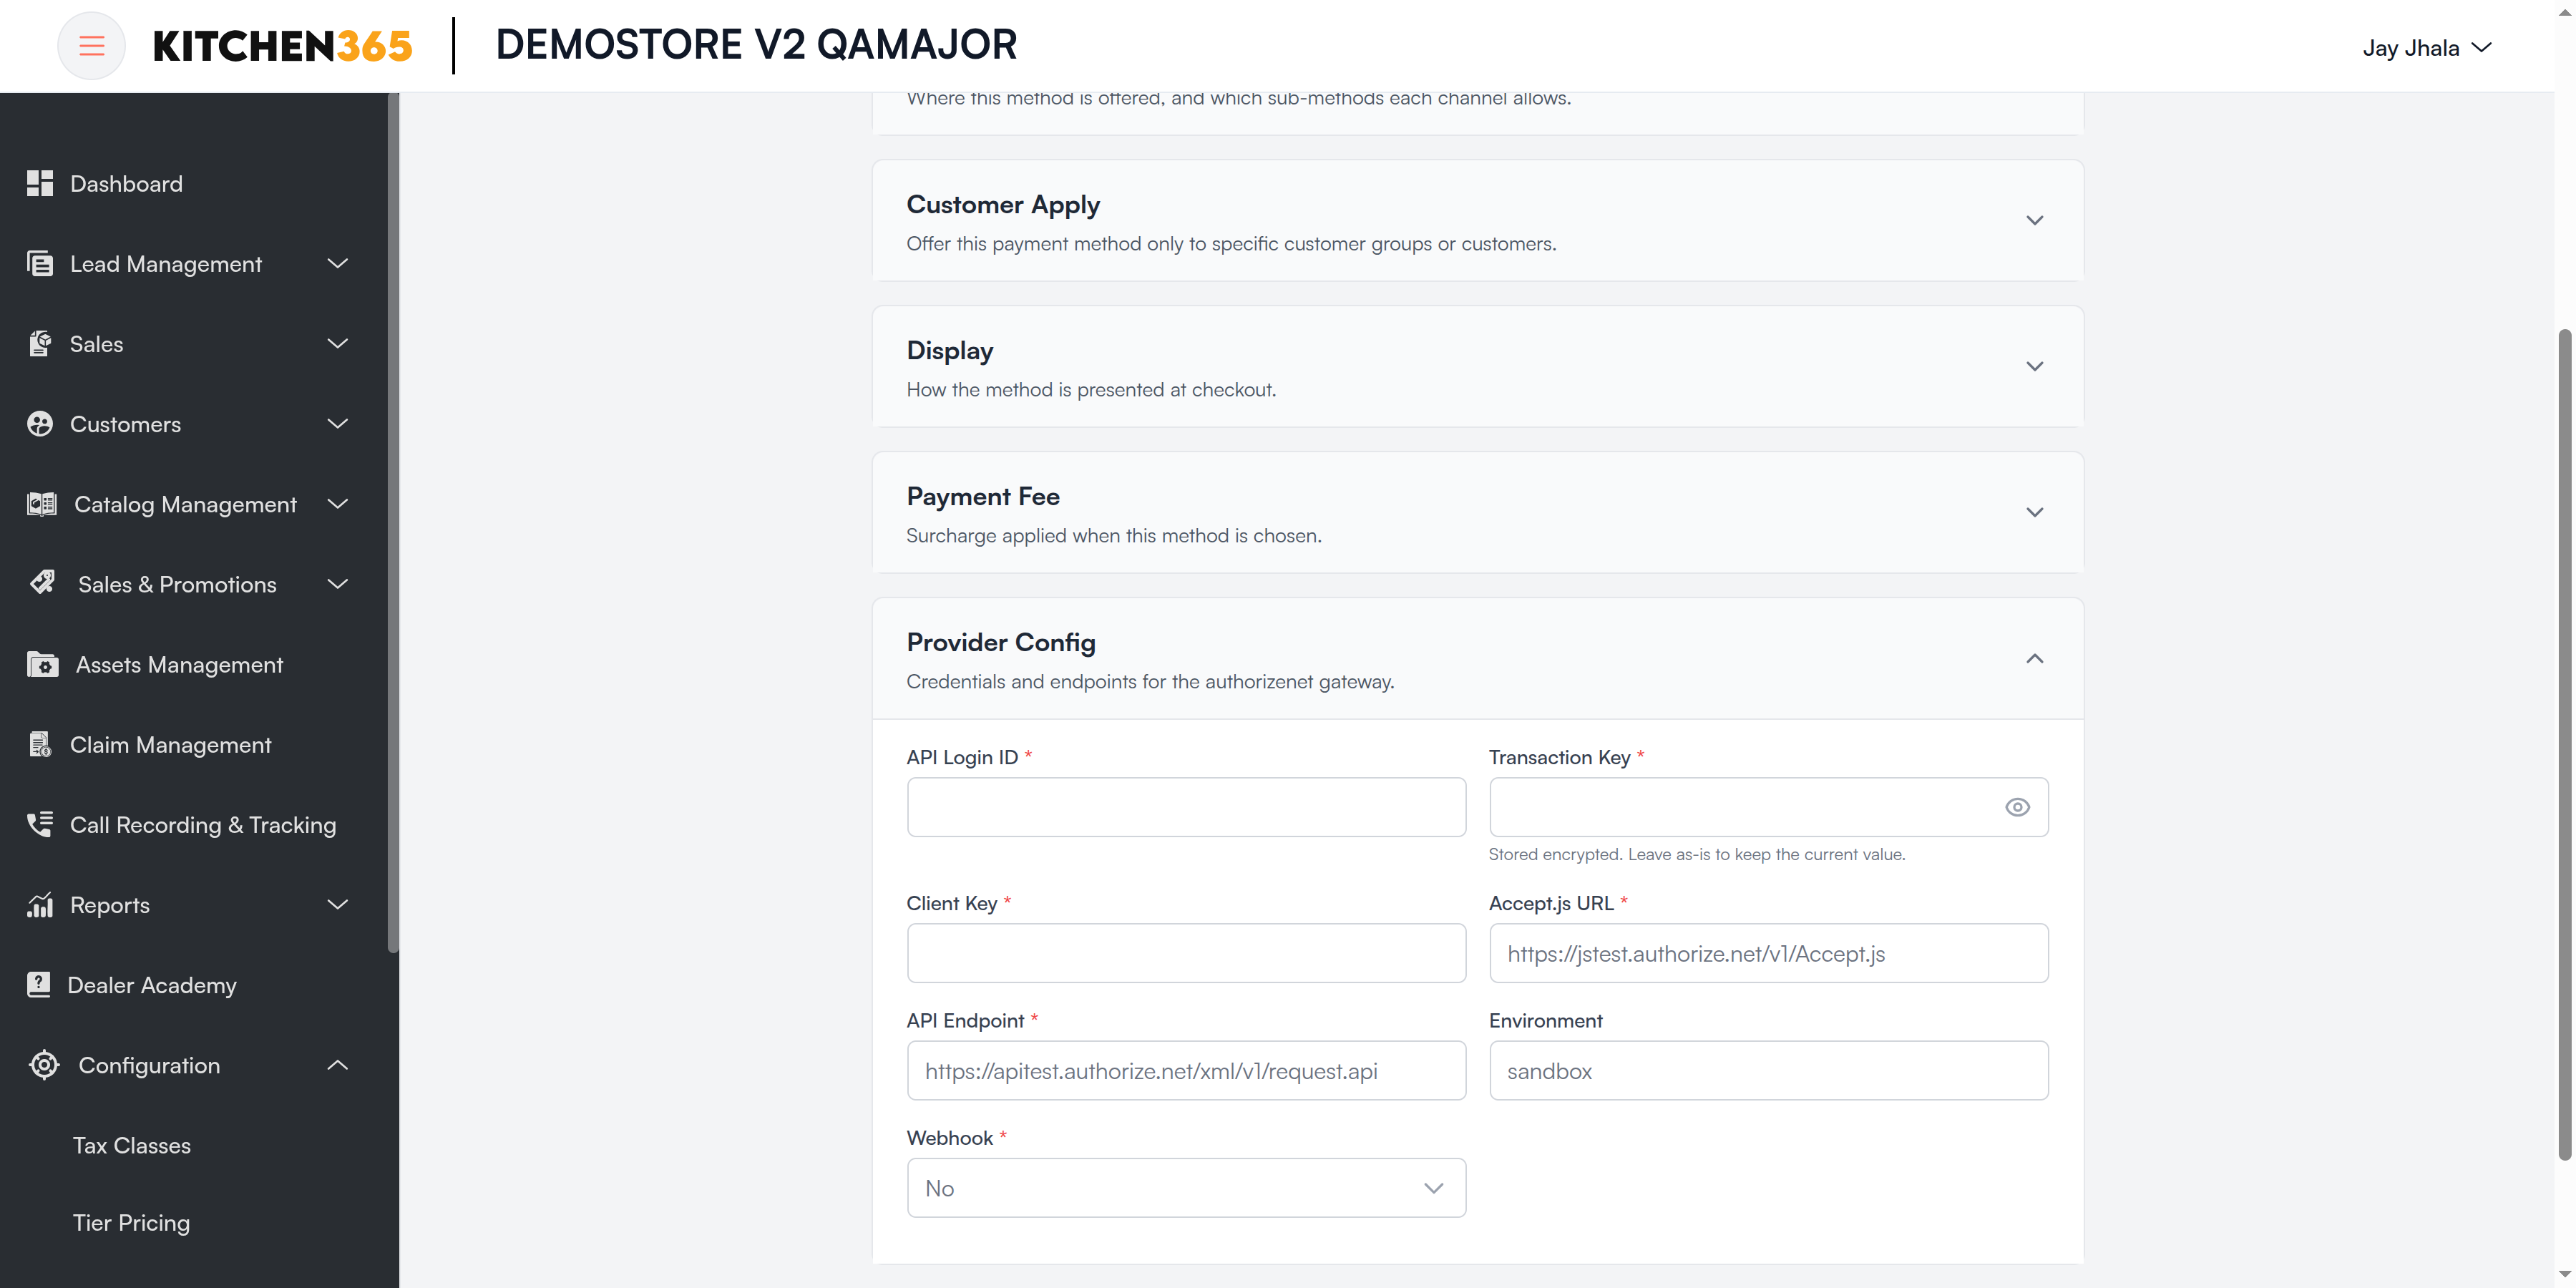
| Field | Required | What it means |
|---|---|---|
| API Login ID | Yes | Your Authorize.Net API Login ID. |
| Transaction Key | Yes | Your Authorize.Net Transaction Key. Stored encrypted. |
| Client Key | Yes | Public Client Key, used to collect card or bank details securely in the browser. |
| Accept.js URL | Yes | Authorize.Net payment script. Test: https://jstest.authorize.net/v1/Accept.js. Live: https://js.authorize.net/v1/Accept.js. |
| API Endpoint | Yes | Authorize.Net API. Test: https://apitest.authorize.net/xml/v1/request.api. Live: https://api.authorize.net/xml/v1/request.api. |
| Environment | — | sandbox or production. Must match the URLs and keys. |
| Webhook | Yes | Yes to receive payment updates from the gateway. See Webhooks. |
Stripe
Methods: Stripe Credit card, Stripe ACH (US bank account).
Before you start, from the Stripe Dashboard:
- Developers > API keys: Secret key and Publishable key
- For webhooks: a Developers > Webhooks endpoint and its Signing secret (see Webhooks)
- For ACH: US bank account payments must be turned on in Stripe
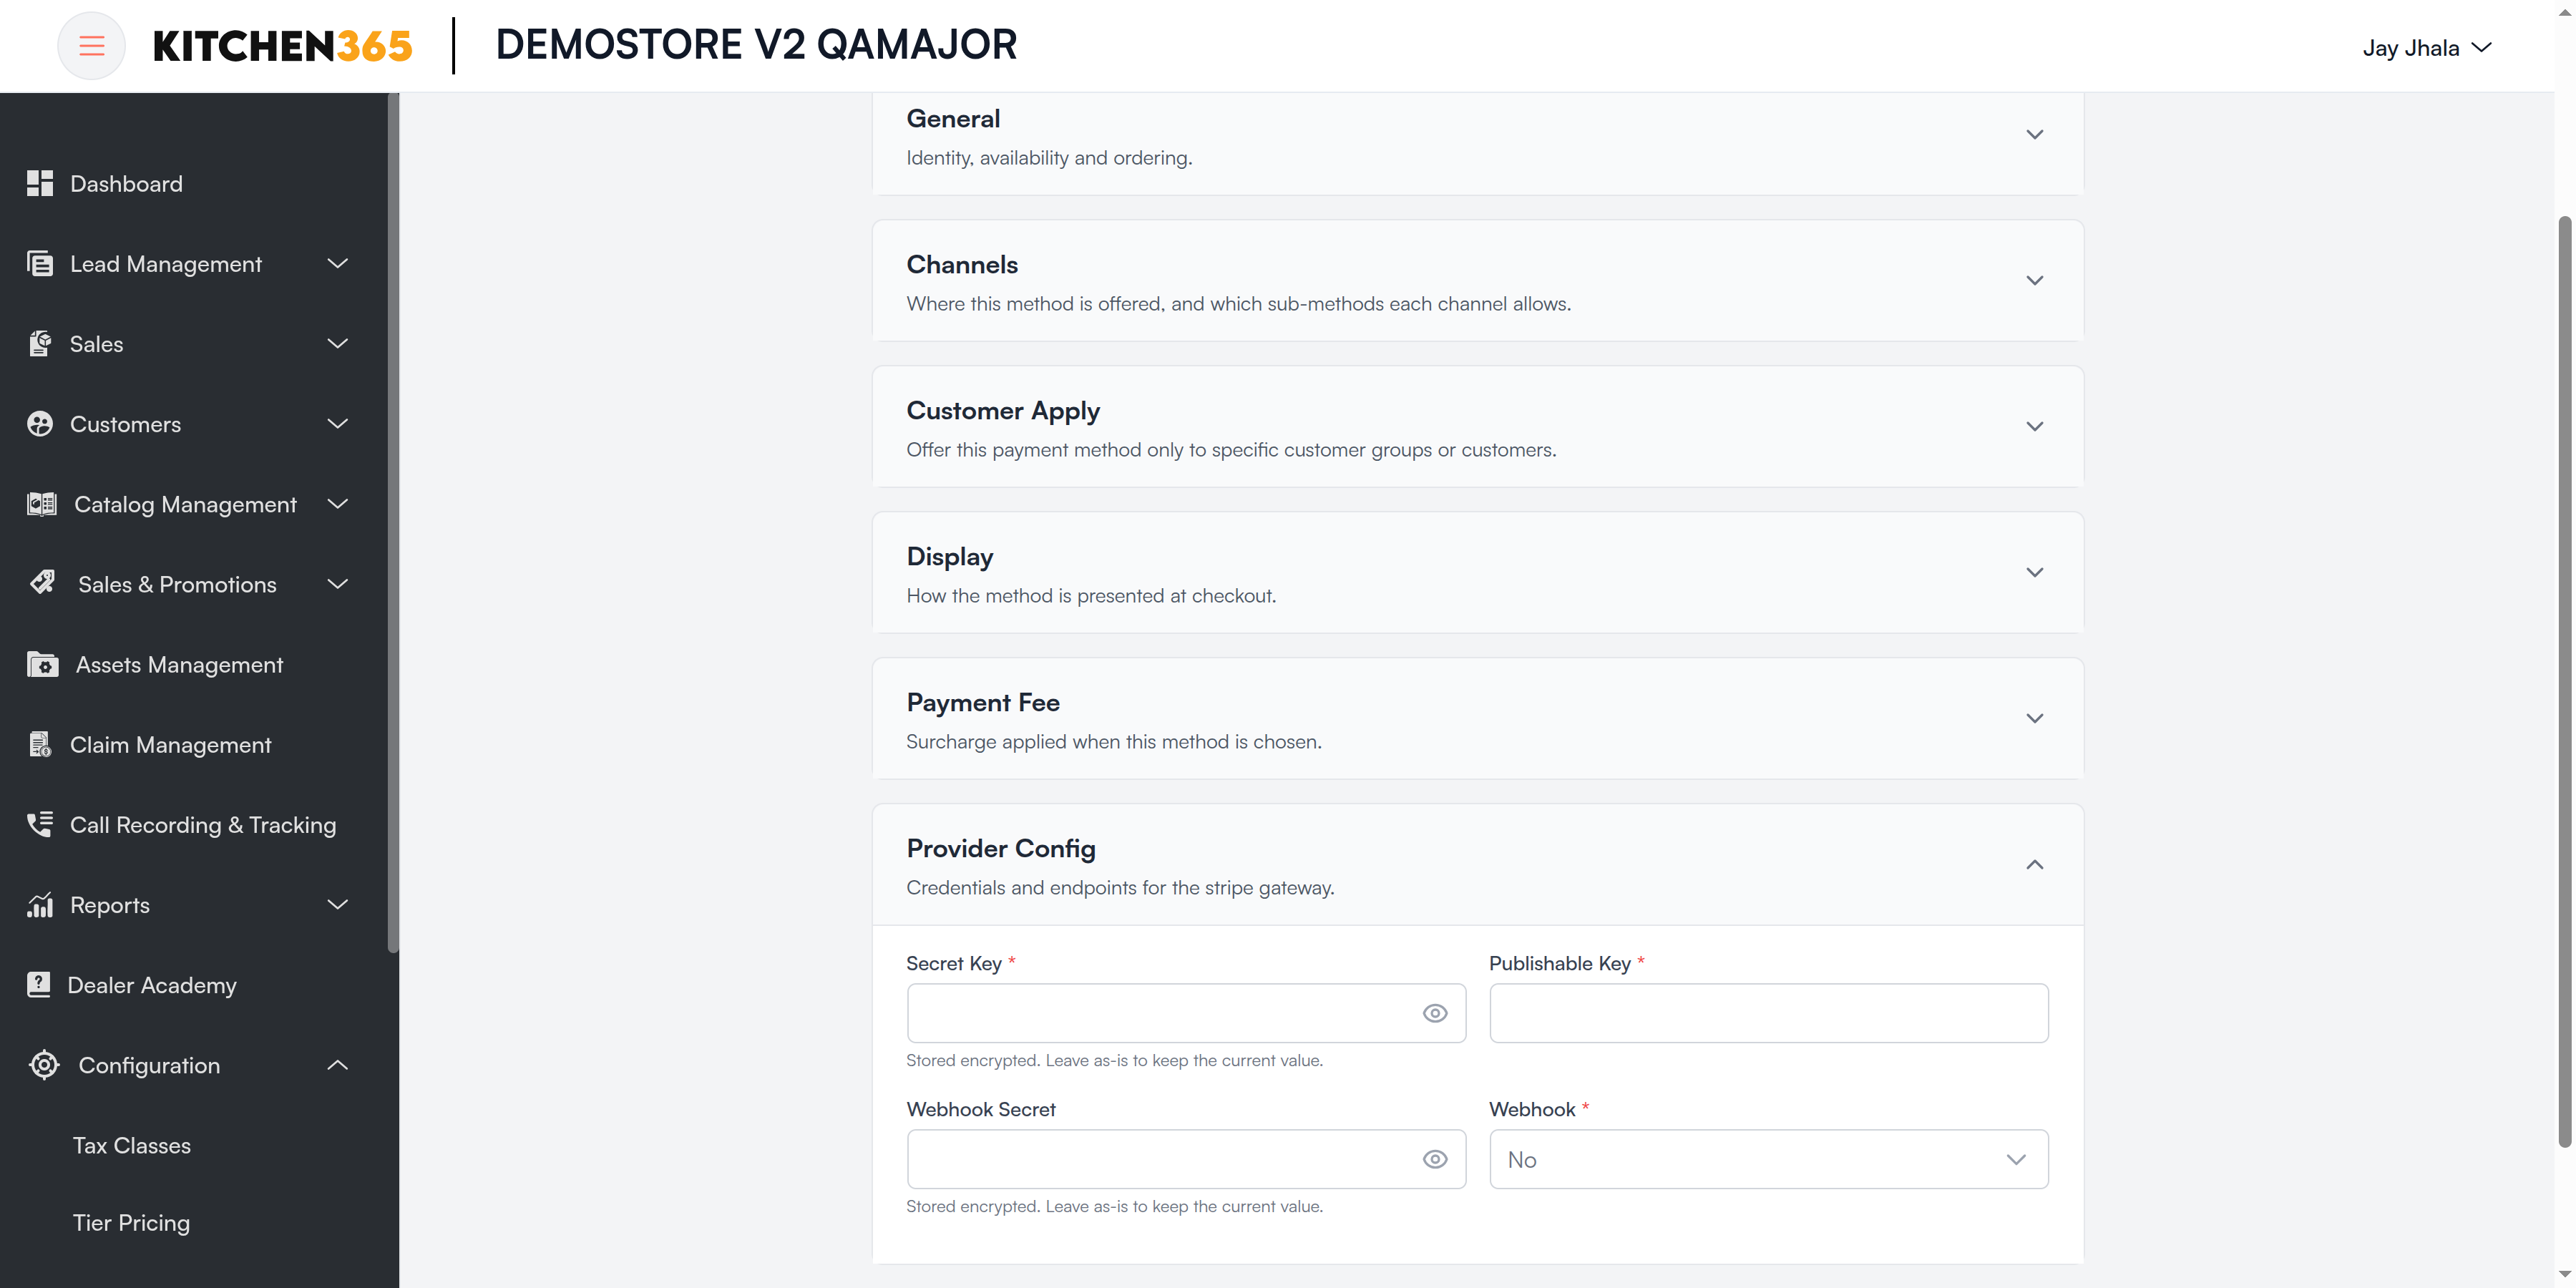
| Field | Required | What it means |
|---|---|---|
| Secret Key | Yes | Stripe secret key (sk_test_… for test, sk_live_… for live). Stored encrypted. |
| Publishable Key | Yes | Stripe publishable key (pk_test_… / pk_live_…). Must be from the same mode as the secret key. |
| Webhook Secret | — | Stripe signing secret. Not used for the webhook check: save the secret on the Payment Method Webhooks page instead. See Webhooks. |
| Webhook | Yes | Yes to receive payment updates from the gateway. See Webhooks. |
Stripe has no URL fields: test or live is decided by the keys.
PayPal
Method: PayPal.
Before you start, from the PayPal Developer Dashboard (Apps & Credentials): create a REST app and copy its Client ID and Secret.
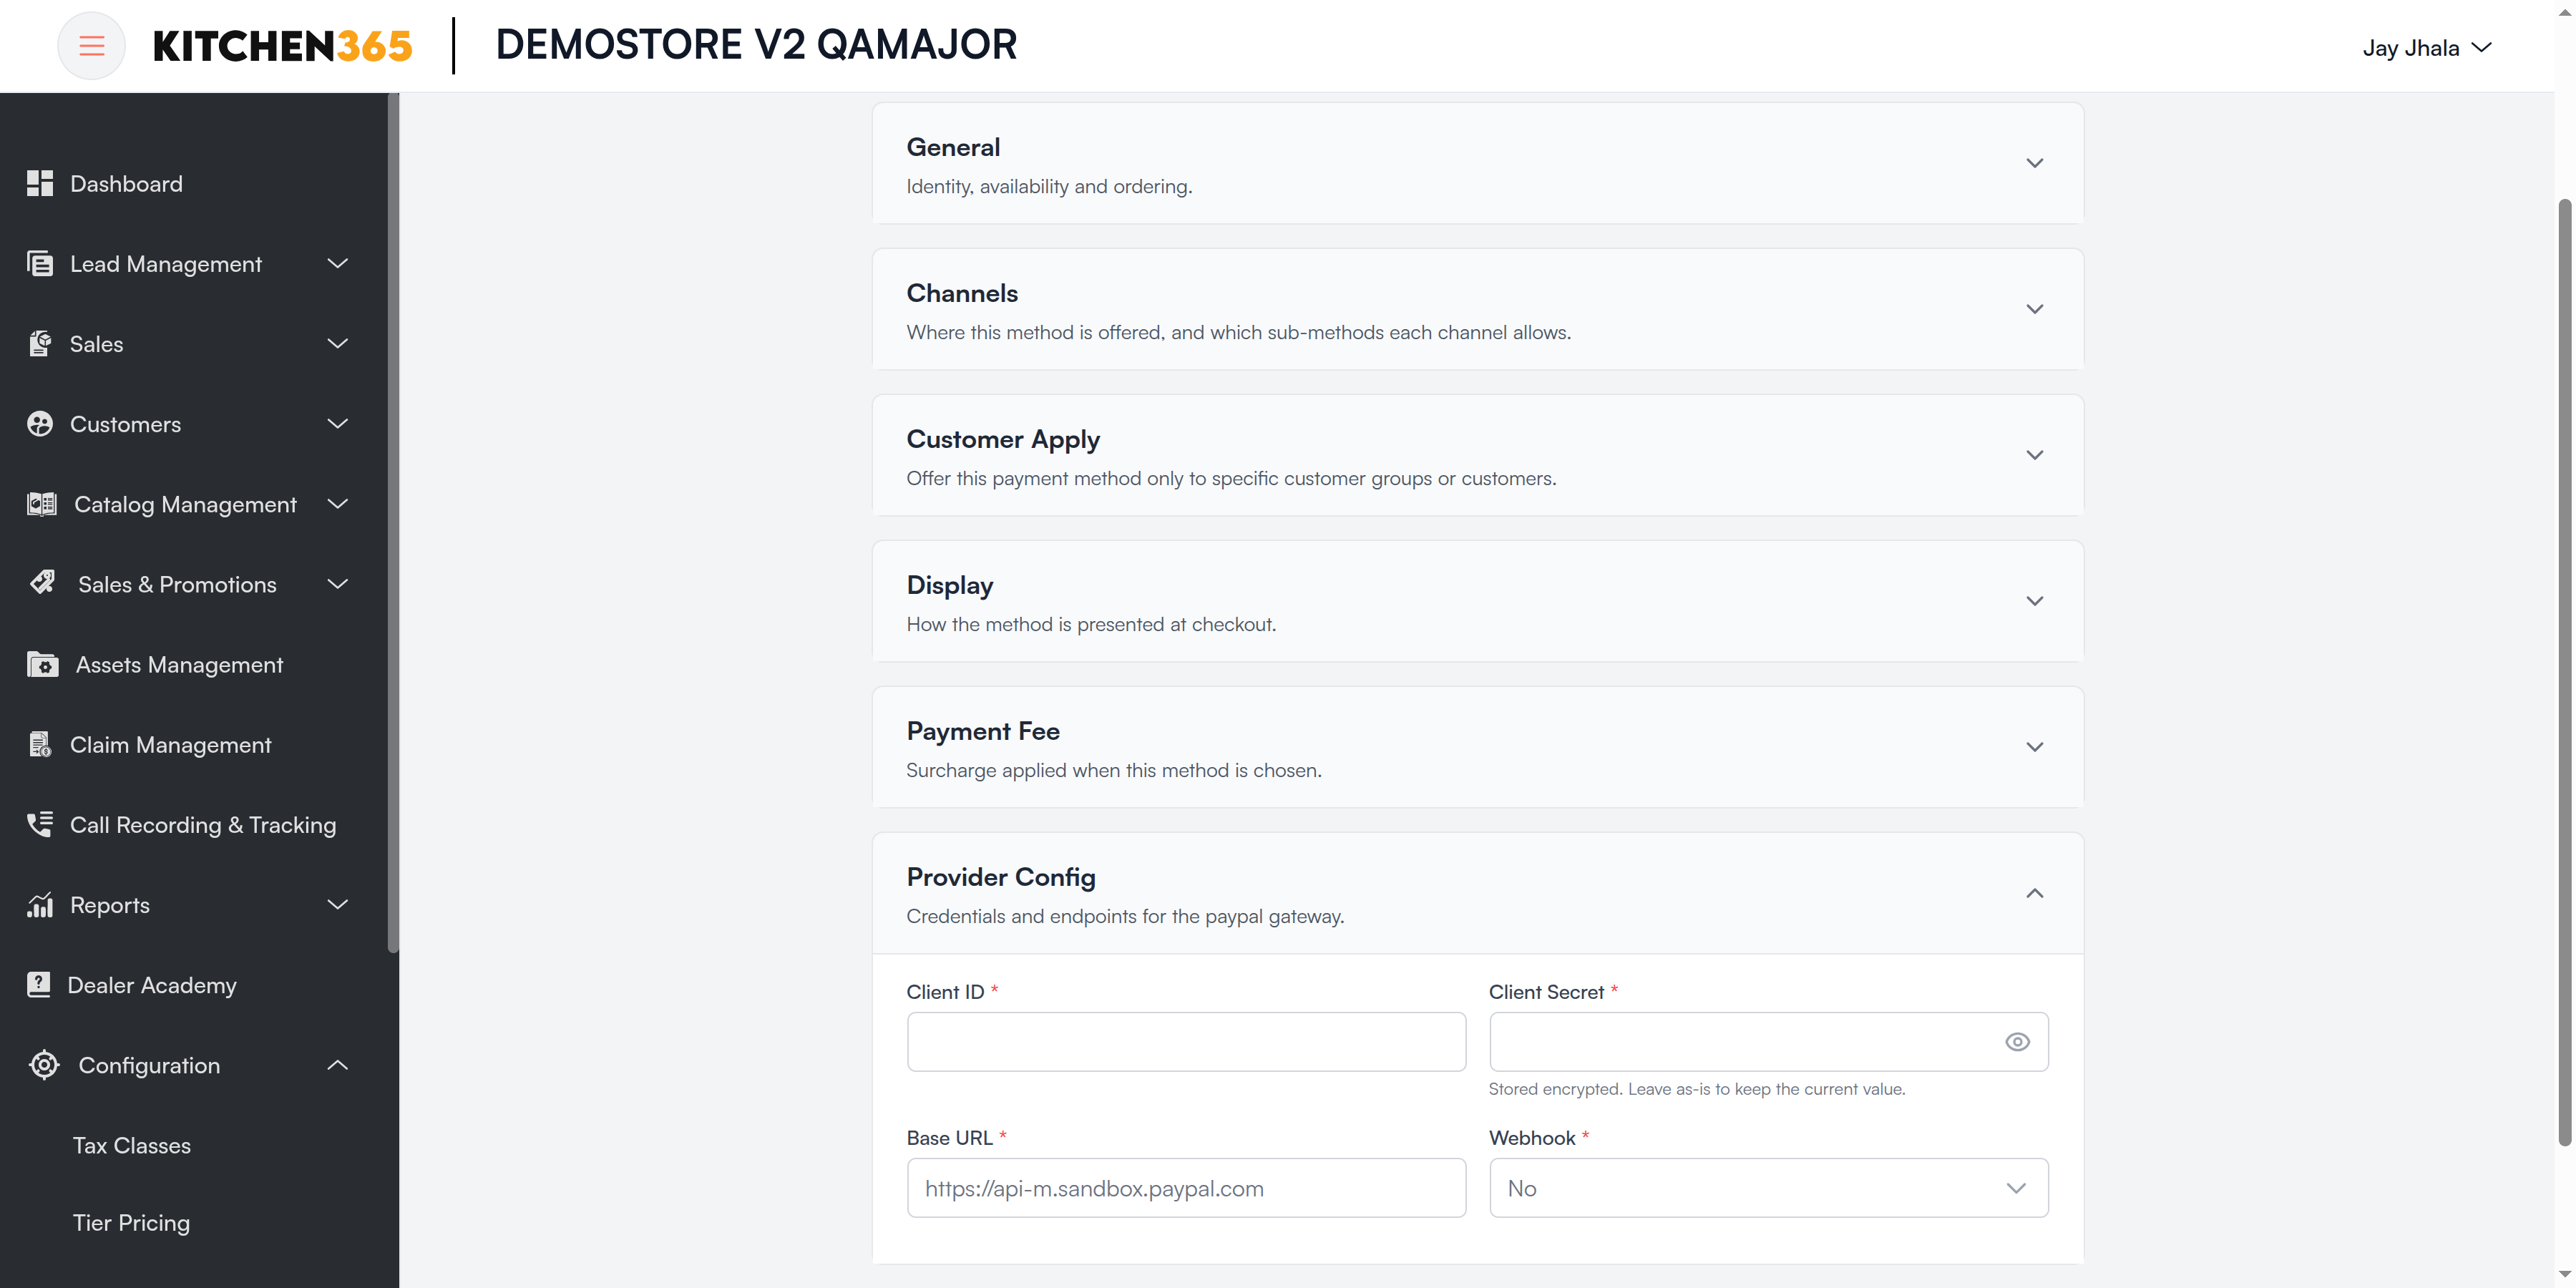
| Field | Required | What it means |
|---|---|---|
| Client ID | Yes | Your PayPal REST app Client ID. |
| Client Secret | Yes | Your PayPal REST app Secret. Stored encrypted. |
| Base URL | Yes | PayPal API. Test: https://api-m.sandbox.paypal.com. Live: https://api-m.paypal.com. |
| Webhook | Yes | Webhook updates are not processed for this gateway yet. Keep No. See Webhooks. |
QuickBooks
Methods: QuickBooks Credit Card, QuickBooks ACH (QuickBooks Payments).
Before you start:
- An Intuit Developer app with QuickBooks Payments: Client ID and Client Secret
- A QuickBooks Payments merchant account
- Your QuickBooks connection set up in QuickBooks Settings
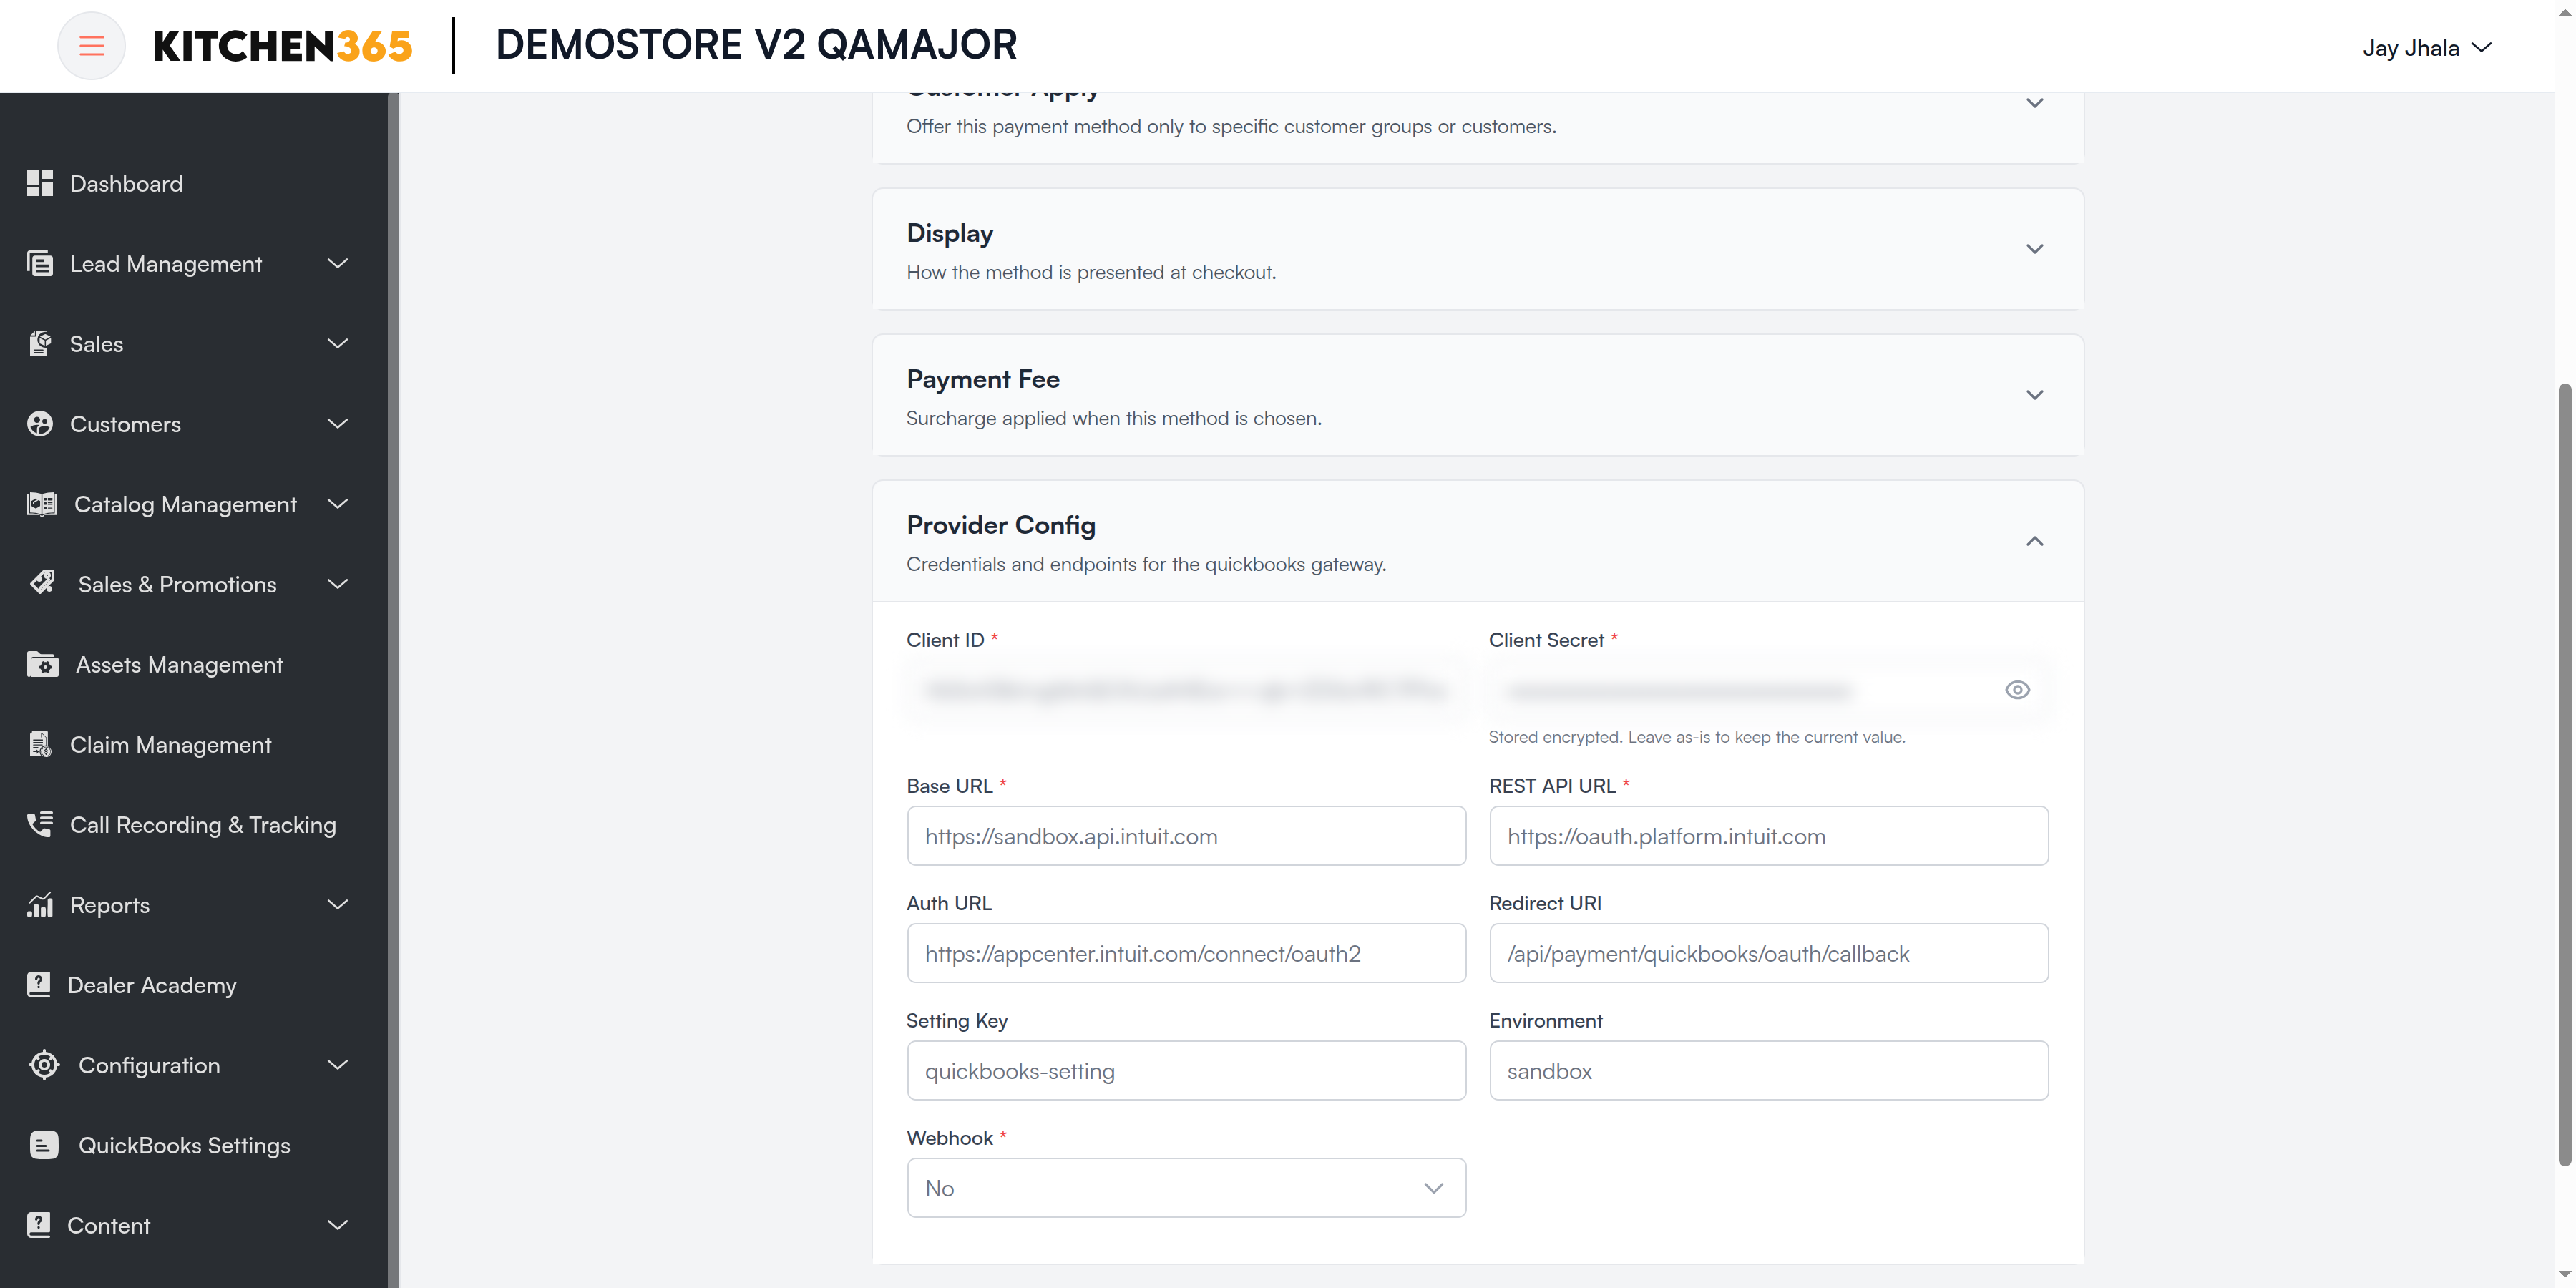
| Field | Required | What it means |
|---|---|---|
| Client ID | Yes | Intuit app Client ID. |
| Client Secret | Yes | Intuit app Client Secret. Stored encrypted. |
| Base URL | Yes | QuickBooks Payments API. Test: https://sandbox.api.intuit.com. Live: https://api.intuit.com. |
| REST API URL | Yes | Intuit sign-in (token) service, normally https://oauth.platform.intuit.com. |
| Auth URL | Yes on ACH | Intuit authorisation page, normally https://appcenter.intuit.com/connect/oauth2. |
| Redirect URI | — | Address Intuit returns to after you connect. Leave the default. |
| Setting Key | Yes on ACH | Links this method to your saved QuickBooks connection. Default quickbooks-setting; leave it unless Kitchen365 advises. |
| Environment | Yes on ACH | sandbox or production. Must match the URLs and keys. |
| Webhook | Yes | Yes to receive payment updates from the gateway. See Webhooks. |
Square
Methods: Square Payment (card), Square ACH Payment.
Before you start, from the Square Developer Dashboard (Applications > your app):
- Credentials: Application ID and Access Token
- Locations: the Location ID that should receive the payments
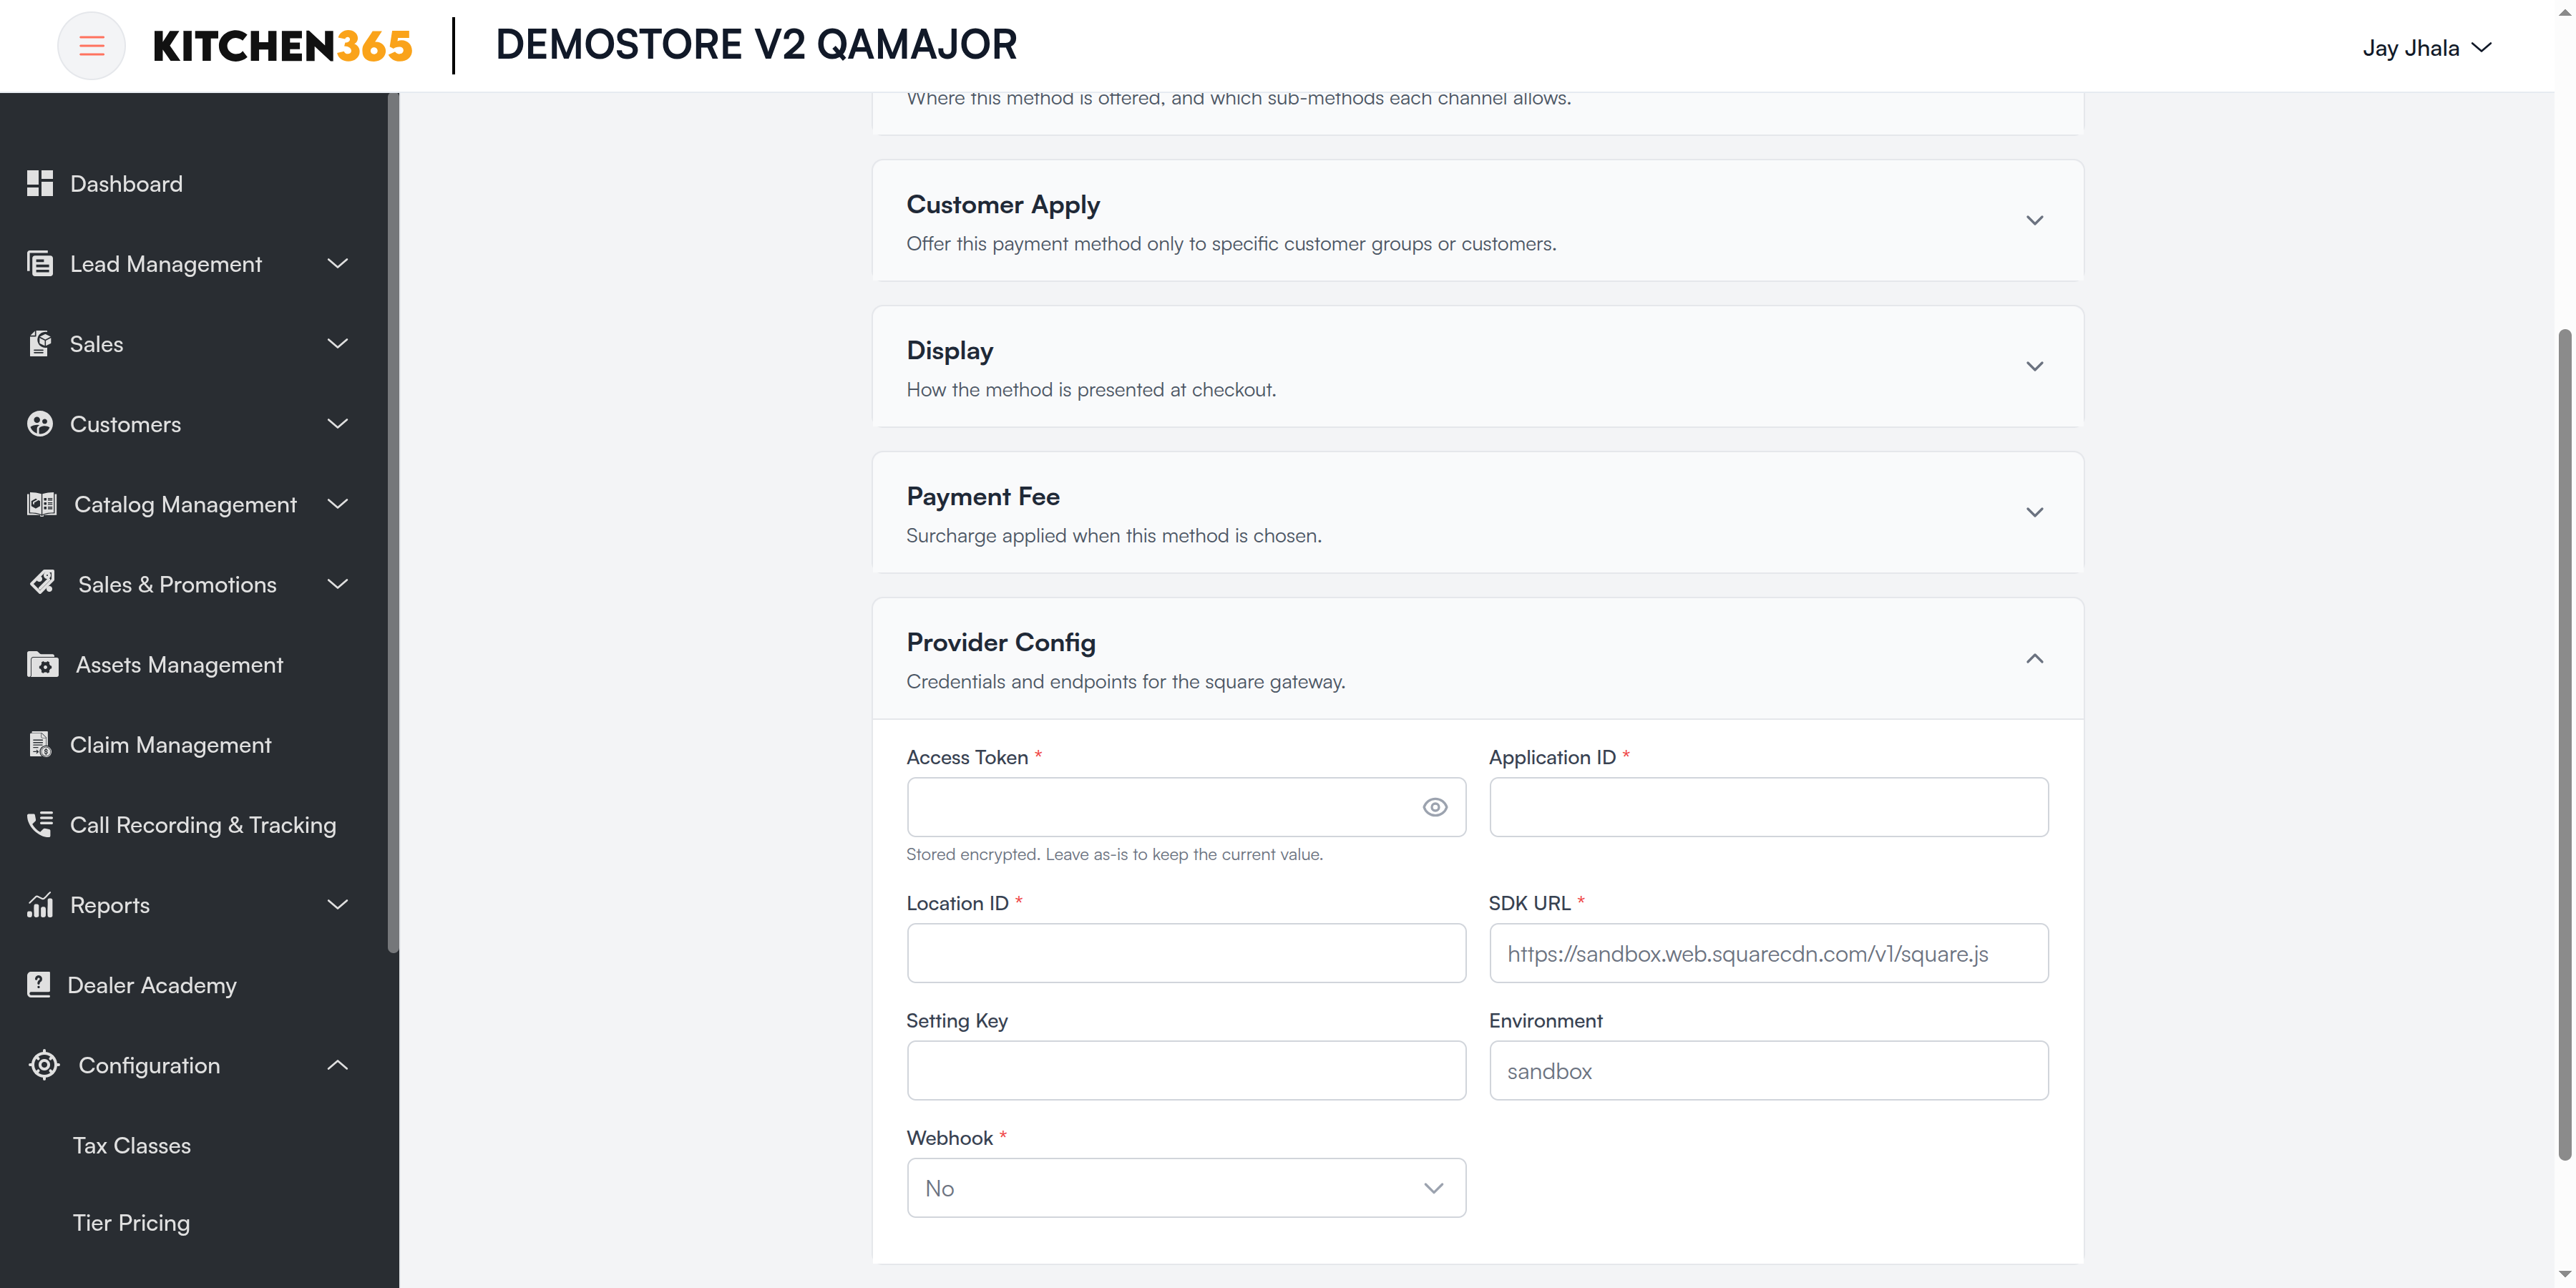
| Field | Required | What it means |
|---|---|---|
| Access Token | Yes | Square access token. Stored encrypted. |
| Application ID | Yes | Square application ID (sandbox-sq0idb-… for test). |
| Location ID | Yes | The Square location the payments are recorded against. |
| SDK URL | Yes | Square payment script. Test: https://sandbox.web.squarecdn.com/v1/square.js. Live: https://web.squarecdn.com/v1/square.js. |
| Setting Key | — | Leave unchanged unless Kitchen365 advises. |
| Environment | — | sandbox or production. |
| Webhook | Yes | Yes to receive payment updates from the gateway. See Webhooks. |
NMI
Methods: NMI Credit Card, NMI ACH.
Before you start, from the NMI merchant portal (Settings > Security Keys):
- A private API key (for Secret Key)
- A public tokenization key (for Public ID)
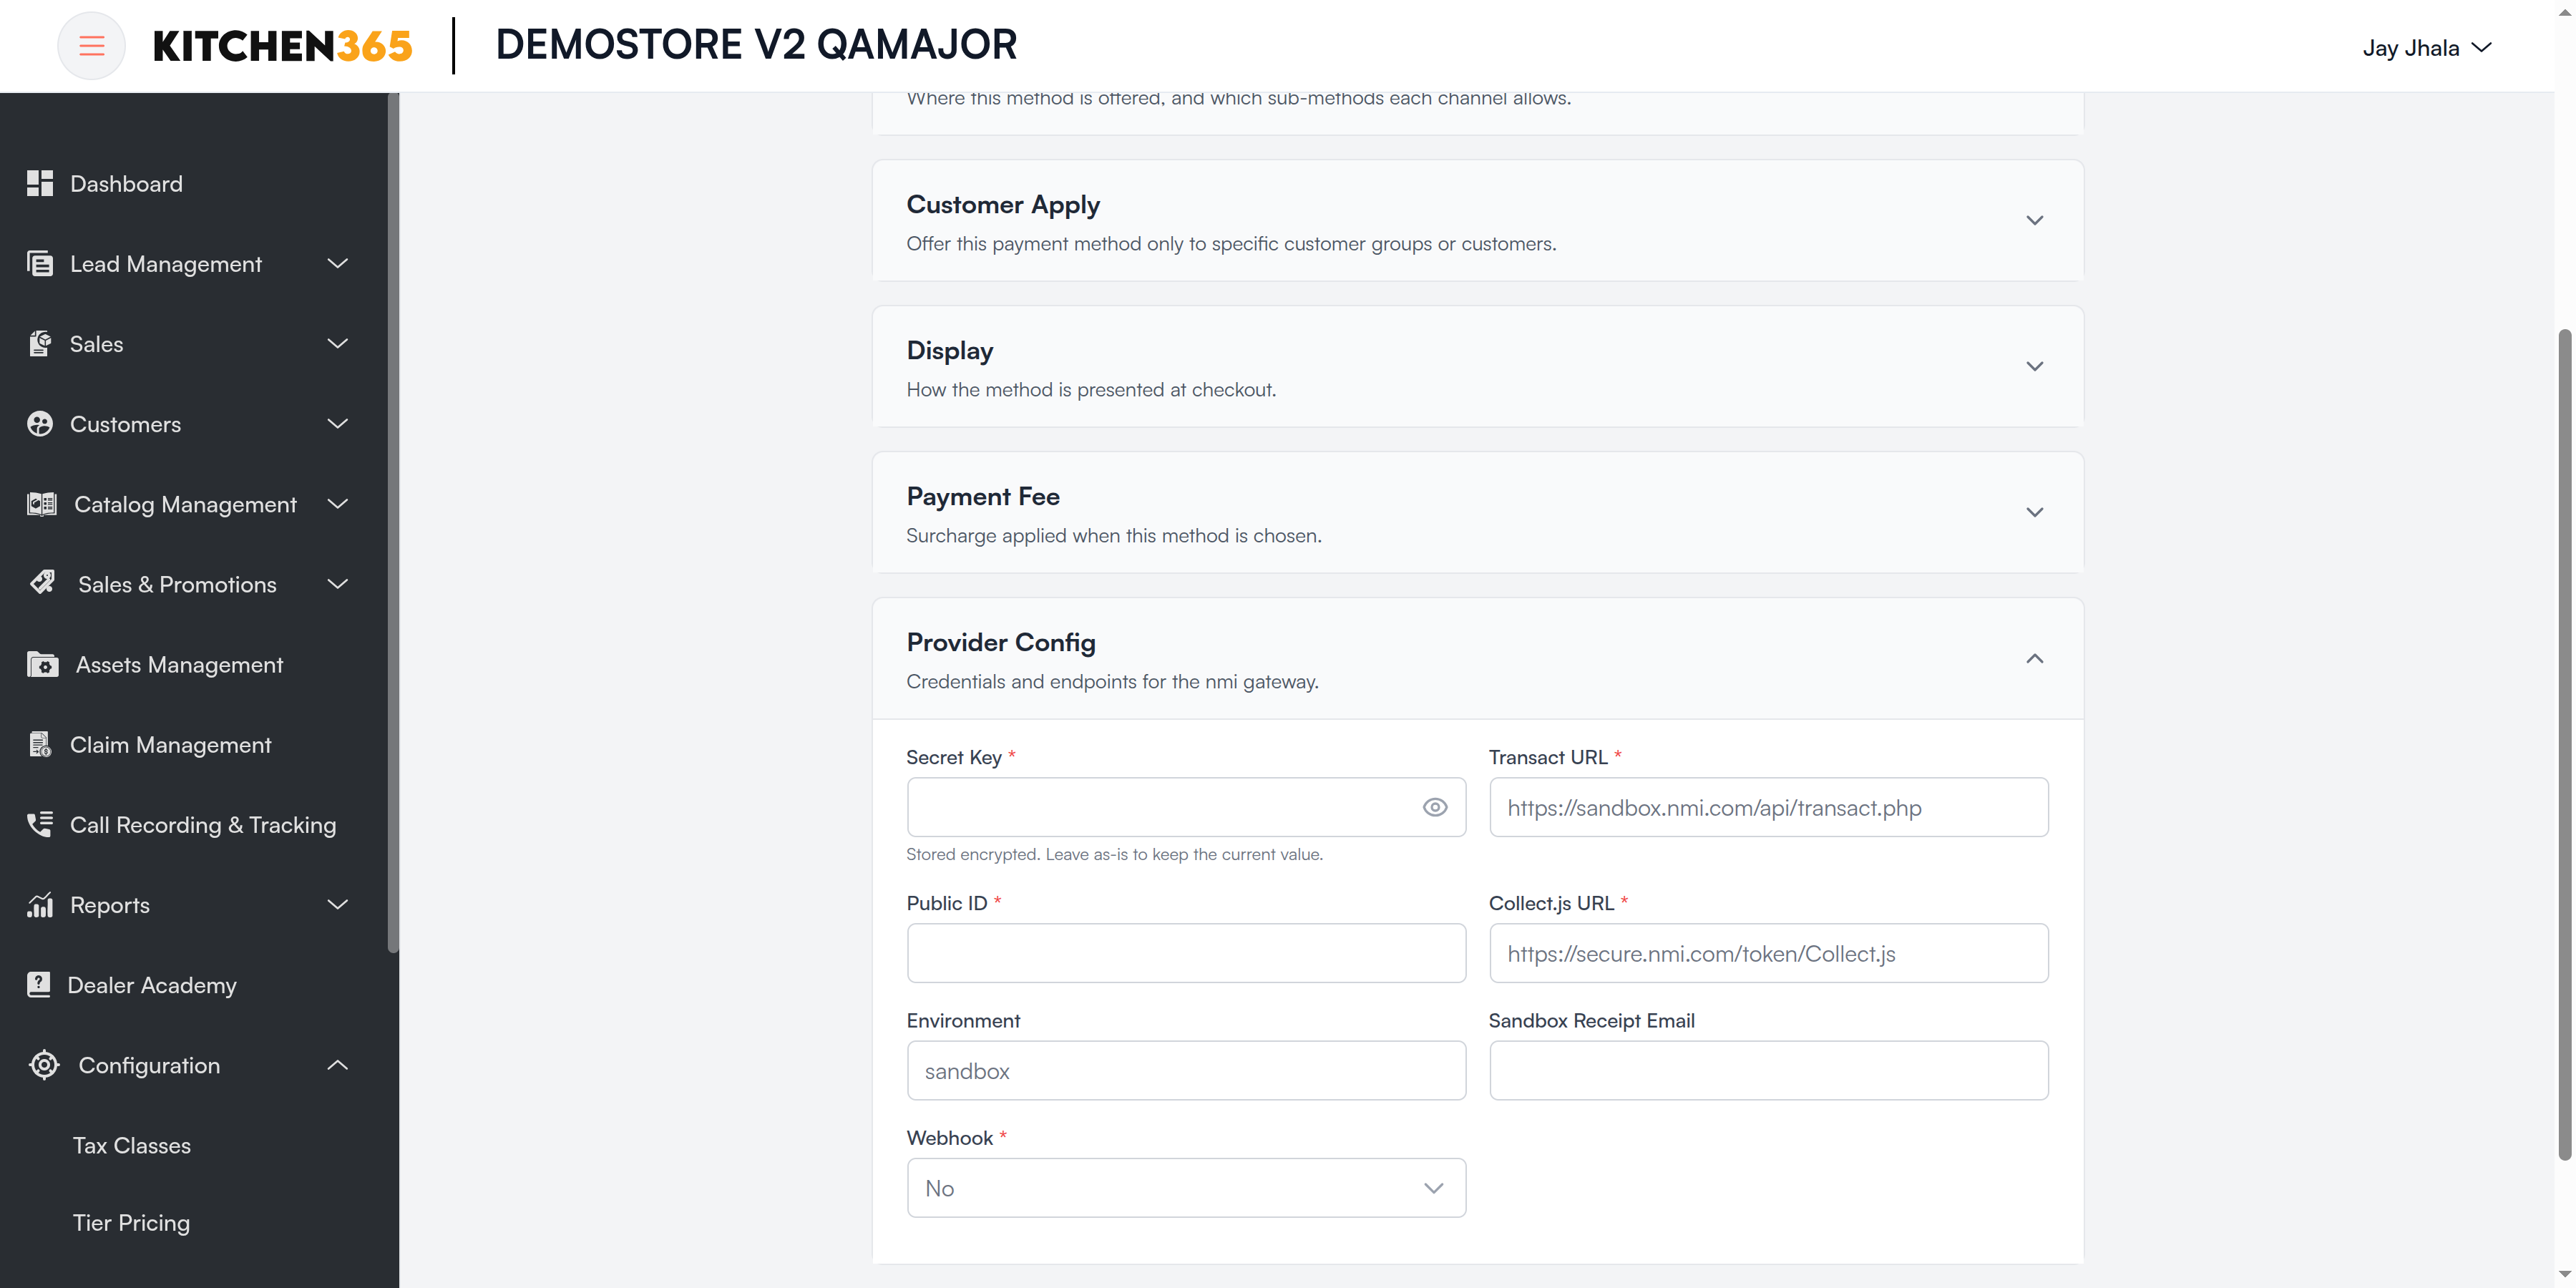
| Field | Required | What it means |
|---|---|---|
| Secret Key | Yes | NMI private API security key. Stored encrypted. |
| Transact URL | Yes | NMI transaction API. Test: https://sandbox.nmi.com/api/transact.php. Live: https://secure.nmi.com/api/transact.php. |
| Public ID | Yes | NMI public tokenization key, used to collect card or bank details securely. |
| Collect.js URL | Yes | NMI payment script, normally https://secure.nmi.com/token/Collect.js. |
| Environment | — | sandbox or production. |
| Sandbox Receipt Email | — | Test only: email address that receives sandbox receipts. |
| Webhook | Yes | Yes to receive payment updates from the gateway. See Webhooks. |
Clover
Method: Credit Card (Clover).
Before you start, from your Clover developer / merchant dashboard: your App ID, Merchant ID and an API access key (token).
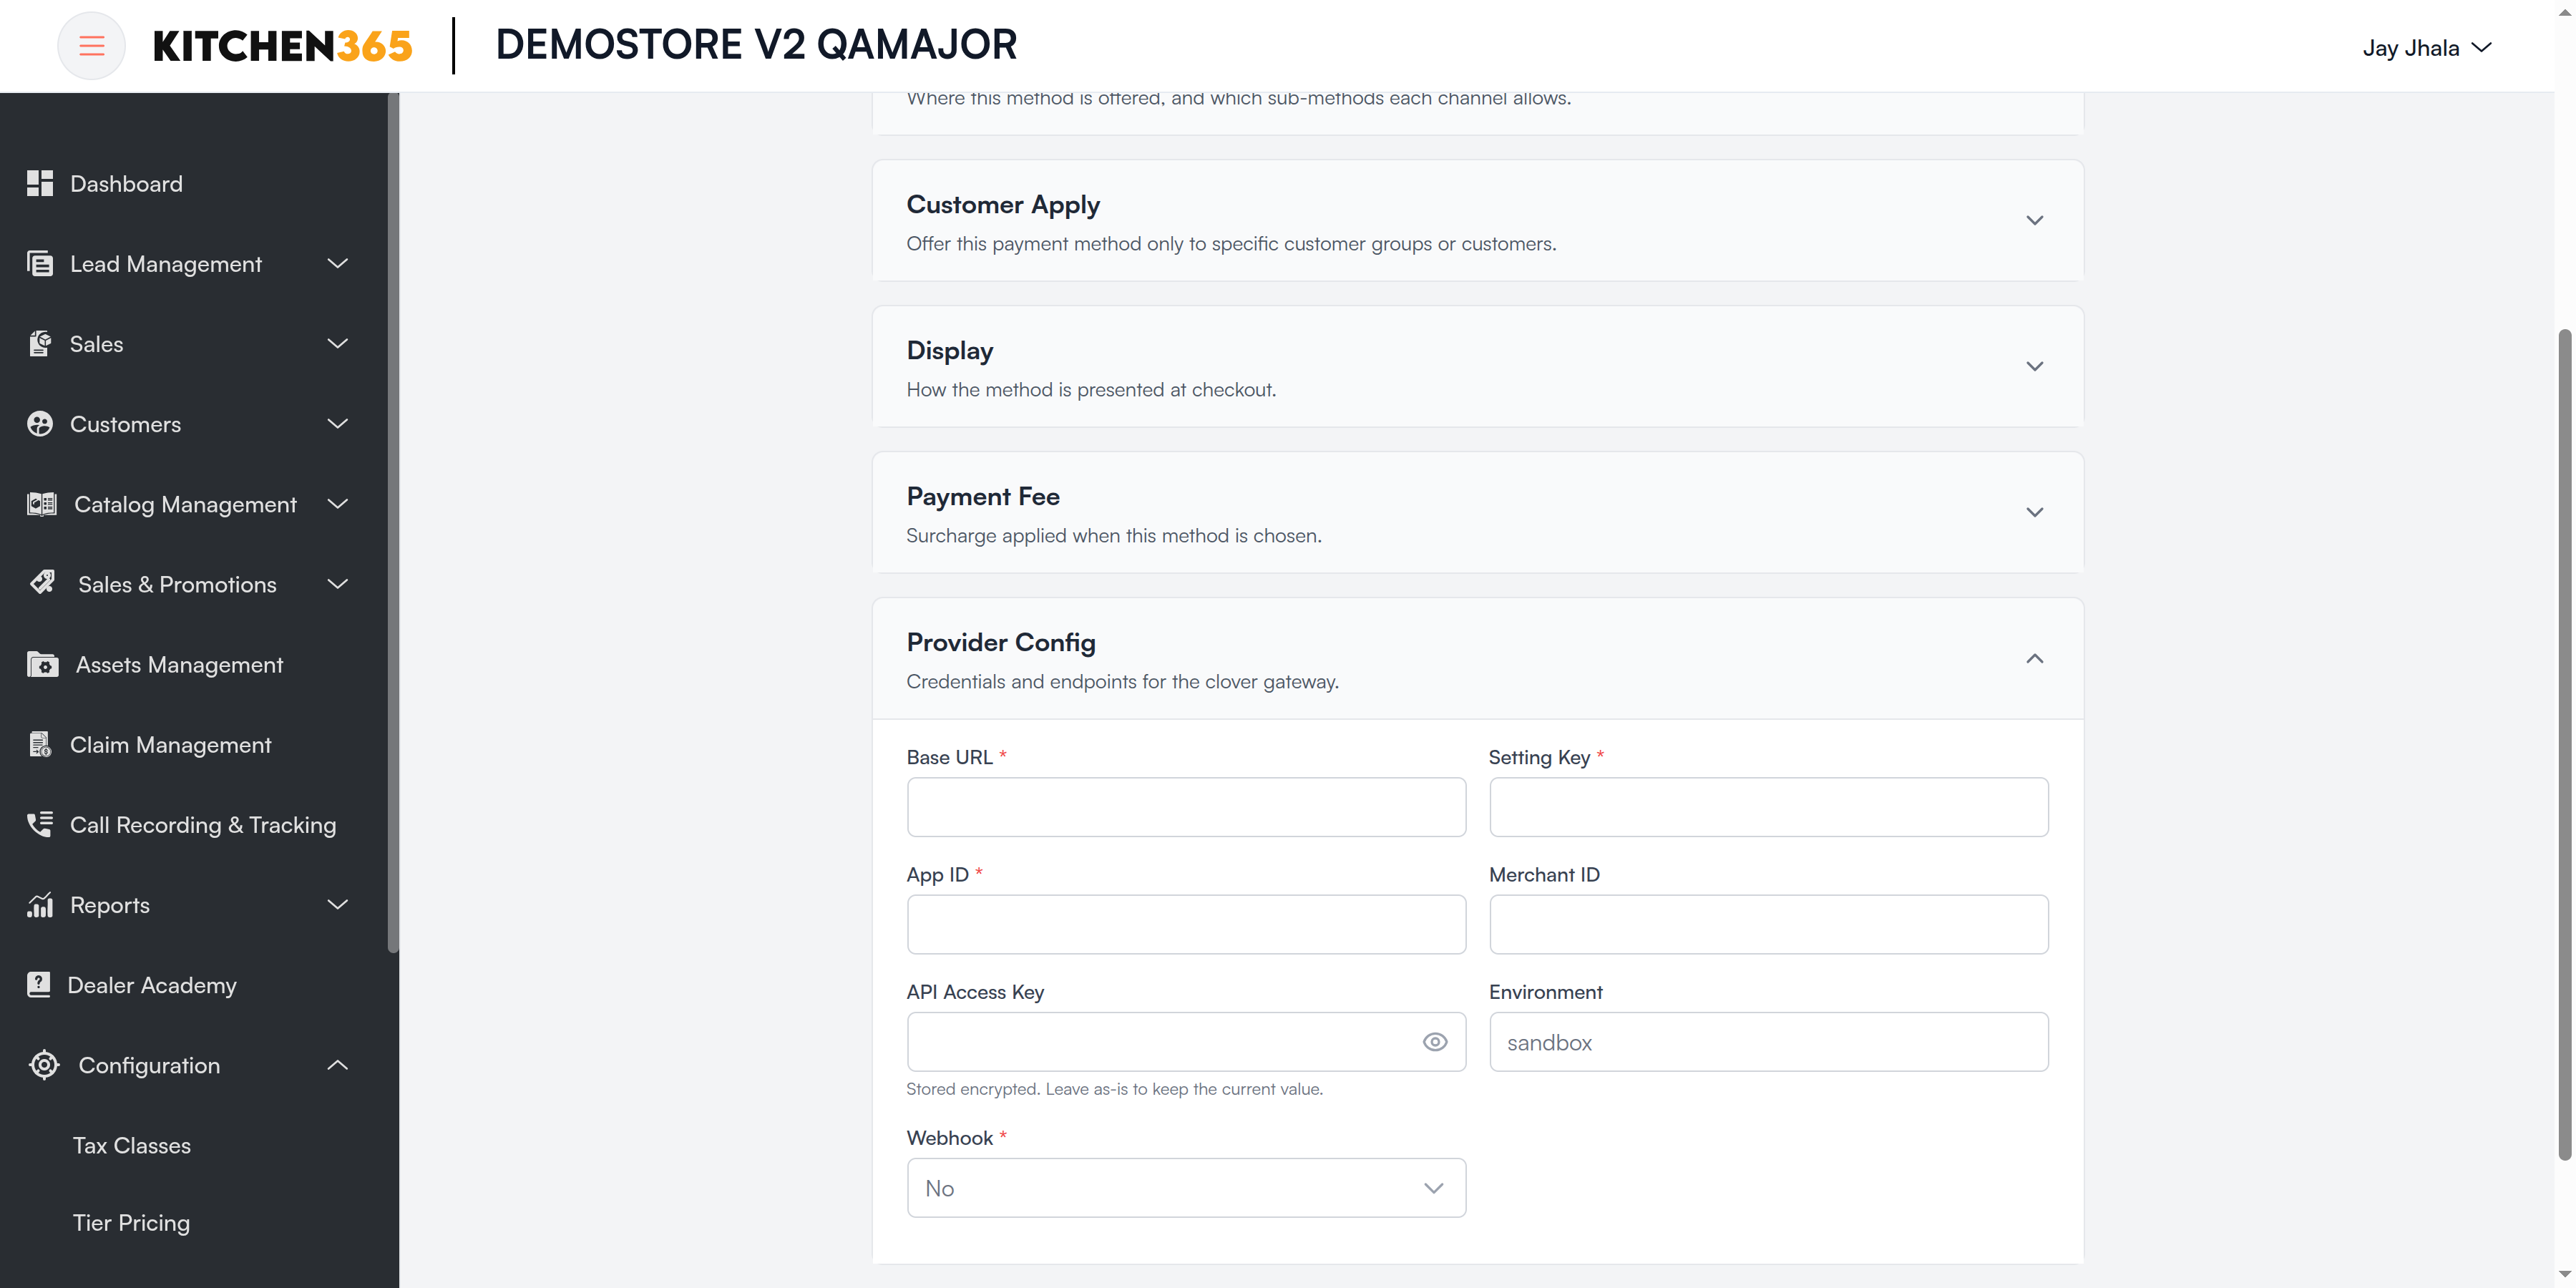
| Field | Required | What it means |
|---|---|---|
| Base URL | Yes | Clover API address for your region and environment (sandbox or production). |
| Setting Key | Yes | Links this method to your Clover setup. Ask Kitchen365 for the value. |
| App ID | Yes | Your Clover app ID. |
| Merchant ID | — | Your Clover merchant ID. |
| API Access Key | — | Clover API token. Stored encrypted. |
| Environment | — | sandbox or production. |
| Webhook | Yes | Webhook updates are not processed for this gateway yet. Keep No. See Webhooks. |
Offline Methods
Cash On Delivery, Money Order and Bank Transfer don't use a gateway, so they have no Provider Config section. The order is placed and you record the payment when the money arrives.
| Method | What the customer does | Default extra checkout field |
|---|---|---|
| Cash On Delivery | Pays in cash when the order is delivered. | — |
| Money Order | Sends a money order to your store address. | Money Order Number |
| Bank Transfer | Transfers the amount to your bank account, using the Order ID as reference. | Transaction ID |
Configuration steps
- Add the method and open Edit Payment Method (see Configuration Steps).
- Keep Is Online = No and Capture Offline = Yes.
- In Display, write clear instructions in Notice, e.g. your mailing address for money orders, or your bank details for bank transfers.
- Optionally limit it with Customer Apply, e.g. Money Order for trade customers only.
- Enable it and save.
Split Payment
Split Payment lets the order total be paid in more than one installment. It does not charge anything itself; each installment is taken by the method it depends on.
| Field | Required | What it means |
|---|---|---|
| Depends On (General) | Yes | The payment method used to take each installment, e.g. Stripe Credit card. That method must be configured and enabled. |
All other sections are the common settings. There is no Provider Config.
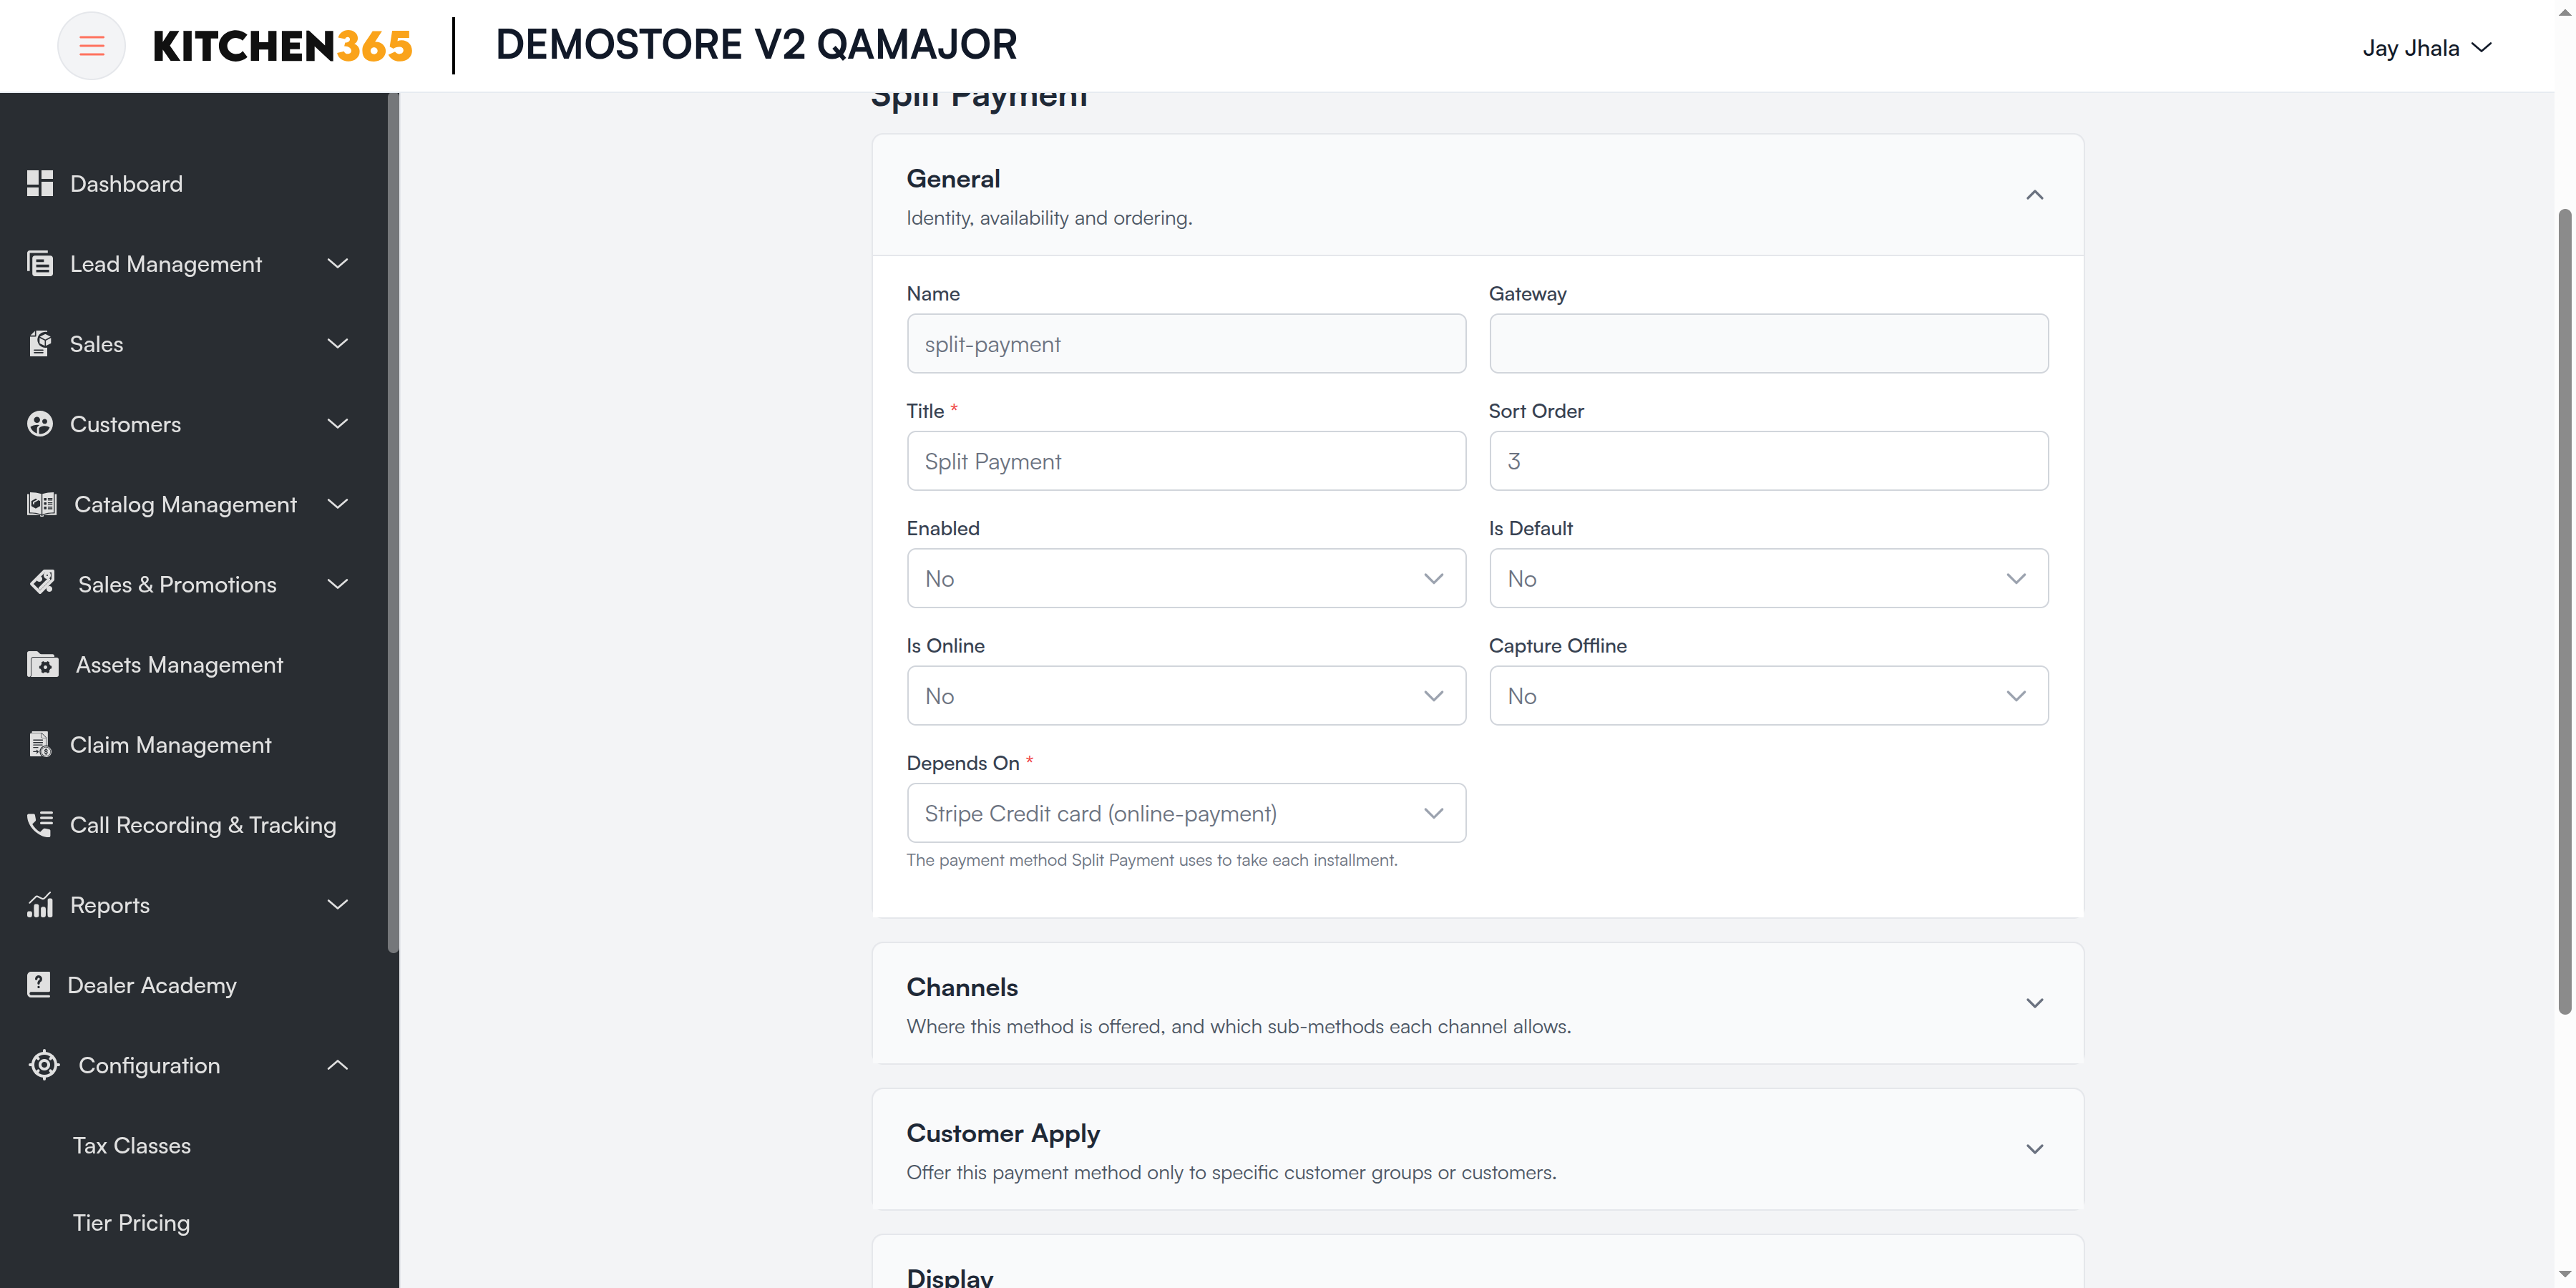
Split Payment is in the catalog, but the full split-payment checkout is still being rolled out. Check with Kitchen365 before enabling it on your website.
Webhooks
A webhook is a message the payment gateway sends to your website when a payment changes, for example when an ACH payment settles, fails, is returned or is refunded. Kitchen365 uses it to update the payment and the order automatically, without staff checking the gateway.
Webhooks matter most for ACH / bank payments. A bank payment is accepted at checkout but only settles (or bounces) a few days later, and the webhook is how Kitchen365 finds out.
Which gateways support webhooks
| Gateway | Webhook updates | What is processed |
|---|---|---|
| Stripe | Yes | Card and ACH payment updates, and refunds. |
| Square | Yes | Payment updates (card and ACH), and refunds. |
| Authorize.Net | Yes | ACH (eCheck) payment capture and void. |
| NMI | Yes | ACH (eCheck) transactions only. Card events are ignored. |
| QuickBooks | Yes | Payment and ACH (eCheck) updates, including ACH returns. |
| PayPal | Not yet | Received but not processed. Keep Webhook = No. |
| Clover | Not yet | Keep Webhook = No. |
How the flow works
Gateway (Stripe, Square, …)
   │  sends event
   ▼
https://<your-website-domain>/api/payment/webhook/
   │  1. replies "received" straight away
   │  2. works out which gateway sent it
   │  3. checks the signature with the secret saved in the Console
   │     (invalid signature → event ignored)
   │  4. finds the order payment by the gateway's transaction ID
   │  5. updates the payment status
   │  6. updates the order status (when needed)
   ▼
Order history gets a note: "payment … reported as … "
There is one webhook address for every gateway. Kitchen365 recognises the gateway from the message itself.
What happens to the payment and the order
| Gateway reports | Payment status becomes | Order status becomes |
|---|---|---|
| Succeeded / settled / captured | Completed | Processing (on v2, the invoice is created automatically) |
| Pending / processing / submitted | Pending | No change |
| On hold / requires action | On Hold | No change |
| Failed / declined / canceled | Failed | Pending Payment |
| ACH returned / reversed / chargeback | Failed (reason kept) | Pending Payment |
| Voided | Failed (reason kept) | Pending Payment |
| Refund succeeded / pending / failed | The refund's status is updated | No change |
Safety rules built into the flow:
- A payment never moves backwards. If events arrive late or out of order, an older "pending" can't undo a "completed".
- Failures are final. An ACH payment can succeed and then be returned days later; the return wins and the order goes back to Pending Payment.
- Repeated events are ignored. Gateways often send the same event more than once; it is applied only once.
- Finished orders are protected. A webhook never changes an order that is Canceled, Closed, Complete or marked Fraud.
- Every update adds a line to the order history, so you can see exactly what the gateway reported.
Set up a webhook
Do this once per gateway. It covers both the card and the ACH method of that gateway.
Step 1: Create the webhook at the gateway
In your gateway's dashboard, add a webhook (sometimes called an endpoint or subscription):
- URL:
https://<your-website-domain>/api/payment/webhook/, for examplehttps://www.yourstore.com/api/payment/webhook/. - Events: see the table below.
- Copy the signing secret / signature key the gateway gives you.
Keep the trailing slash (/webhook/) and use your live website domain with https. Without the slash, the gateway's message is redirected and may never arrive. Square also includes the URL in its signature, so the URL registered in Square must match exactly.
| Gateway | Where to add it | Events to subscribe to | Secret to copy |
|---|---|---|---|
| Stripe | Developers > Webhooks > Add endpoint | payment_intent.succeeded, payment_intent.payment_failed, payment_intent.processing, payment_intent.canceled, payment_intent.requires_action, refund.created, refund.updated, refund.failed | Signing secret (whsec_…) |
| Square | Developer Dashboard › your app › Webhooks > Subscriptions | payment.created, payment.updated, refund.created, refund.updated | Signature key |
| Authorize.Net | Account > Settings > Webhooks | net.authorize.payment.authcapture.created, net.authorize.payment.void.created | Signature Key (Account > Settings > API Credentials & Keys) |
| NMI | Merchant portal Settings > Webhooks | Transaction sale, capture, auth, void and refund events (success and failure) | Signing key |
| QuickBooks | Intuit Developer › your app › Webhooks | Payment / eCheck (ACH) events | Verifier token |
Step 2: Save the secret in the Console
-
Open Configuration > Payment Methods and click Edit on the method.
-
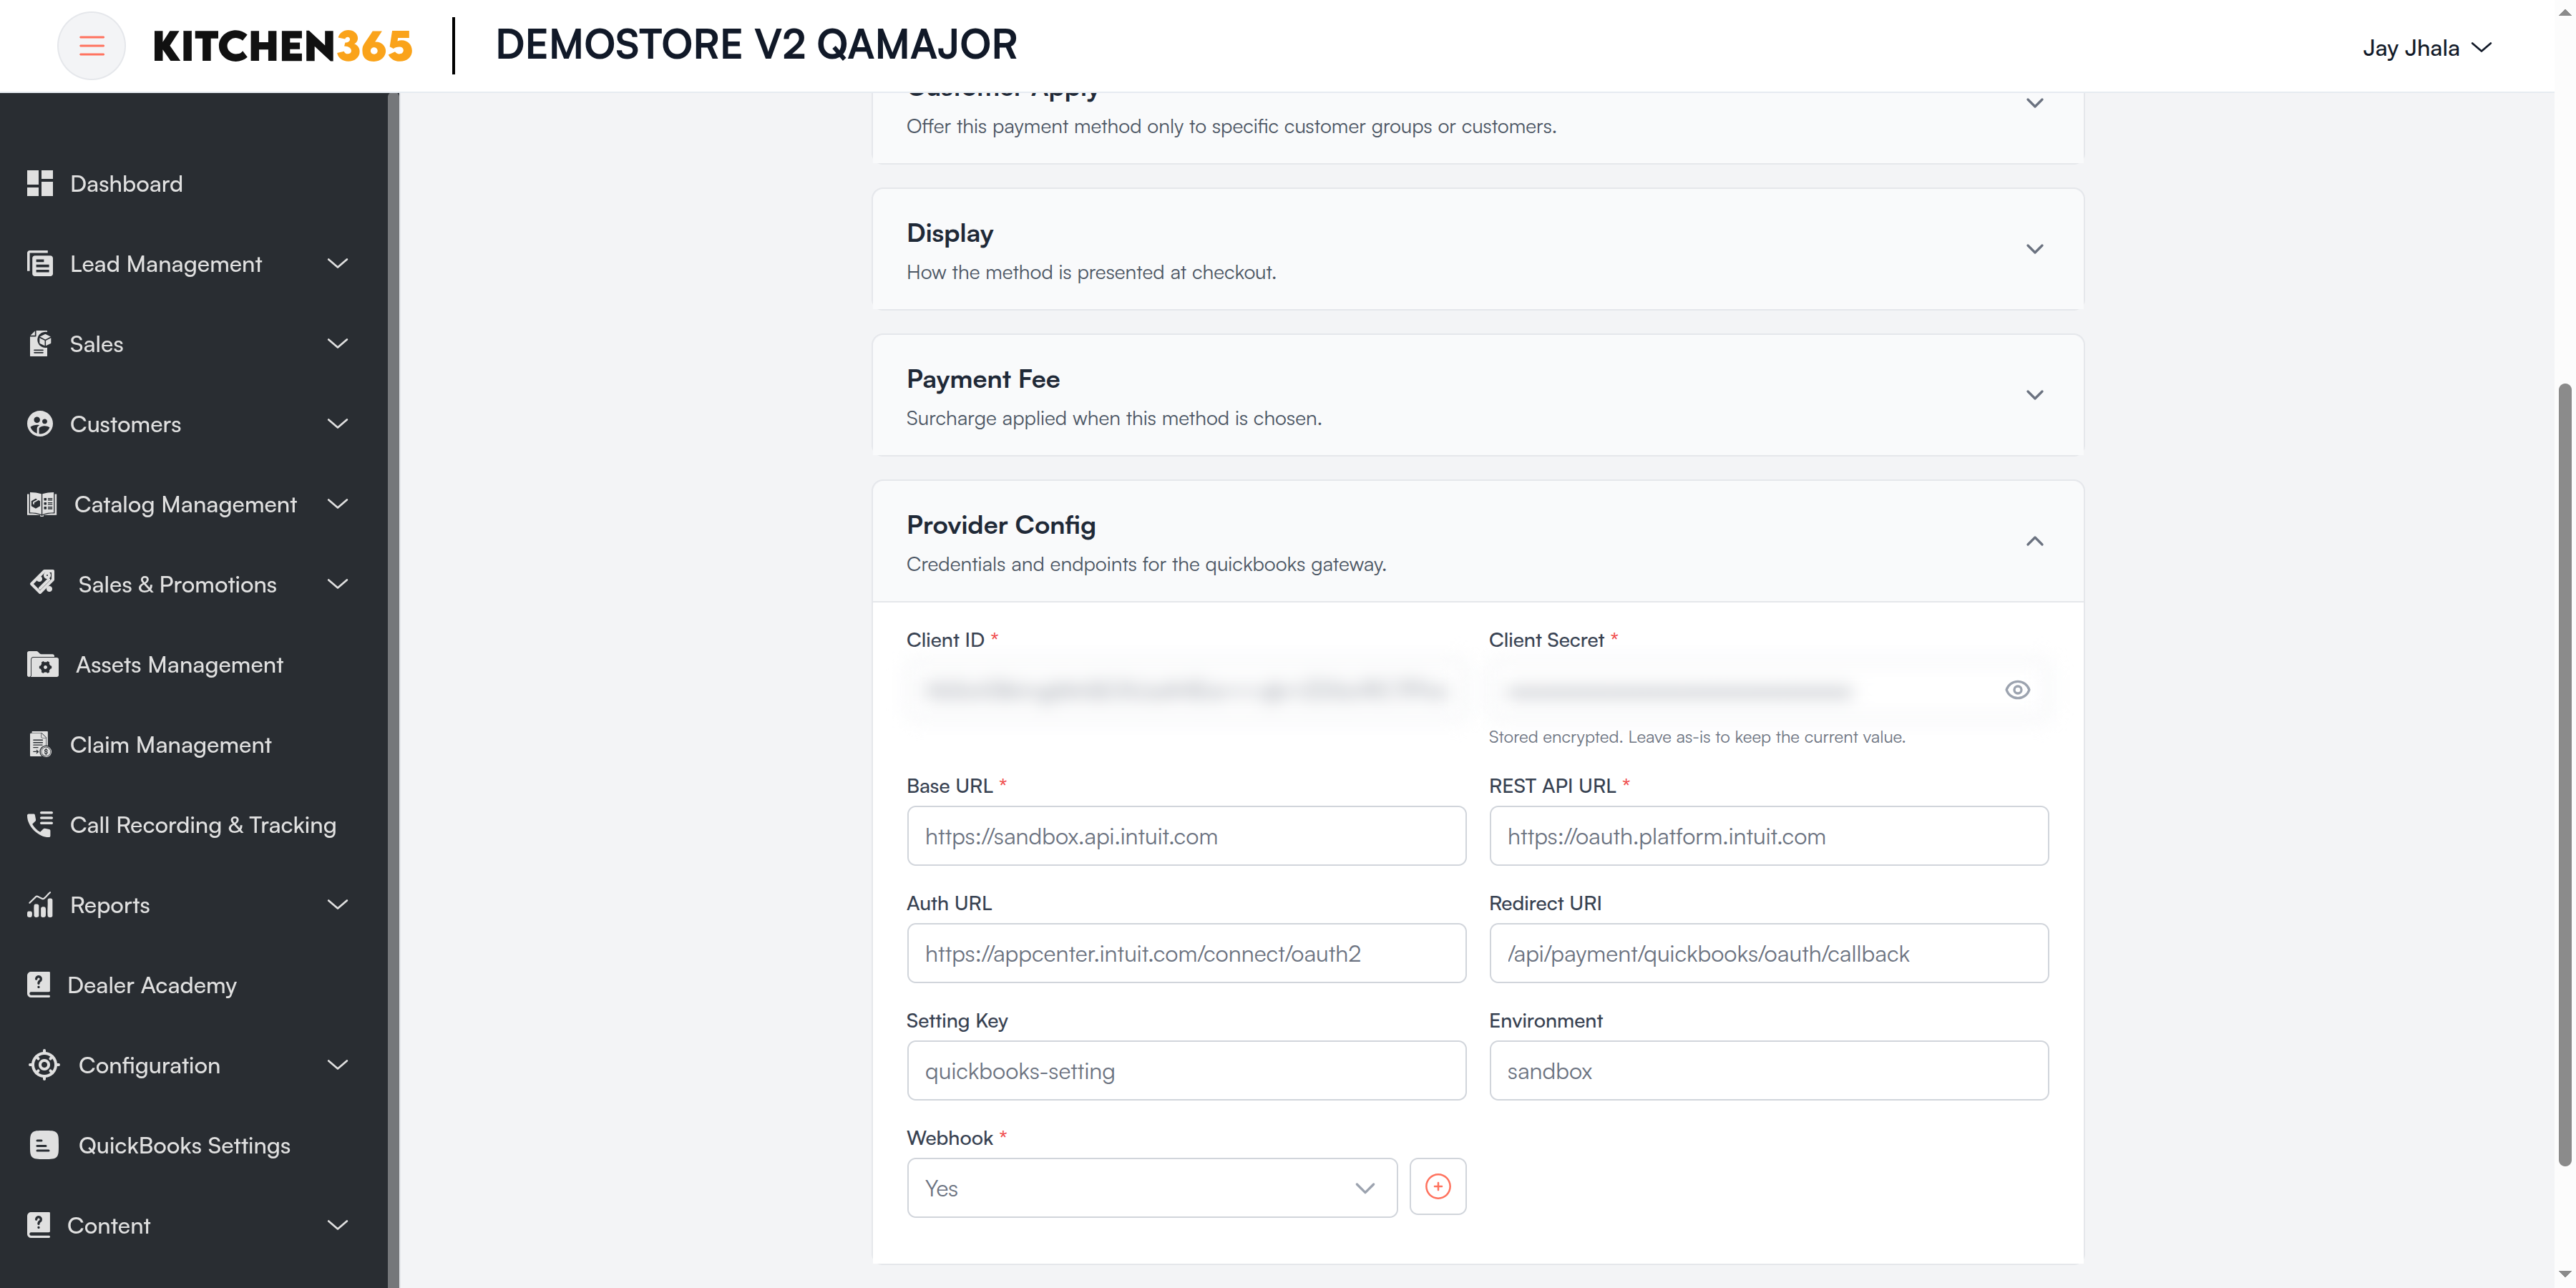
In Provider Config, set Webhook to Yes. A + (Manage webhooks) button appears next to it.
-
Click +. The Payment Method Webhooks page opens.
-
Click Add Webhook and fill in:
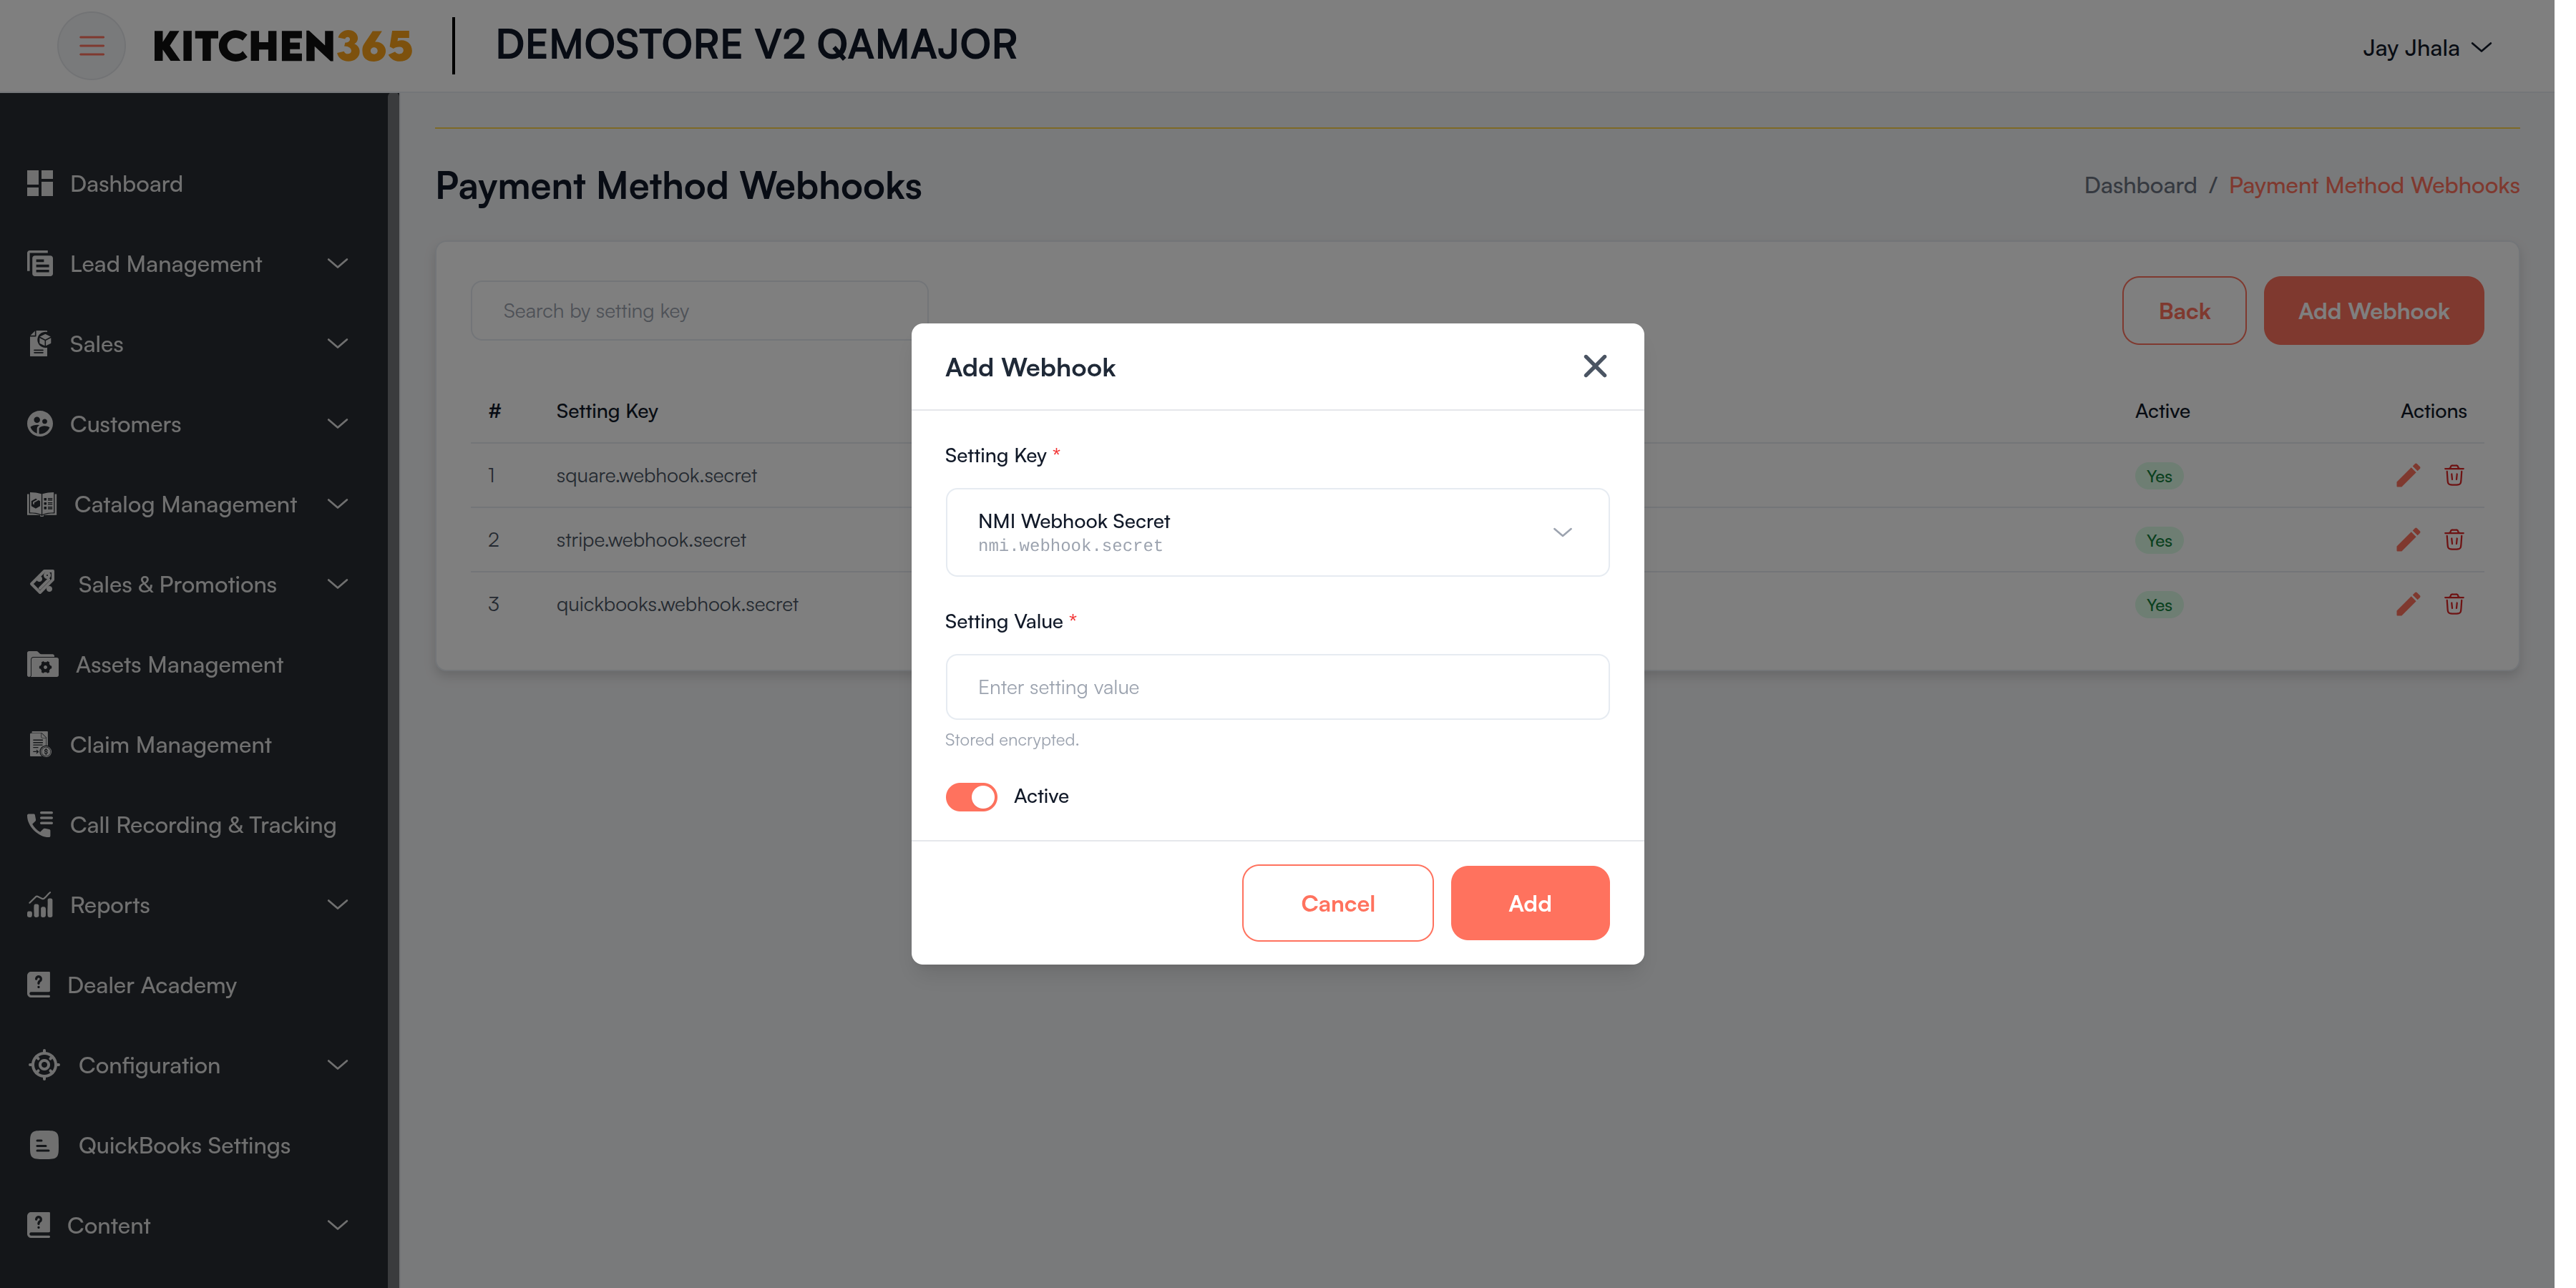
| Field | Required | What it means |
|---|---|---|
| Setting Key | Yes | Which gateway the secret is for. The key for this method's gateway is preselected: Stripe Webhook Secret, Square Webhook Secret, Authorize.Net Webhook Secret, NMI Webhook Secret or QuickBooks Webhook Secret. Keys already added show Added. |
| Setting Value | Yes | Paste the signing secret from Step 1. Stored encrypted. |
| Active | — | On (default): the secret is used. Off: webhooks from this gateway are rejected. |
- Click Add. The message "Webhook added" appears.
- Click Back, then Submit and Yes, save changes on the payment method.
Step 3: Test
Send a test event from the gateway dashboard, or place a small test ACH order, and check that the order's payment status and history update.
Payment Method Webhooks page
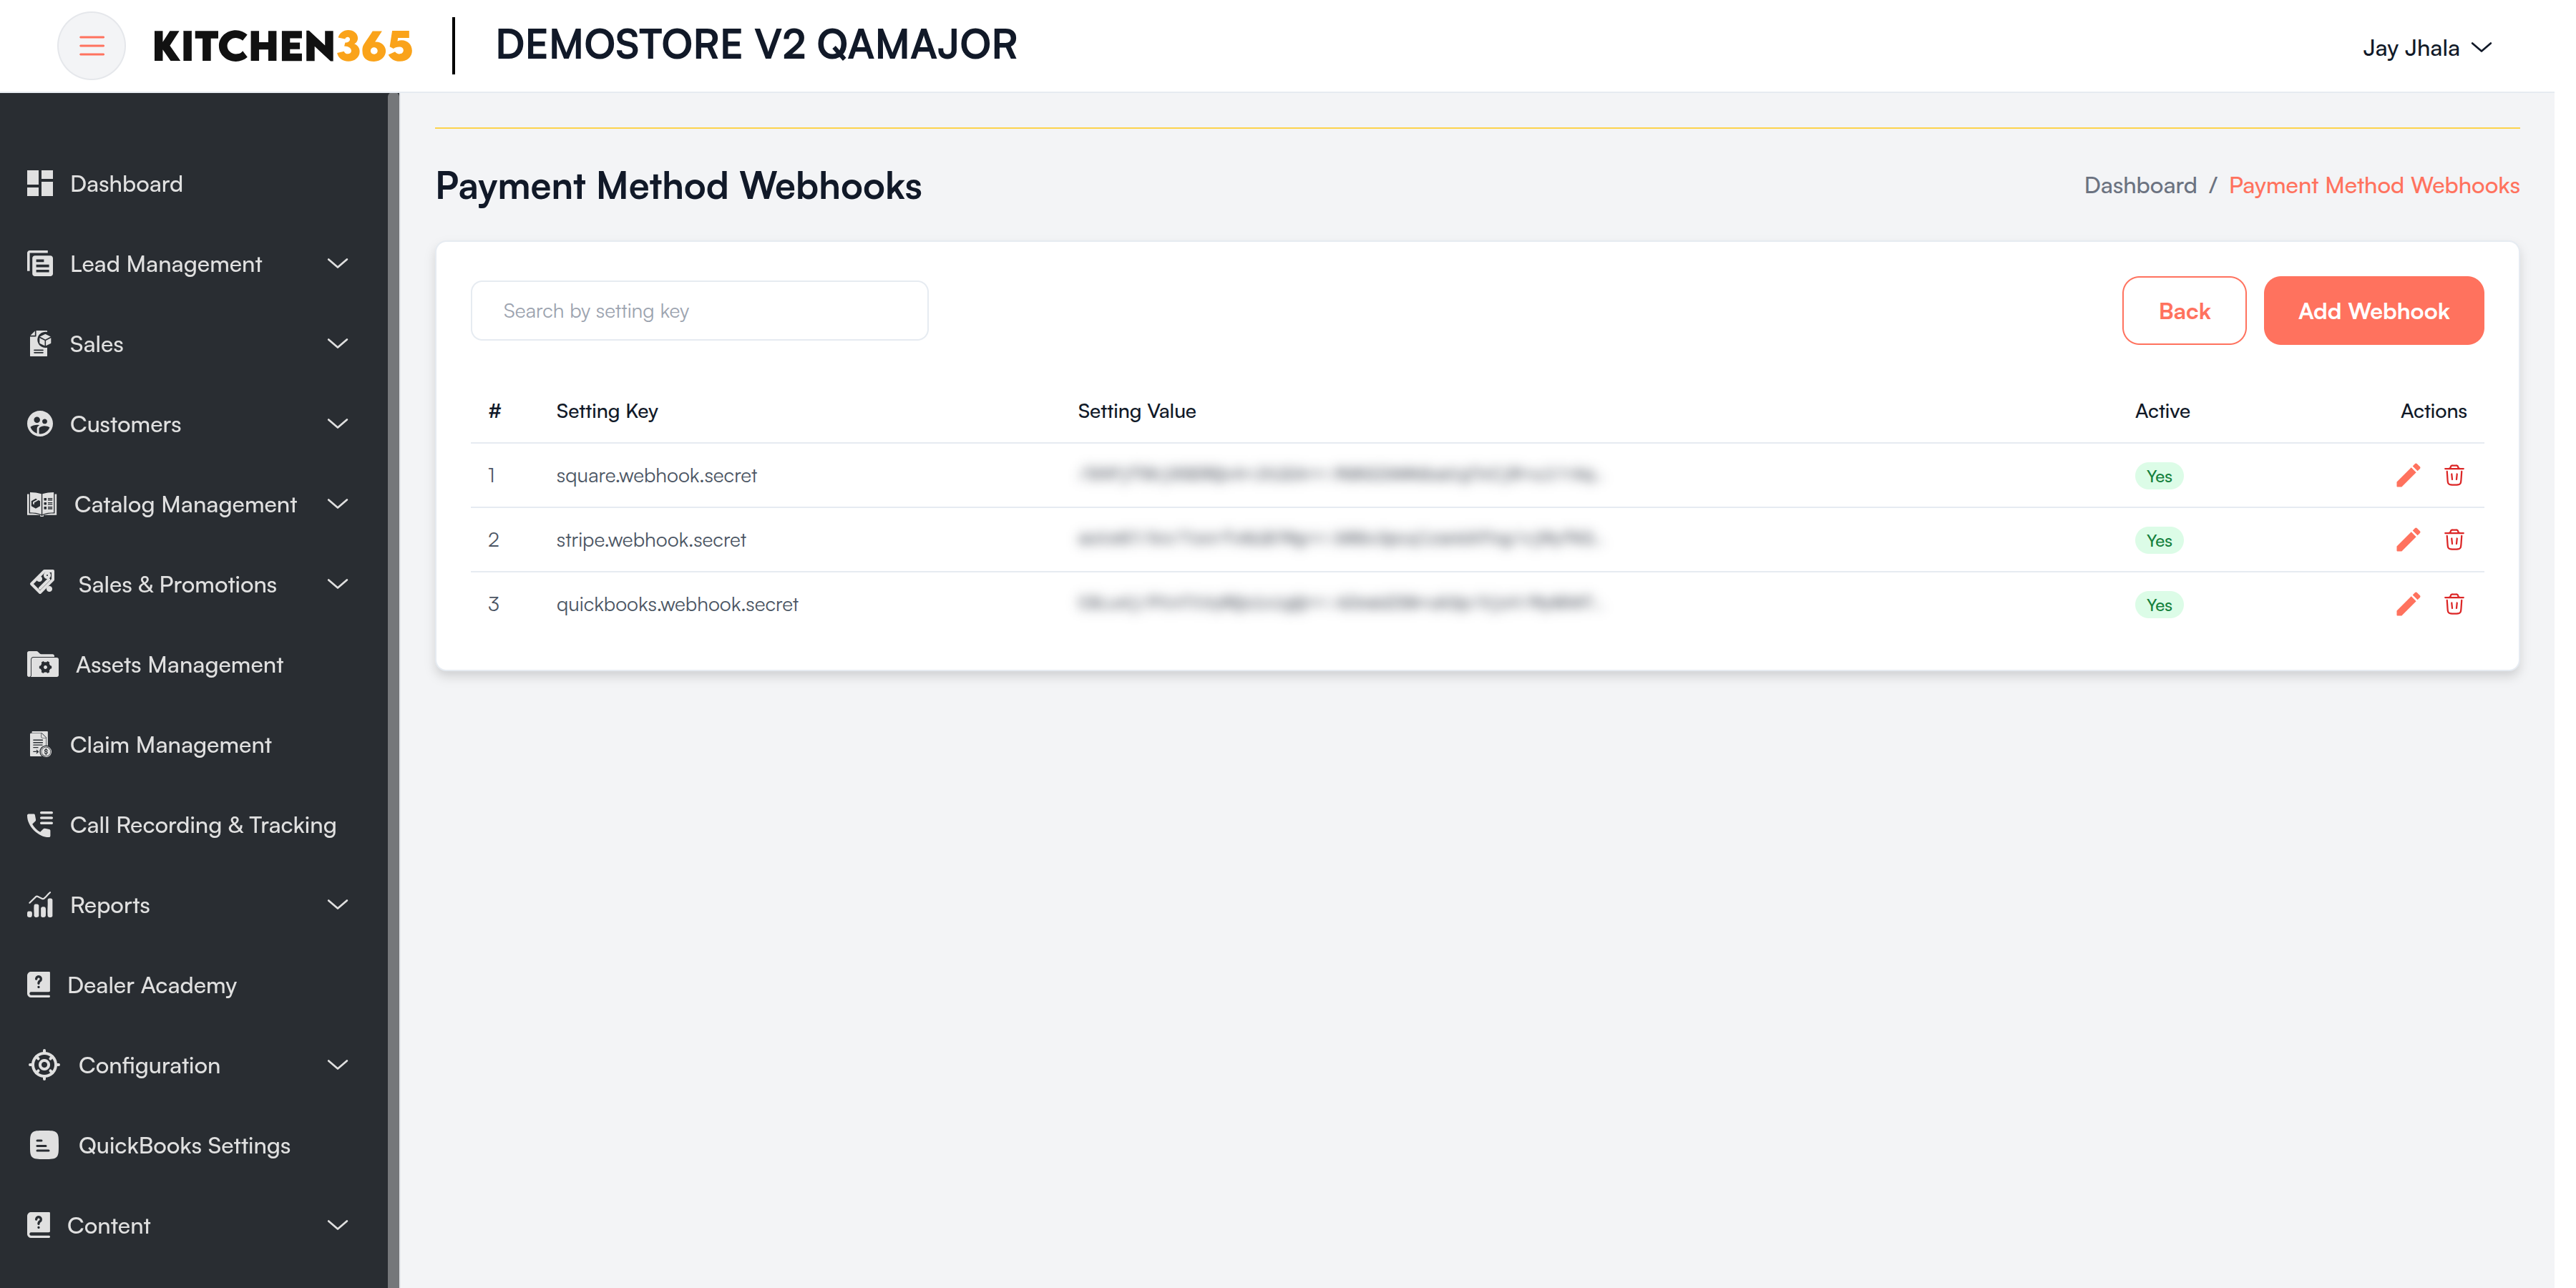
| Column | What it shows |
|---|---|
| # | Row number. |
| Setting Key | The gateway the secret belongs to, e.g. stripe.webhook.secret. |
| Setting Value | The saved secret, shown encrypted. |
| Active | Yes or No. |
| Actions | Edit (change the secret or Active; the key can't be changed) and Delete. |
- One secret per gateway. Both methods of a gateway (e.g. Stripe Credit card and Stripe ACH) share it.
- Use Search by setting key to filter the list.
- When you rotate the secret at the gateway, click Edit here and paste the new one; otherwise every webhook will fail the signature check.
Saving with Webhook = Yes
When you save a method with Webhook = Yes, the Console checks that an active secret exists for its gateway. If not, the save is stopped with one of these messages:
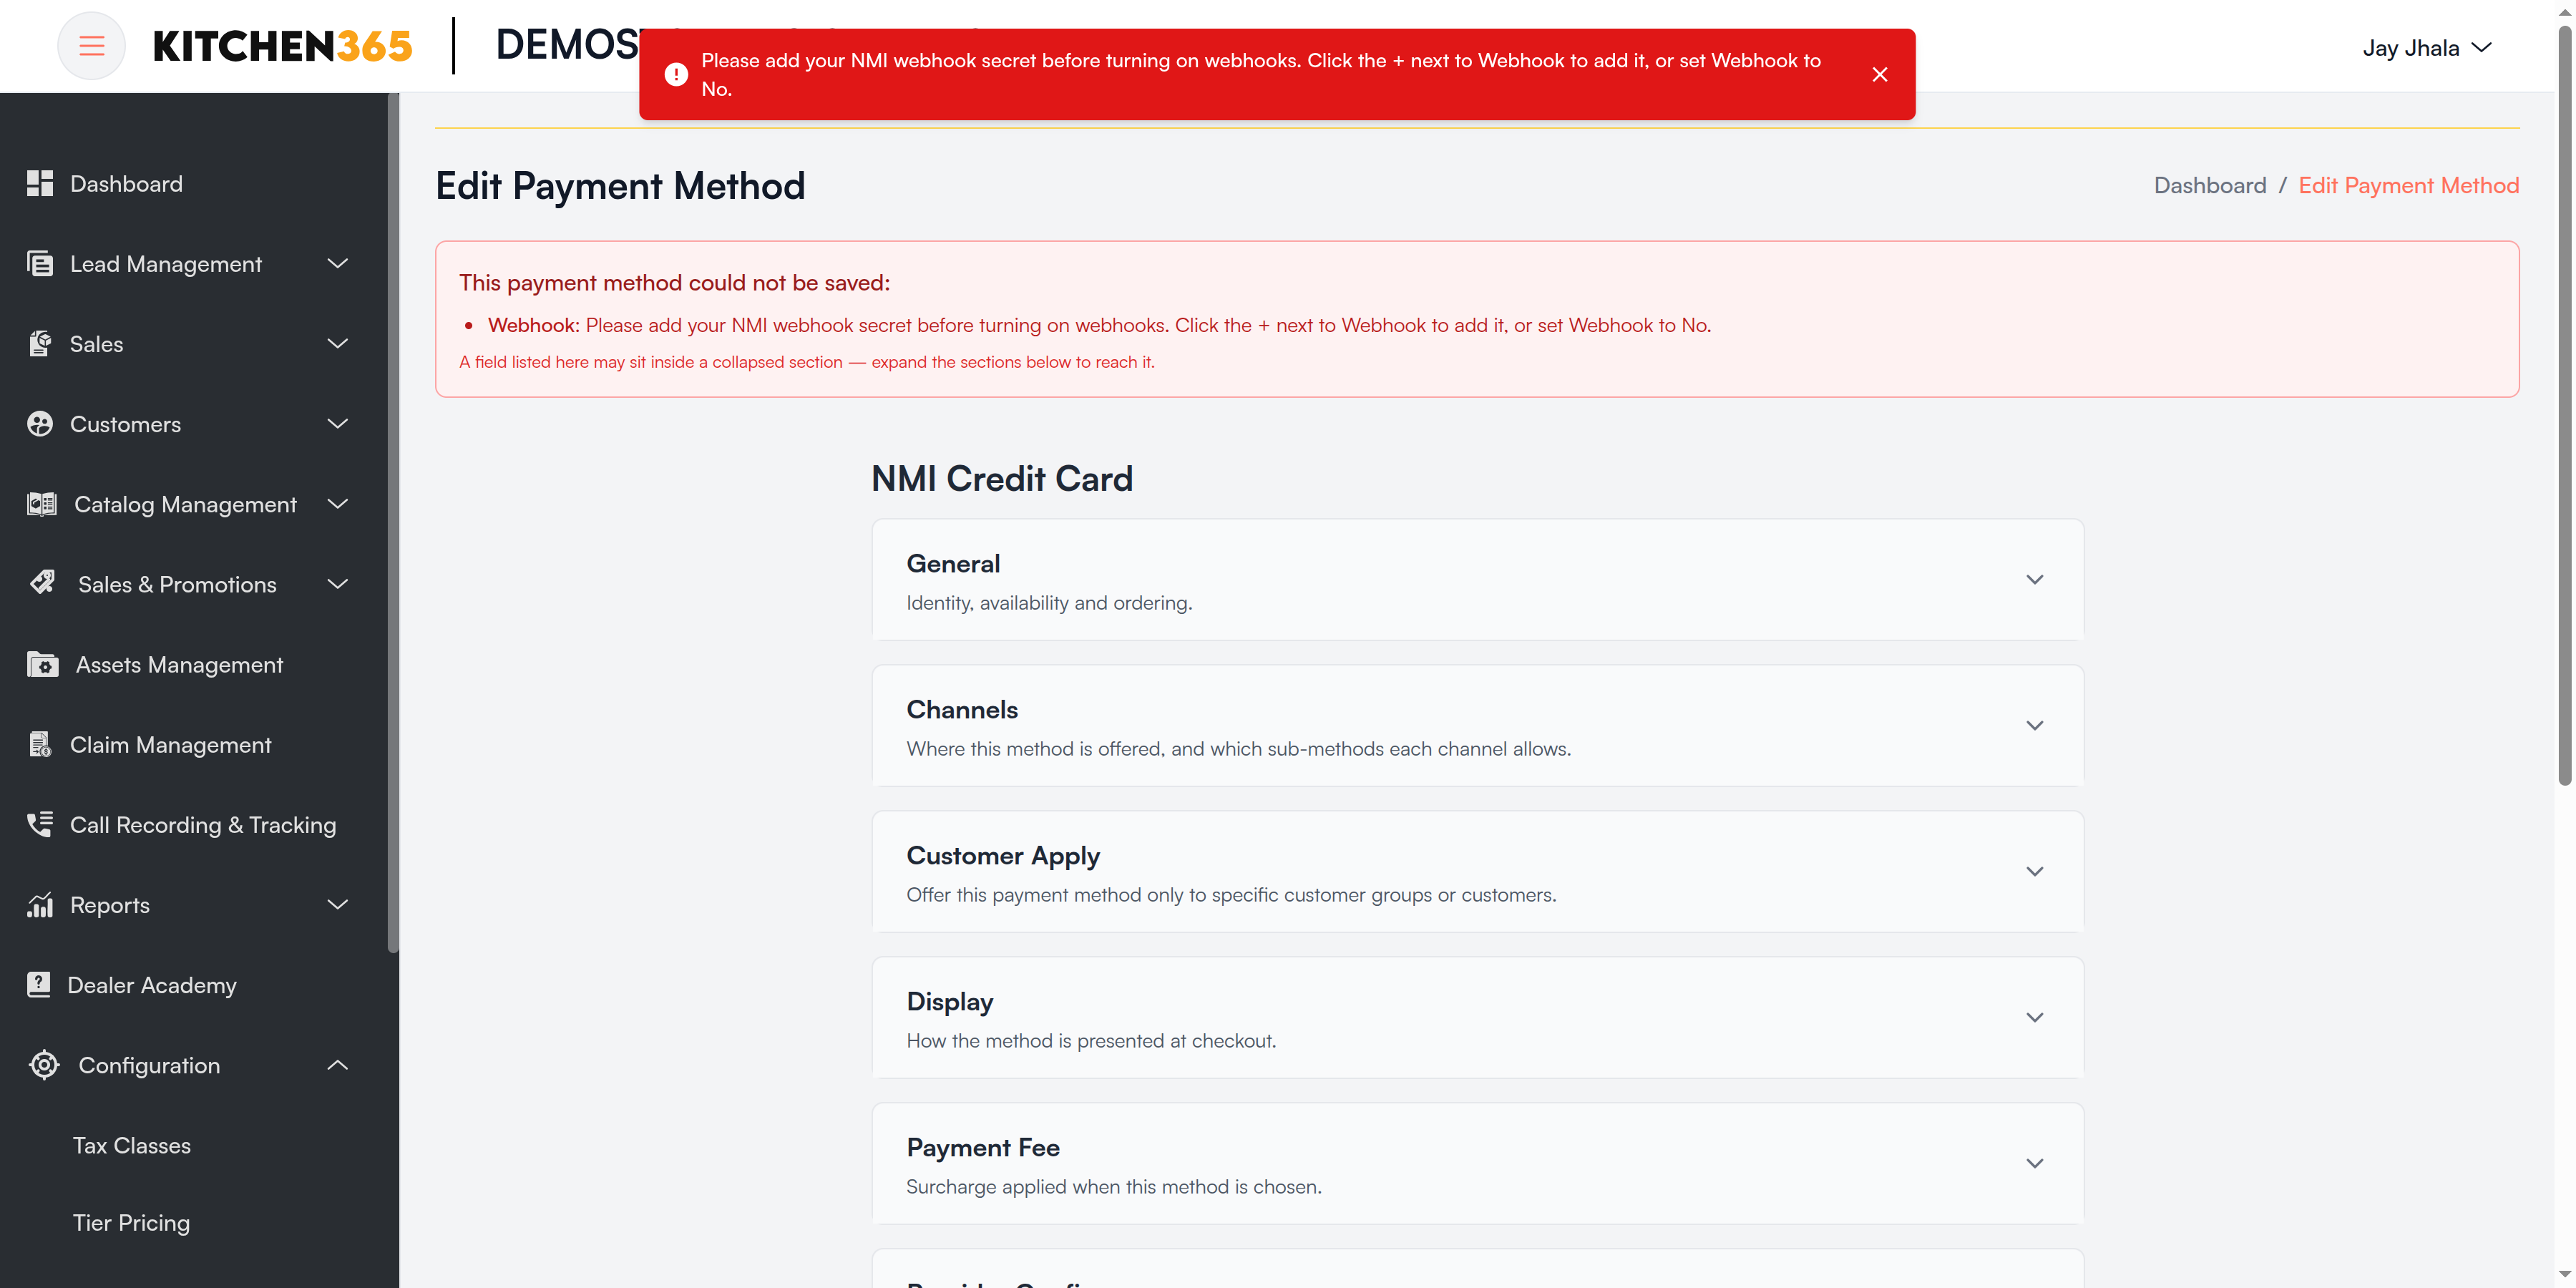
| Message | What to do |
|---|---|
| Please add your Gateway webhook secret before turning on webhooks. Click the + next to Webhook to add it, or set Webhook to No. | Add the secret (Step 2), or set Webhook to No. |
| Your Gateway webhook secret is turned off. Turn it on from the webhooks page (the + next to Webhook), or set Webhook to No. | Open the webhooks page, Edit the row and switch Active on. |
| We couldn't check your webhooks right now. Please try saving again in a moment. | Temporary problem. Try again. |
The signature check uses the secret saved on the Payment Method Webhooks page. Always enter your Stripe signing secret there. The Webhook Secret field in Stripe's Provider Config is not used for the check.
Troubleshooting
| Problem | Likely cause | What to do |
|---|---|---|
| All payments fail after going live | Live keys with sandbox URLs, or the reverse. | Check that every URL, the Environment and the keys are all test or all live. |
| Method doesn't appear at checkout | Enabled or Enabled (website) is No, or Customer Apply restricts it. | Check the channel switches and the Customer Apply selections. |
| Restricted method not shown to a group | The shopper isn't signed in, so their group is unknown. | Also select the customer under Apply on Customer Level, or ask them to sign in. |
| Can't save: "nobody selected" | Customer Apply = Yes but no group or customer chosen. | Select at least one, or set Customer Apply to No. |
| ACH order stays pending | Bank payments take a few days to settle, or the webhook isn't reaching Kitchen365. | Wait for settlement. Check that Webhook = Yes, the gateway webhook URL ends in /api/payment/webhook/, and an active secret is saved. See Webhooks. |
| Gateway shows the webhook delivered but the order didn't change | Signature check failed (wrong or old secret), or the event type isn't one Kitchen365 processes. | Re-copy the signing secret into Payment Method Webhooks and check the subscribed events. |
| Can't save: "Please add your … webhook secret" | Webhook = Yes but no secret saved for that gateway. | Click + next to Webhook and add it, or set Webhook to No. |
| Paid ACH order went back to Pending Payment | The bank returned the payment days later. | Expected. Contact the customer for another payment. |
| Fee not added | Fee Calculation not set, or Fee Amount is 0. | Set both in Payment Fee. |
| Website still shows old settings | The storefront refreshes its saved list periodically. | Your change is saved; it appears after the next refresh. |
For the list, Remove and Confirm Changes screens, see Configuration › Payment Methods.