Staffs Management
The Staffs Management module in the Kitchen365 Console v2.0.0 helps you add team members to your account, control who can sign in, and decide what each person can see and do in the Console.
Use this module when you need to:
- Invite sales reps, support staff, or other team members to the Console
- Assign each person a role (for example, Sales, Support, or Admin)
- Turn access on or off without removing the user record
- Resend login invites when someone did not receive the email
You may see different labels for the same feature:
| Where you see it | Label |
|---|---|
| Extensions dashboard | Team Management |
| User menu (top-right) | Staff Management |
| Staff list page title | Staffs Management |
| Roles page title | Role Management |
All of these open the same Team Management extension.
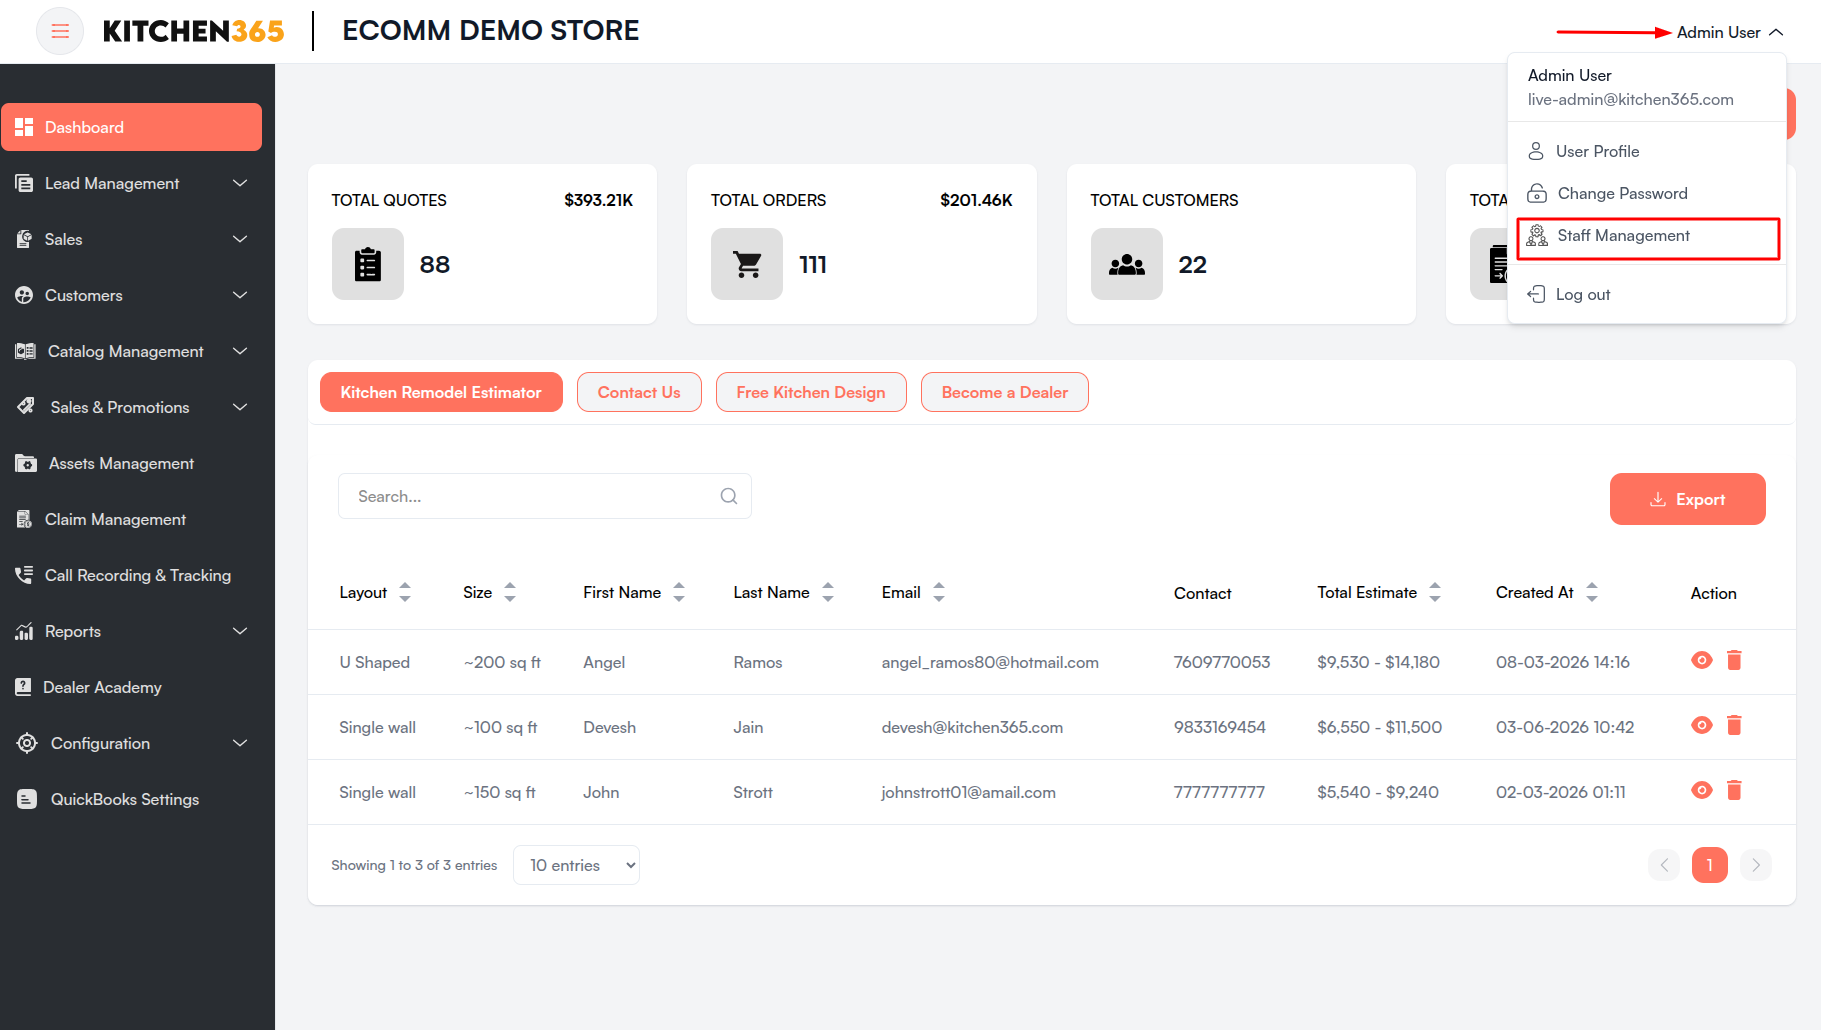
Access
How to open Staffs Management
| Entry Point | What to click |
|---|---|
| Left sidebar | Manage Staffs or Manage Roles |
| Extensions dashboard | Team Management tile |
| User menu (header) | Staff Management |
When the extension is active, the sidebar shows two menu items:
| Menu Item | What it does |
|---|---|
| Manage Staffs | View and manage individual staff user accounts. |
| Manage Roles | Create and edit roles that control Console access. |
Each menu item appears only if your account has permission to view it. If you can view roles but not staff users, opening Manage Staffs automatically redirects you to Manage Roles.
If you do not see either menu item, contact your tenant administrator to update your permissions.
Overview: Staff Users and Roles
Staff Management works in two steps:
- Create roles — Define what areas of the Console a role can access (Customers, Orders, Quotes, Reports, and more).
- Add staff users — Invite team members and assign each person one role.
Each staff member can have one role at a time. Changing their role changes what they can see and do in the Console.
a. Manage Staffs
The Staffs Management page shows every staff user on your tenant account.
Breadcrumb: Dashboard / Staffs Management
From this page you can:
- Search for staff by name, email, or phone
- Add new team members
- Edit name, phone, or role
- Resend login invites
- Activate or deactivate accounts
i. Staff Users List
The main table lists all staff users with sortable columns.
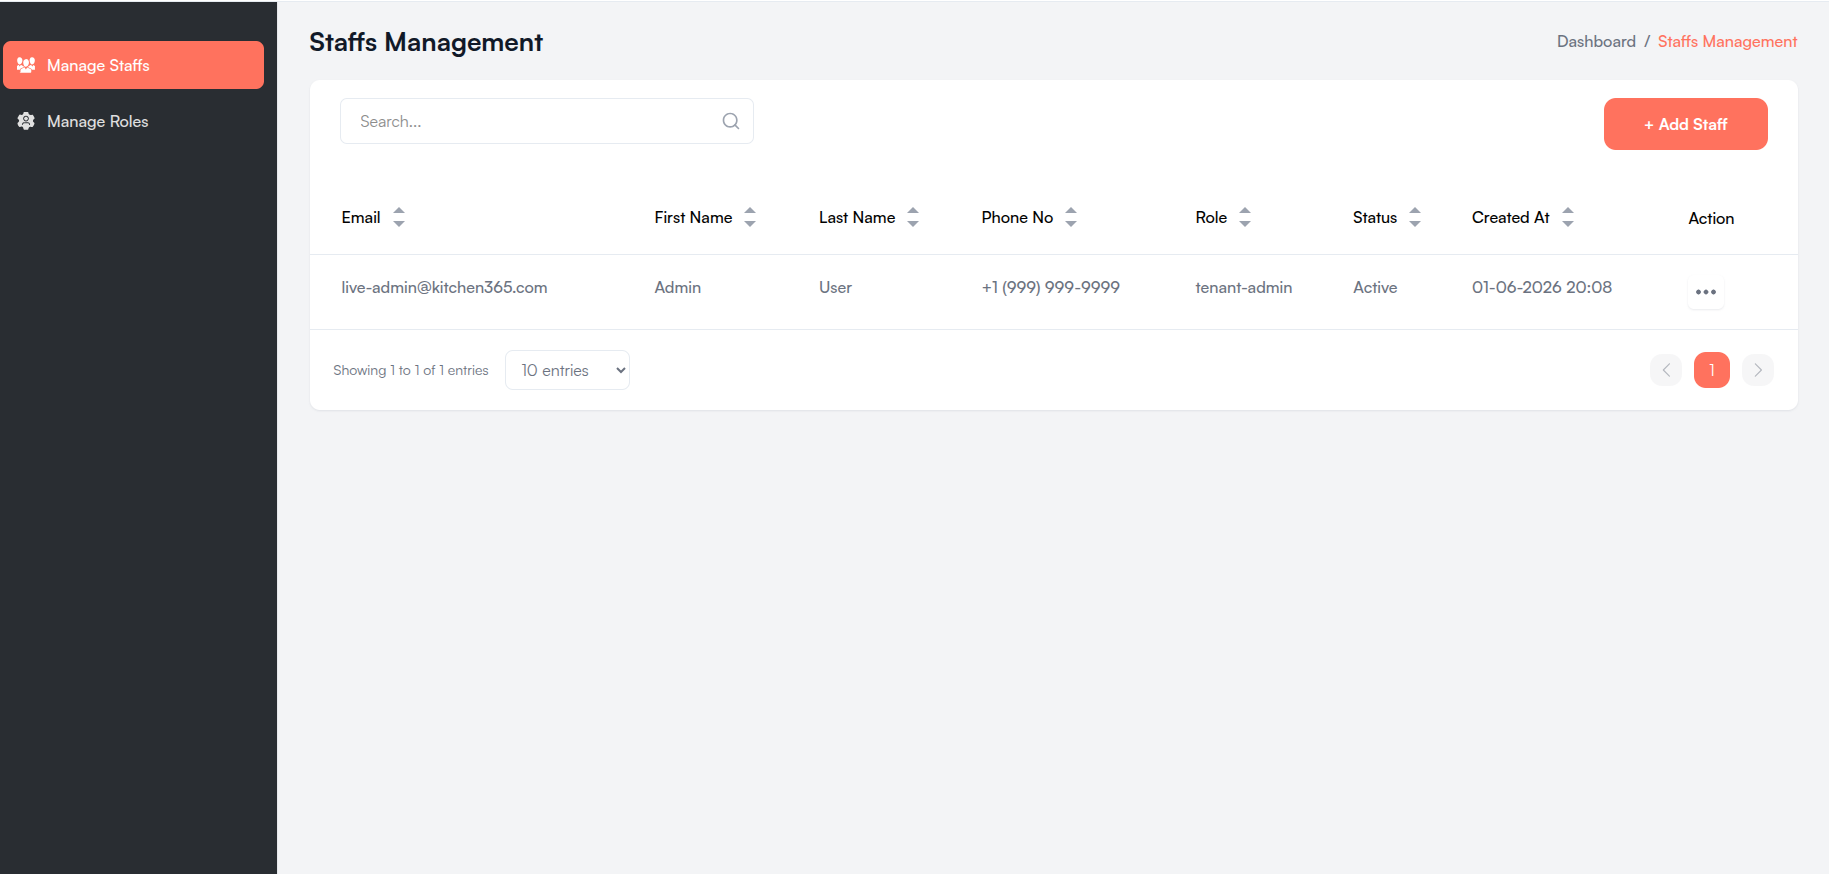
| Column | Description |
|---|---|
| The email address the staff member uses to sign in. | |
| First Name | Staff member's first name. |
| Last Name | Staff member's last name. |
| Phone No | Contact number formatted as +1 (555) 555-5555. |
| Role | The role assigned to this user (for example, Sales or Admin). |
| Status | Active — can sign in. Inactive — cannot sign in. |
| Created At | When the account was created (shown in EST). |
| Action | Menu button (⋮) with options for this user. |
Click any column header (except Action) to sort the list ascending or descending.
Search Bar
- Located at the top of the table.
- Placeholder: "Search..."
- Type at least 3 characters to start searching.
- Matches name, email, and phone number.
Pagination
- Default: 10 entries per page.
- Change page size to 10, 25, 50, 75, or 100.
- Bottom text: "Showing X to Y of Z entries".
- If nothing matches your search: "No data available for the selected filters."
Add Staff Button
- + Add Staff — Opens the form to invite a new team member.
- Shown at the top-right of the table when you have create permission.
ii. Add a New Staff User
Follow these steps to invite a new team member:
- Go to Manage Staffs.
- Click + Add Staff at the top-right of the table.
- Fill in all required fields (marked with *).
- Select a Role from the dropdown.
- Click Submit.
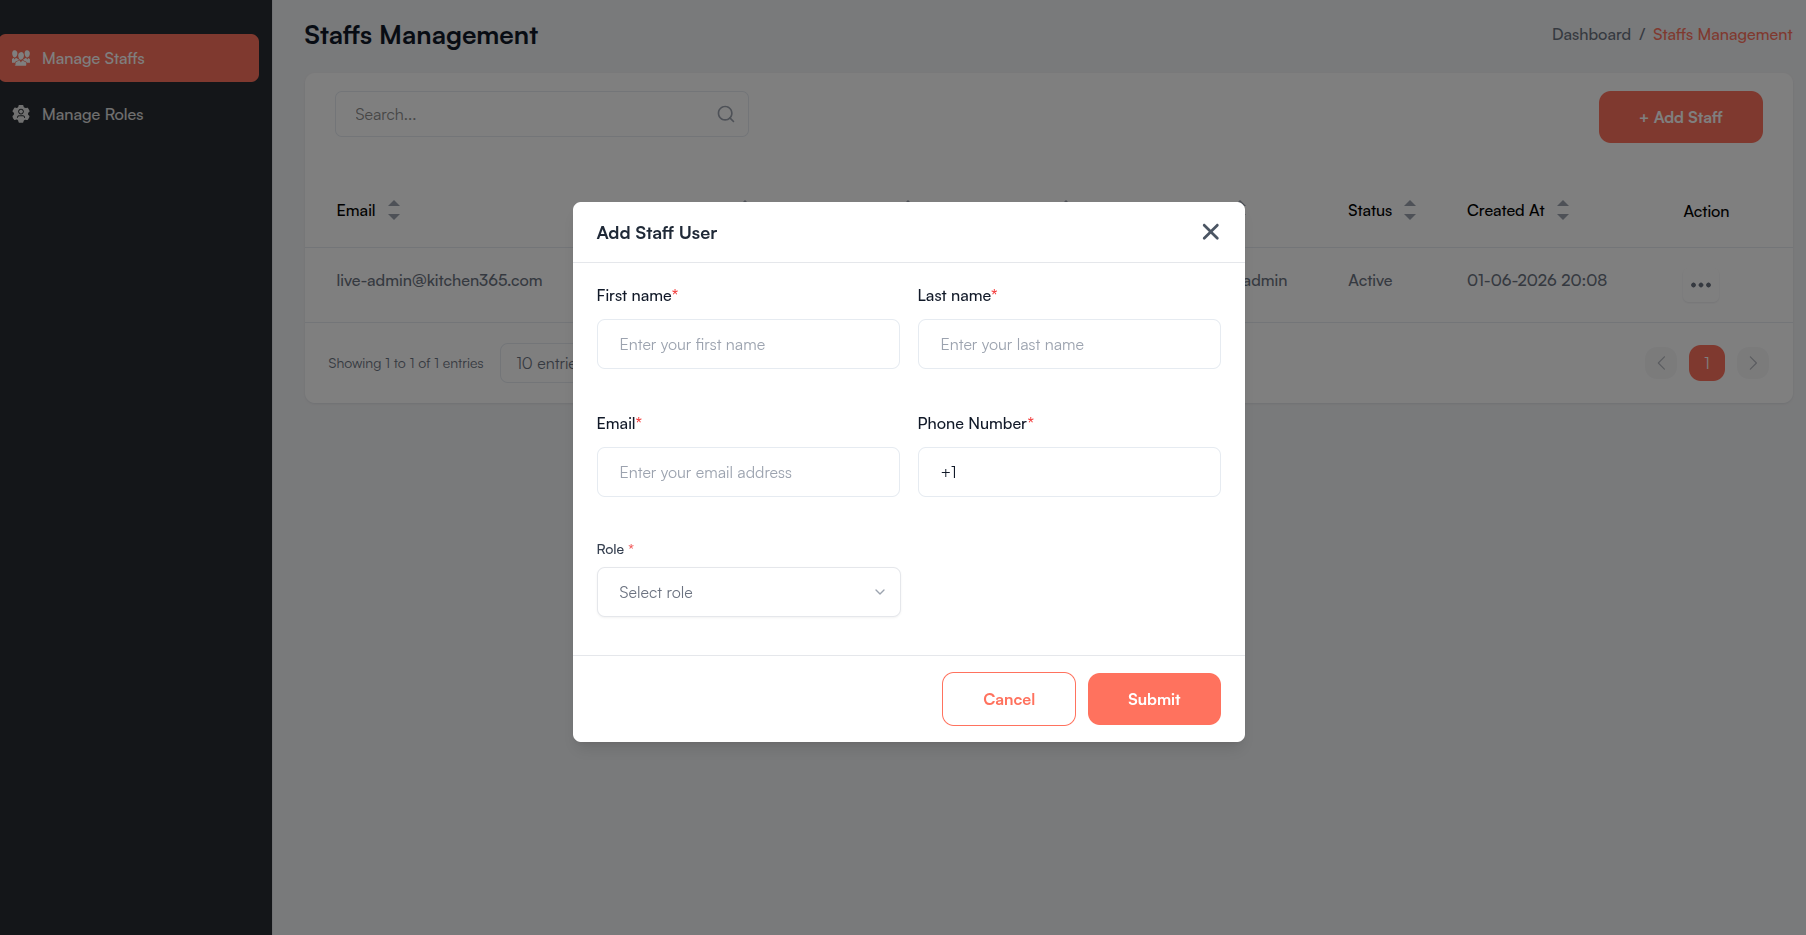
| Field | Required | Description |
|---|---|---|
| First name | Yes | Staff member's first name. Placeholder: "Enter your first name". |
| Last name | Yes | Staff member's last name. Placeholder: "Enter your last name". |
| Yes | Login email. Must be a valid email format. Placeholder: "Enter your email address". | |
| Phone Number | Yes | US phone number. Auto-formats as +1 (555) 555-5555. Must be 10 digits. The +1 prefix stays fixed. |
| Role | Yes | Choose the role that controls Console access. Placeholder: "Select role". |
Buttons:
| Button | Action |
|---|---|
| Cancel | Closes the form without saving. |
| Submit | Creates the account and sends an email invite. |
What happens after you submit
- A new staff account is created with status Active.
- The staff member receives an email invite with a temporary password.
- They use that email and password to sign in to the Console for the first time.
- Until they complete signup, Resend Invite appears in their row action menu if they need the email again.
Success and error messages
| Message | Meaning |
|---|---|
| User created successfully | The invite was sent and the account is ready. |
| User already exists | That email is already registered. Use a different email or edit the existing user. |
| Invalid role IDs | The selected role is no longer valid. Refresh the page and try again. |
| Failed to send email | The account may have been created, but the invite email could not be sent. Try Resend Invite from the action menu. |
Validation messages
| Field | Error shown |
|---|---|
| First name | First name is required |
| Last name | Last name is required |
| Email is required or Please enter valid email | |
| Phone Number | Phone number must be 10 digits |
| Role | Please select a role. |
iii. Edit a Staff User
To update an existing staff member:
- Go to Manage Staffs.
- Find the user in the table.
- Click the Action menu (⋮) on their row.
- Click Edit.
- Update the fields you need.
- Click Update.
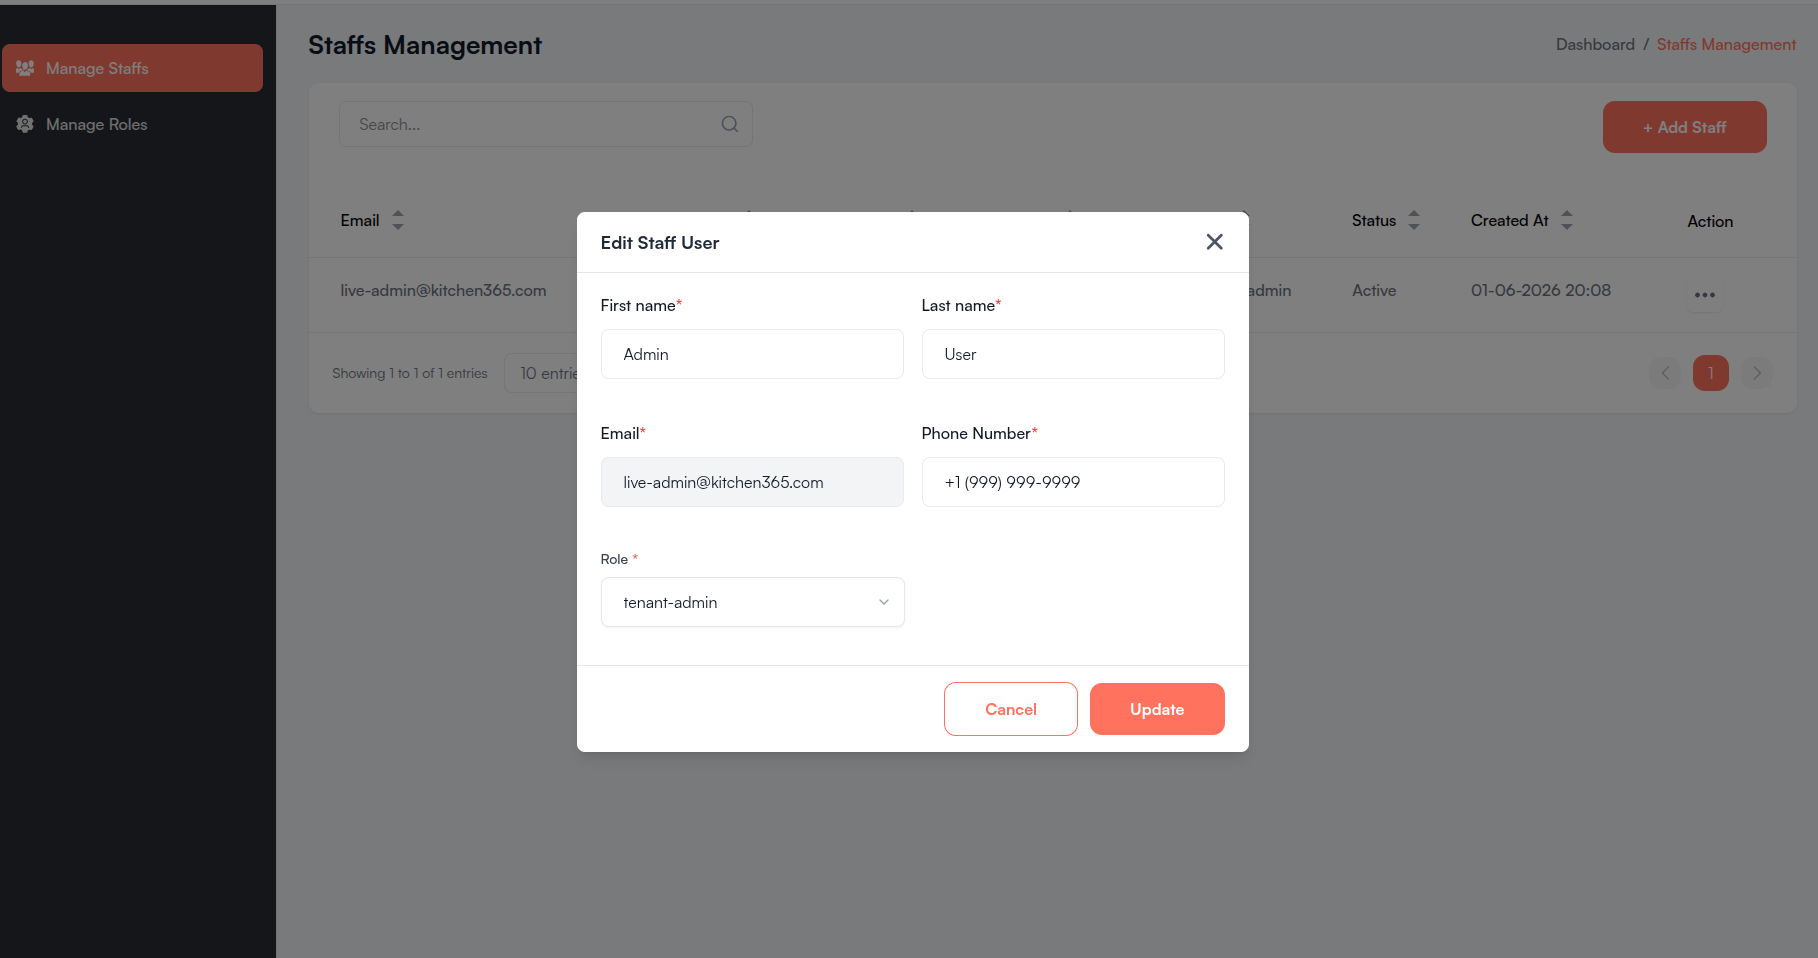
| Field | Can be changed? |
|---|---|
| First name | Yes |
| Last name | Yes |
| No — locked after the account is created | |
| Phone Number | Yes |
| Role | Yes — changing the role updates what they can access |
Buttons:
| Button | Action |
|---|---|
| Cancel | Closes the form without saving. |
| Update | Saves your changes. |
iv. Staff User Row Actions
Click the Action menu (⋮) on any row to see available options.
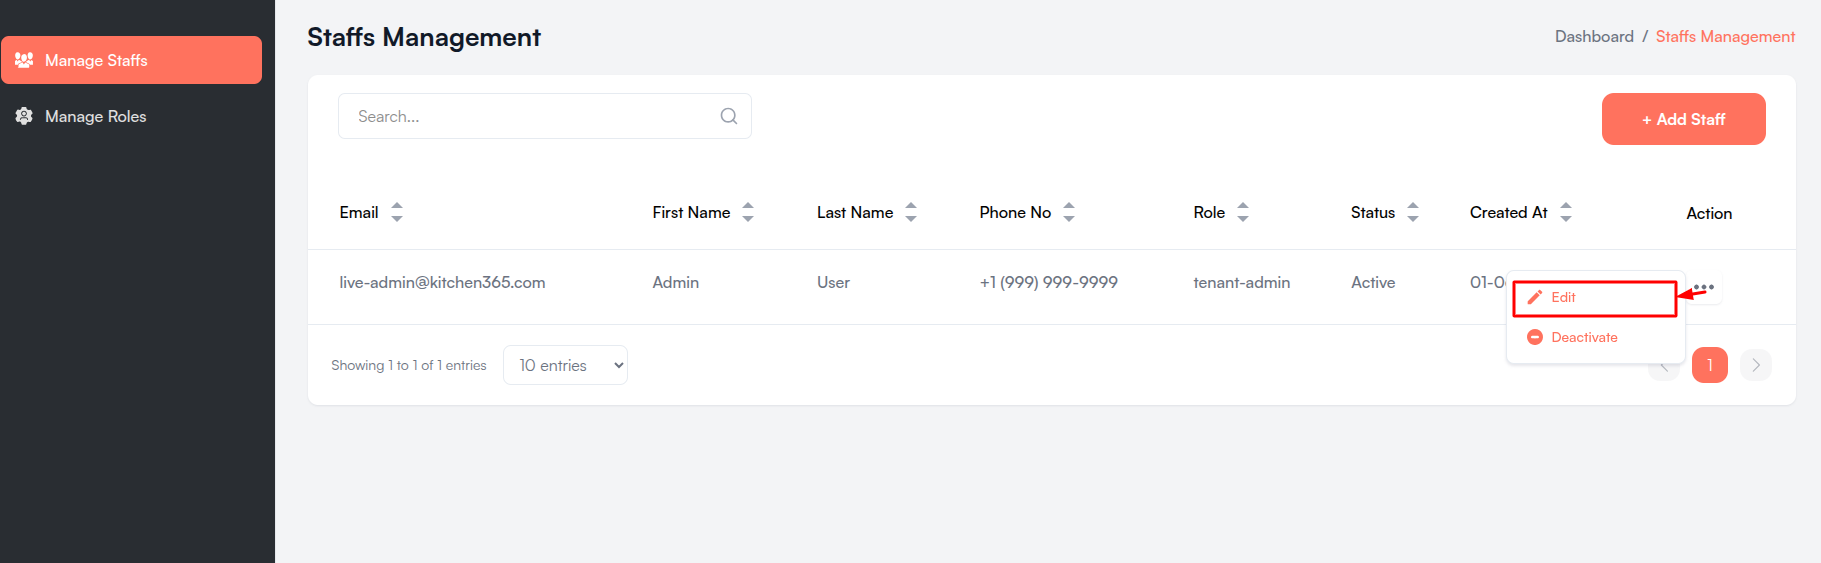
| Action | When it appears | What it does |
|---|---|---|
| Edit | Always (with edit permission) | Opens the Edit Staff User form. |
| Resend Invite | Staff member has not completed signup | Sends the invitation email again. Success message: Invite sent successfully. |
| Deactivate | Status is Active | Blocks the user from signing in. Success message: User deactivated successfully. |
| Activate | Status is Inactive | Restores sign-in access. Success message: User activated successfully. |
Activate, Deactivate, and Resend Invite take effect right away — there is no confirmation popup. Double-check you selected the correct user before clicking.
Status shows whether the account can sign in (Active or Inactive). This is separate from whether the person has finished their first login setup. A user can be Active and still show Resend Invite if they have not completed signup.
You cannot deactivate your own account. If you try, the Console shows: Cannot deactivate your own account.
b. Manage Roles
The Role Management page lets you create and edit roles. Each role defines which Console features staff members can access.
Breadcrumb: Dashboard / Role Management
Sidebar: Manage Roles
Before adding staff users, create at least one role (for example, Sales, Support, or Read Only). Then assign that role when you invite each team member.
i. Roles List
The table shows all roles available for your tenant.
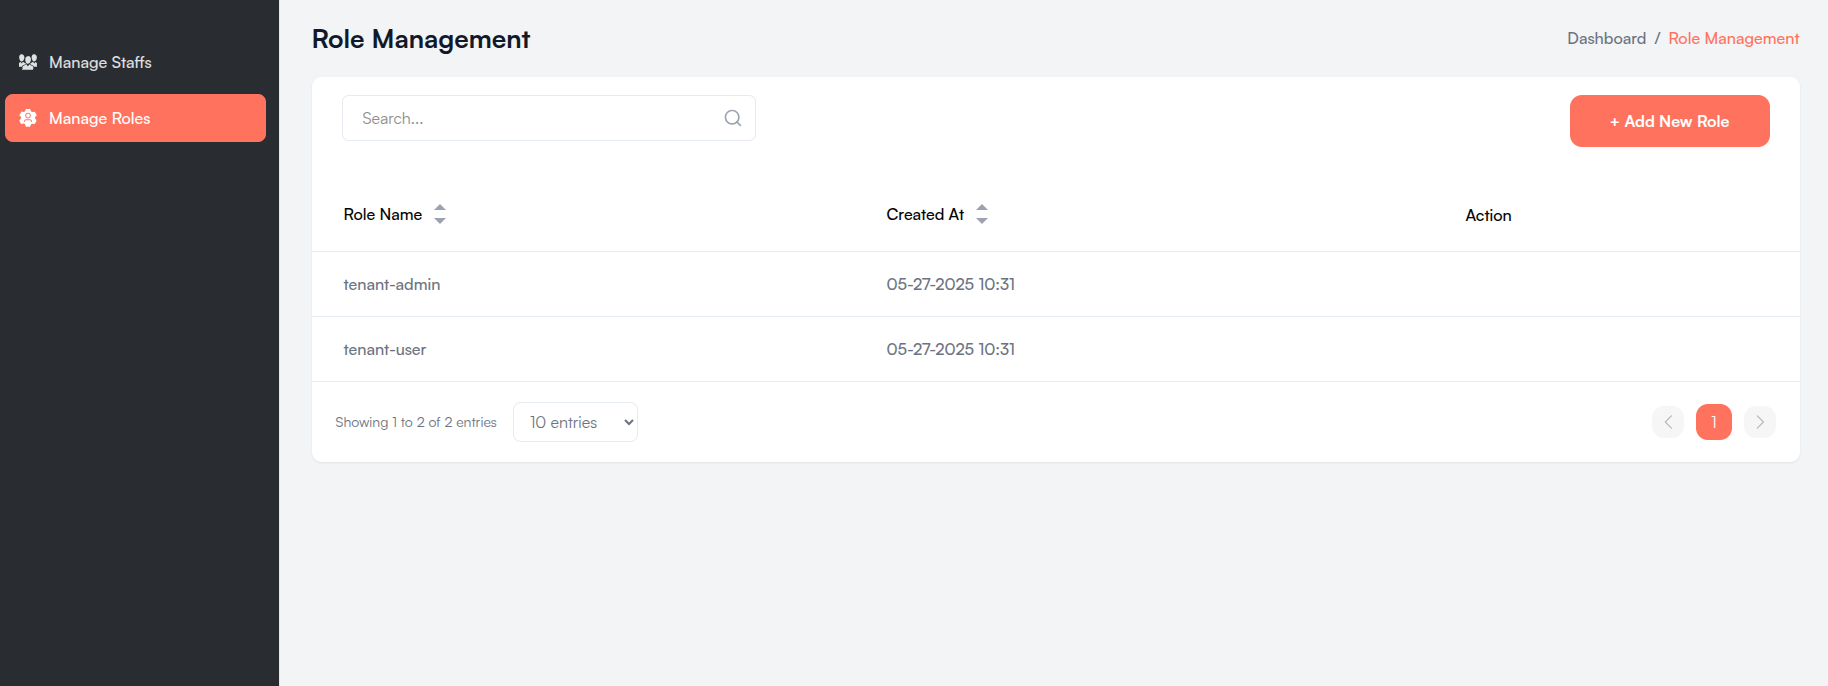
| Column | Description |
|---|---|
| Role Name | The name shown when assigning a role to a staff user. |
| Created At | When the role was created (shown in EST). |
| Action | Edit icon — opens the role form (when permitted). |
Click column headers to sort. Search and pagination work the same way as the staff users list.
Add New Role Button
- + Add New Role — Opens the form to create a new role.
- Shown at the top-right when you have create permission.
Row Actions
| Action | Description |
|---|---|
| Edit | Opens the Edit Role form to change the role name or permissions. Available only for roles that belong to your tenant. |
System or default roles from another tenant context cannot be edited from this screen.
ii. Create a New Role
Follow these steps to create a role:
- Go to Manage Roles.
- Click + Add New Role.
- Enter a Role name (for example, Sales Team).
- Expand the permission tree and check the permissions this role needs.
- Click Submit.
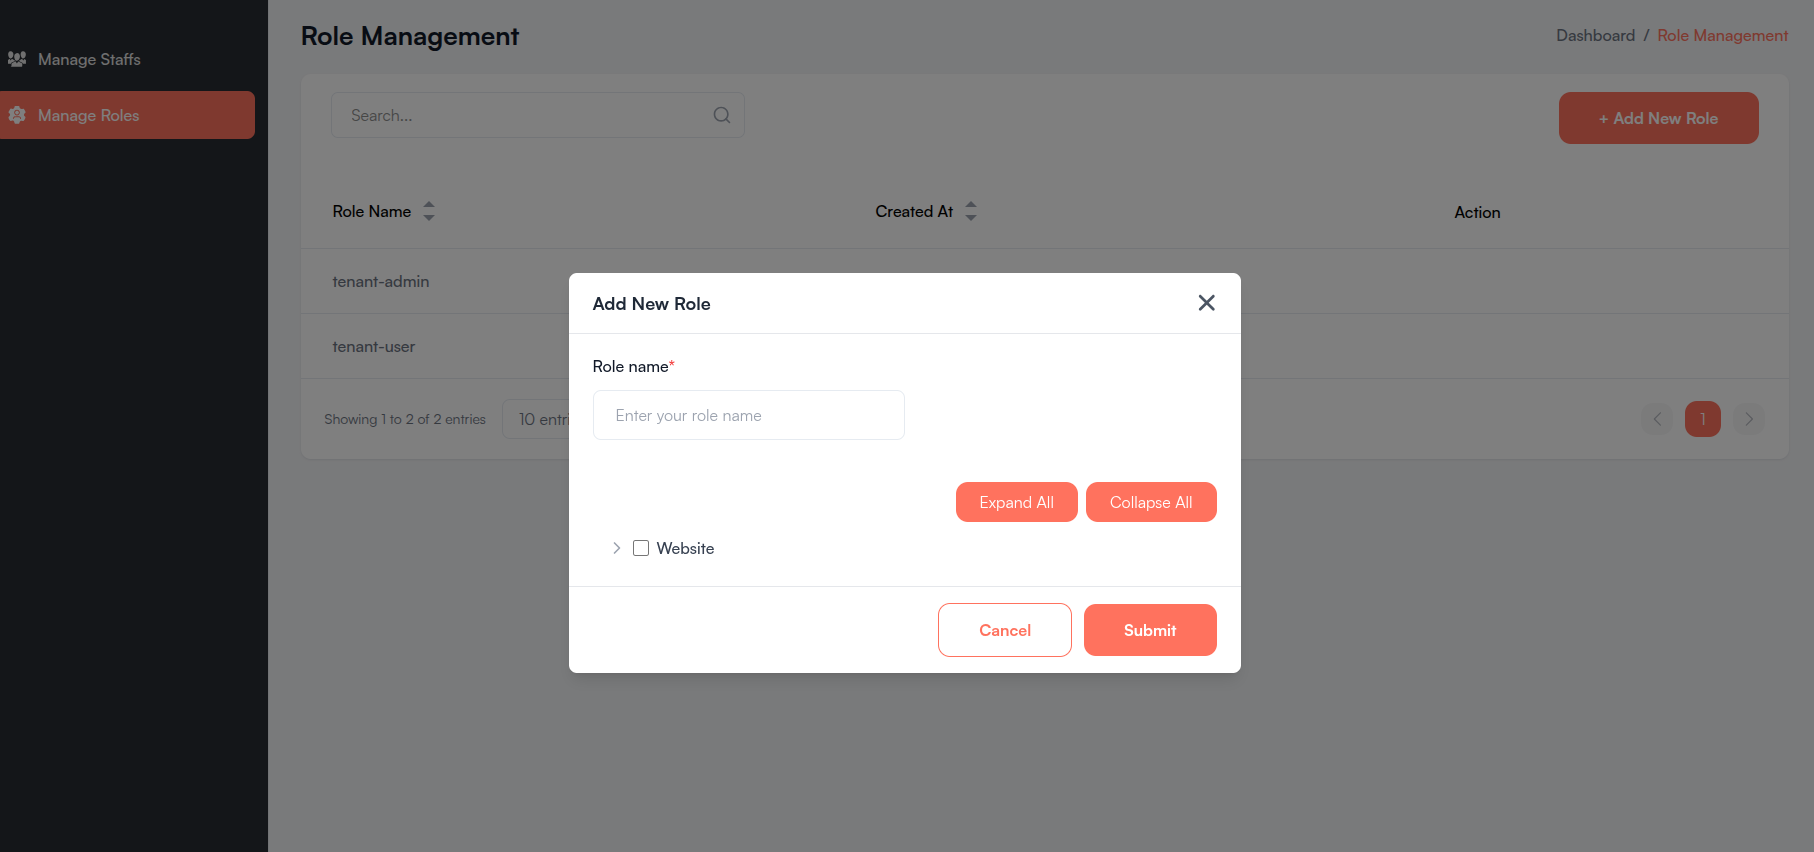
| Field | Required | Description |
|---|---|---|
| Role name | Yes | A clear name for the role. Placeholder: "Enter your role name". |
| Permissions | Yes | Check at least one permission in the tree below. |
Buttons:
| Button | Action |
|---|---|
| Cancel | Closes the form without saving. |
| Submit | Creates the role with the selected permissions. |
Validation messages
| Field | Error shown |
|---|---|
| Role name | Role name is required |
| Permissions | At least one permission is required |
When you save a role, the system automatically adds baseline permissions needed for basic Console use (profile, uploads, site settings, and related features). These are added in the background and are not shown in the permission tree.
iii. Edit a Role
To change an existing role:
- Go to Manage Roles.
- Find the role in the table.
- Click the Edit icon on that row.
- Update the role name or permissions.
- Click Update.
The form is the same as Add New Role, but the title shows Edit Role and the save button shows Update.
Any staff user assigned to this role will get the updated permissions the next time they use the Console.
iv. Permission Tree
The permission tree is where you choose what each role can do in the Console. It appears inside the Add New Role and Edit Role forms.
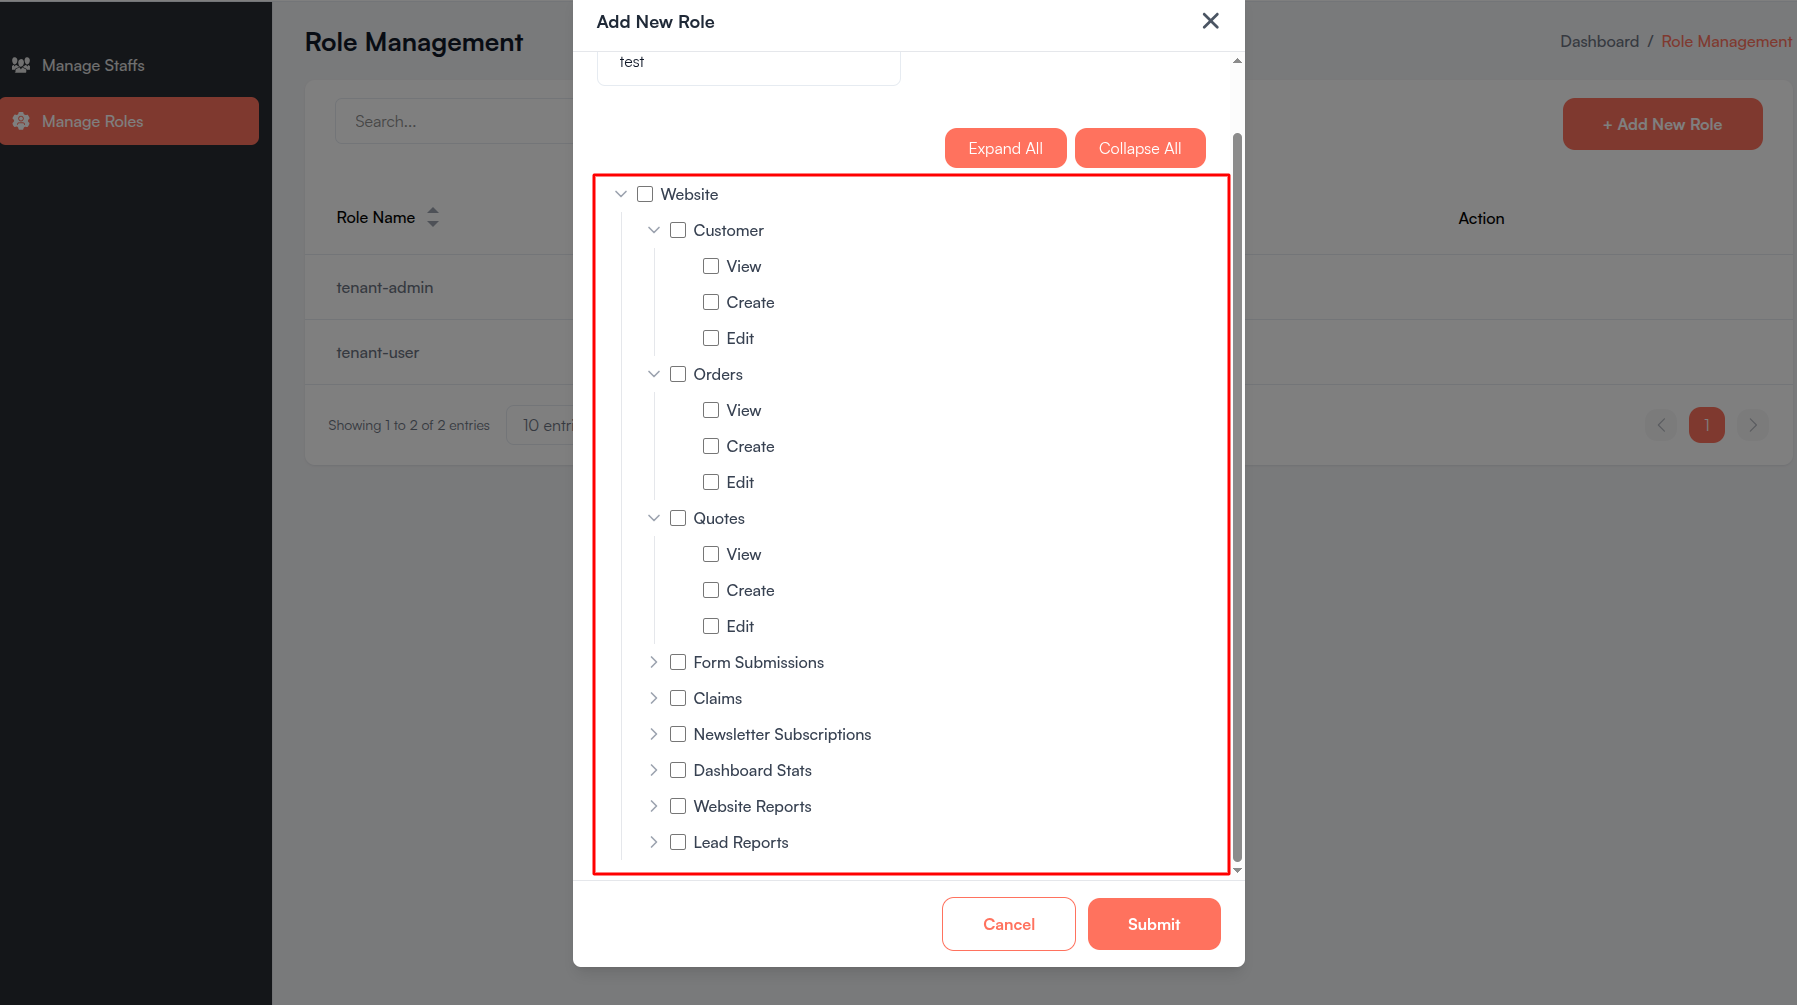
How the tree is organized
The tree has three levels:
| Level | Example | Meaning |
|---|---|---|
| Module | Website | Top-level area of the Console. |
| Group | Customer, Orders, Quotes | A feature area within the module. |
| Action | View, Create, Edit, Delete | What the user can do in that area. |
Tree controls
| Control | What it does |
|---|---|
| Expand All | Opens every section in the tree. |
| Collapse All | Closes every section in the tree. |
How checkboxes work
- Checking a parent checkbox selects its children.
- Some permissions depend on others. For example, Customer:Create automatically selects Customer:View because you need view access to create customers.
- Unchecking a permission may also uncheck permissions that depend on it.
Available permission groups
These are the feature areas you can assign under the Website module:
| Group | What staff can do |
|---|---|
| Customer | View, create, or edit customer records |
| Orders | View, create, or edit orders |
| Quotes | View, create, or edit quotes |
| Form Submissions | View, edit, or delete form submissions |
| Claims | View or edit customer claims |
| Newsletter Subscriptions | View or delete newsletter signups |
| Dashboard Stats | View dashboard statistics |
| Website Reports | View website performance reports |
| Lead Reports | View lead performance reports |
| Sales Promotions | View, create, edit, or delete sales promotions |
| Tax Class | View, create, edit, or delete tax classes |
| Customer Groups | View, create, or delete customer groups |
| Sales Rule | View, create, edit, or delete cart price rules |
Start with View permissions only if you want read-only access. Add Create and Edit only when the role needs to make changes. This keeps each role limited to what the person actually needs.
The permissions in this tree control access to Console features like customers, orders, quotes, sales, and reports. Permissions for managing staff users and roles themselves are handled separately and are not shown in this tree.
c. Common Workflows
Onboard a new team member
- Go to Manage Roles and create a role (or confirm an existing role fits their job).
- Go to Manage Staffs and click + Add Staff.
- Enter their name, email, phone, and assign the role.
- Click Submit — they receive an email invite.
- If they do not receive the email, use Resend Invite from the action menu.
Temporarily remove Console access
- Go to Manage Staffs.
- Find the user and open the Action menu (⋮).
- Click Deactivate.
- Their status changes to Inactive and they cannot sign in.
- To restore access later, click Activate from the same menu.
Change what a staff member can access
Option A — Change their role:
- Edit the staff user and select a different Role.
- Click Update.
Option B — Change the role itself:
- Go to Manage Roles and edit the role's permissions.
- All staff users with that role get the updated access.
d. Access Control
What you can see and do in Staff Management depends on your own role and permissions.
Staff users
| If you need to… | You need permission to… |
|---|---|
| View the staff list | View staff users |
| Add staff or resend invites | Create staff users |
| Edit, activate, or deactivate staff | Edit staff users |
Staff roles
| If you need to… | You need permission to… |
|---|---|
| View the roles list | View roles |
| Create a new role | Create roles |
| Edit a role | Edit roles |
If a button or menu item is missing, your account does not have that permission. Contact your tenant administrator to request access.
e. Troubleshooting
| Problem | What to try |
|---|---|
| Manage Staffs or Manage Roles not in sidebar | Ask your administrator to grant Staff Management view permissions. |
| + Add Staff button not visible | You need staff user create permission. |
| + Add New Role button not visible | You need role create permission. |
| Staff member did not receive invite email | Use Resend Invite from the action menu. Check spam folder. |
| User already exists when adding staff | That email is already registered. Search the staff list or use a different email. |
| Cannot edit a role | System or default roles may not be editable. Create a new custom role for your tenant instead. |
| Staff member cannot see a Console feature | Edit their role and add the required permission in the permission tree. |
| Cannot deactivate your own account | Ask another administrator to deactivate your account if needed. |
Quick Reference
| Task | Where to go | Action |
|---|---|---|
| Invite a team member | Manage Staffs | + Add Staff → fill form → Submit |
| Update staff details | Manage Staffs | Action menu (⋮) → Edit → Update |
| Resend login email | Manage Staffs | Action menu (⋮) → Resend Invite |
| Block sign-in | Manage Staffs | Action menu (⋮) → Deactivate |
| Restore sign-in | Manage Staffs | Action menu (⋮) → Activate |
| Create a role | Manage Roles | + Add New Role → set permissions → Submit |
| Change role permissions | Manage Roles | Edit icon → update tree → Update |