QuickBooks Settings
The QuickBooks Settings page in the Kitchen365 Console v2.0.0 lets admin users connect a QuickBooks account to accept online payments. Once connected, customers can pay orders and quotes using QuickBooks Credit Card and QuickBooks ACH.
Access
How to open QuickBooks Settings
- Log in to the Kitchen365 Console.
- In the left sidebar, open Extensions → Websites.
- Click QuickBooks Settings.
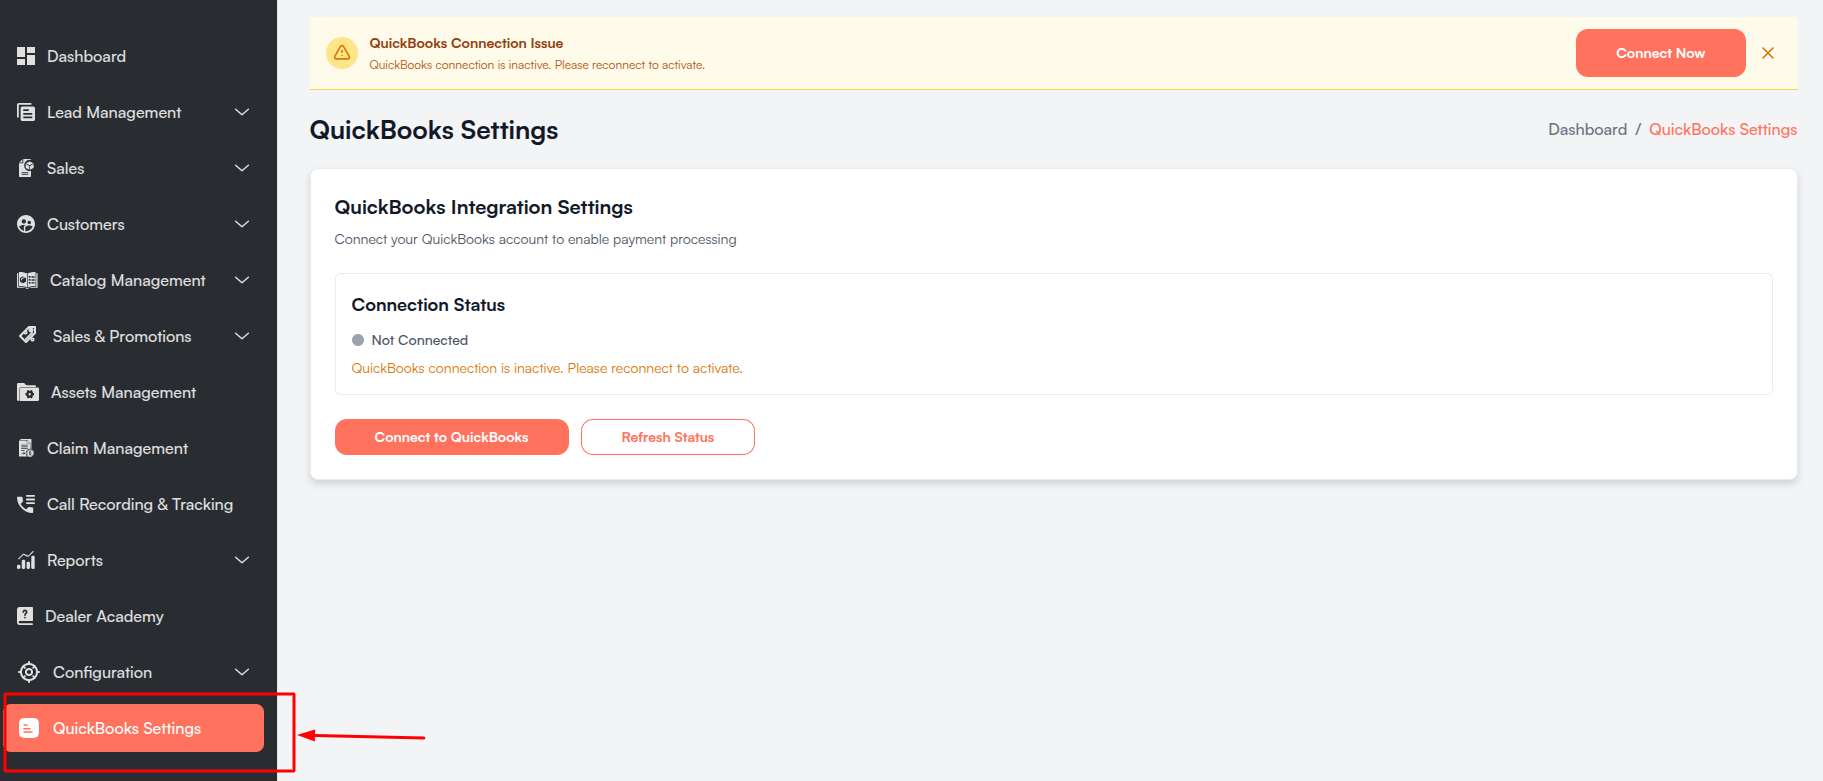
If QuickBooks Settings does not appear in the sidebar, it means QuickBooks payment is not enabled in your account. This is expected — the menu is only visible when QuickBooks payment has been set up for your account.
Contact your Kitchen365 administrator or support team if you need QuickBooks payments enabled.
a. QuickBooks Settings Page
The QuickBooks Integration Settings page shows whether your QuickBooks account is linked and lets you connect, activate, deactivate, or refresh the connection.
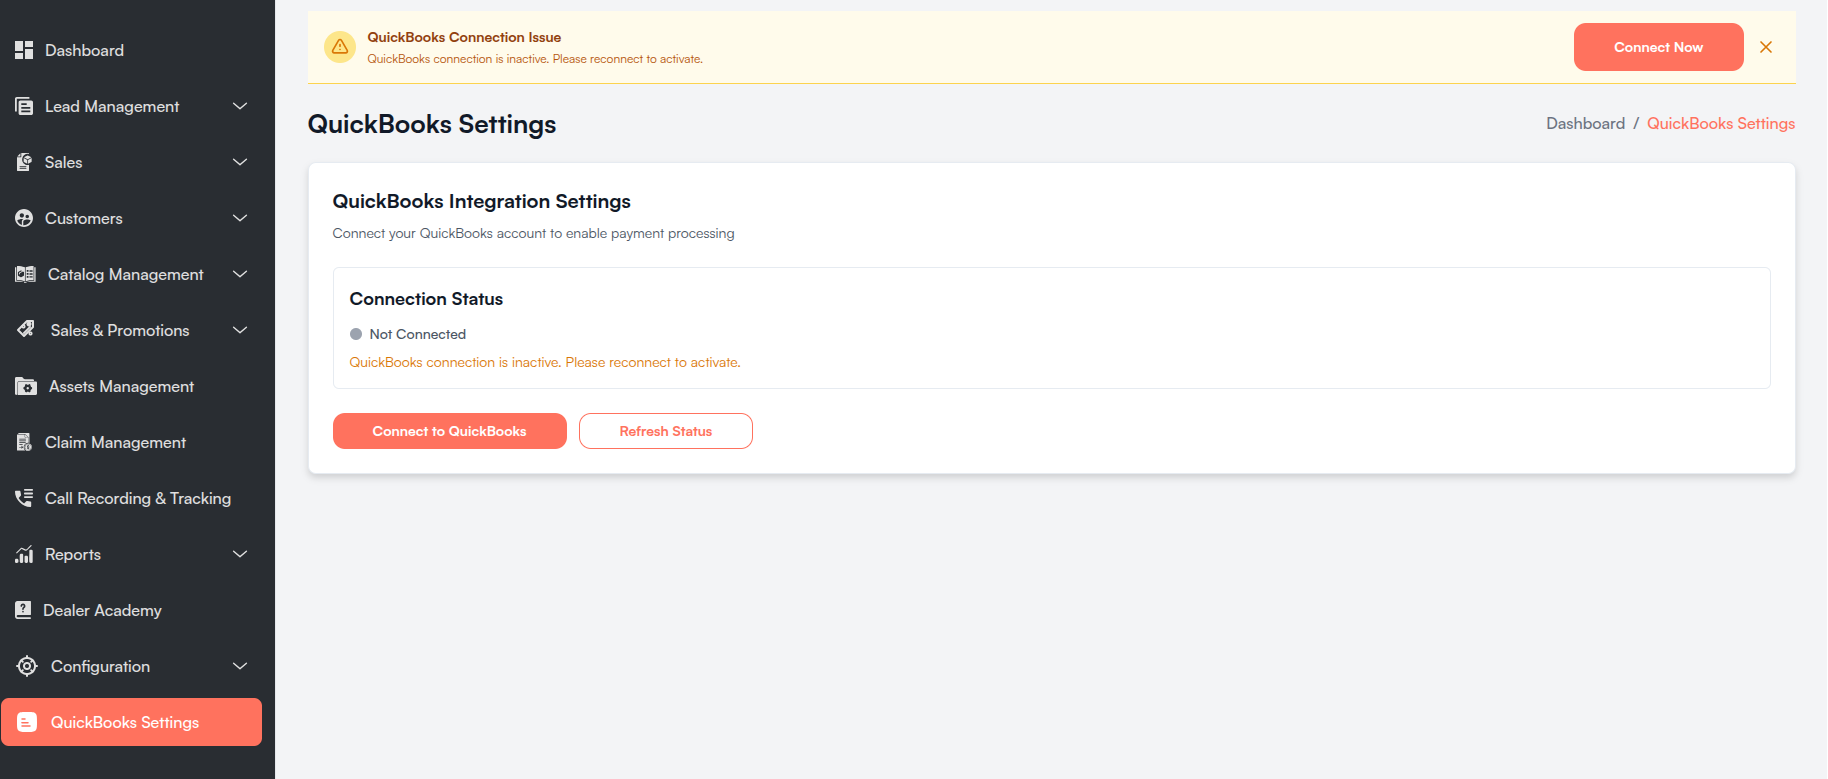
i. Connection Status
The Connection Status panel shows the current state of your QuickBooks integration.
| Status | Indicator | Description |
|---|---|---|
| Connected & Active | Green dot | QuickBooks is linked and ready to accept payments. |
| Not Connected | Gray dot | QuickBooks is not linked, or the connection is inactive. |
While the status is loading, the page displays "Checking connection status..."
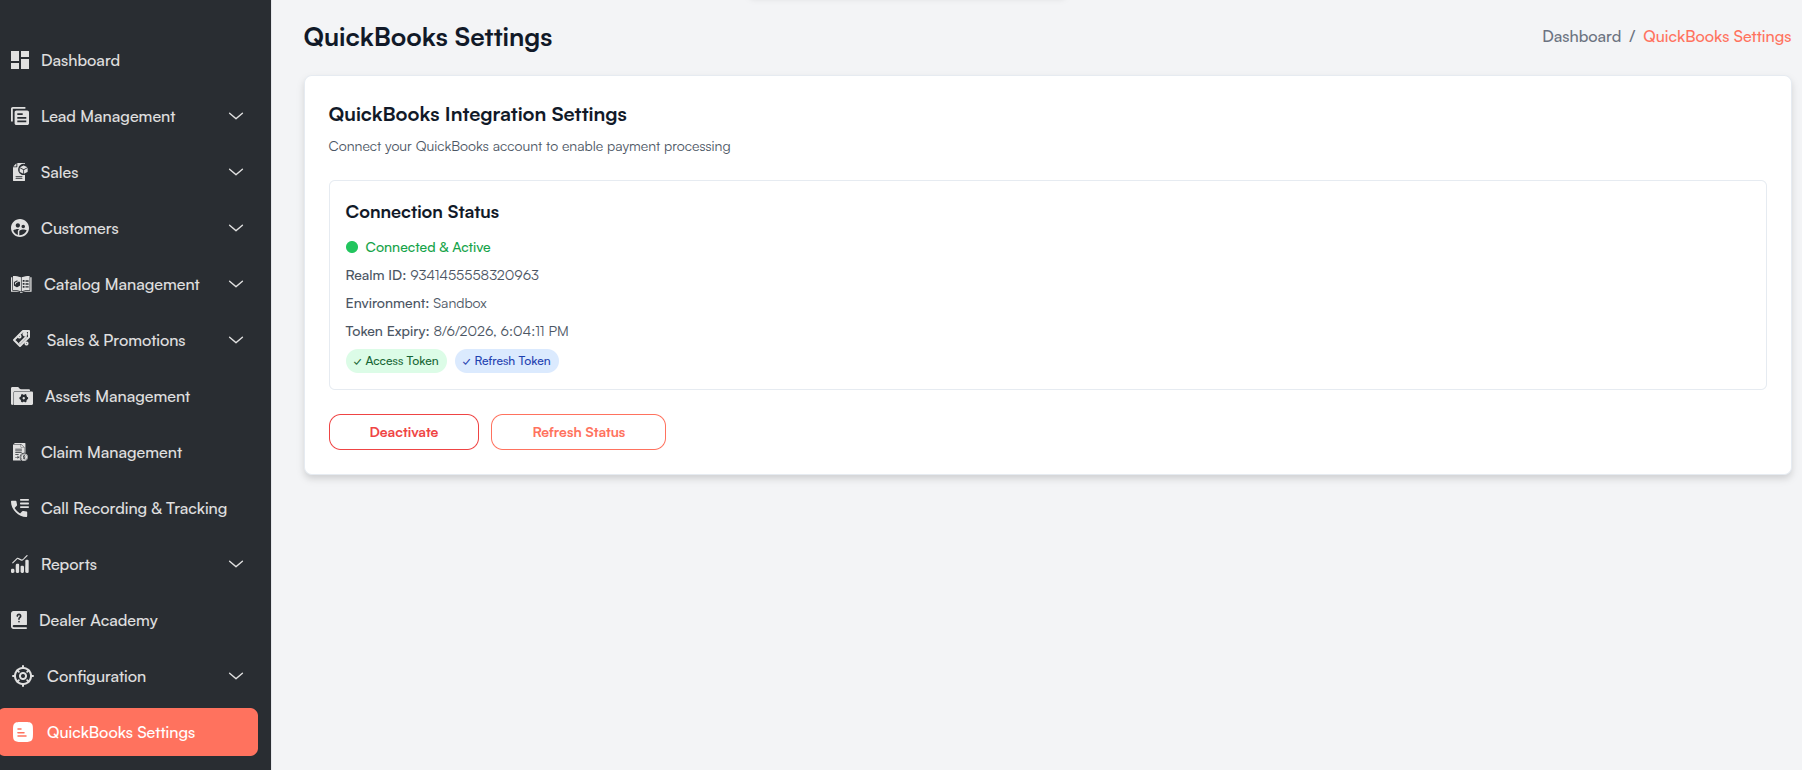
When connected, the panel also shows:
| Field | Description |
|---|---|
| Realm ID | Your QuickBooks company identifier. |
| Environment | Sandbox (testing) or Production (live). |
| Token Expiry | When the current access token expires. |
| Access Token | Confirms a valid access token is present. |
| Refresh Token | Confirms a valid refresh token is present. |
ii. Action Buttons
| Button | When It Appears | What It Does |
|---|---|---|
| Connect to QuickBooks | No existing connection | Opens QuickBooks sign-in to authorize the connection. |
| Activate | Connection exists but inactive | Turns the integration back on without signing in again. |
| Deactivate | Connected & active | Temporarily disables QuickBooks without removing credentials. |
| Refresh Status | Always | Re-checks the latest connection status. |
Success and error messages appear as toast notifications at the top of the page.
b. Connect to QuickBooks
Follow these steps to link your QuickBooks account:
- Open QuickBooks Settings from the sidebar.
- Confirm the status shows Not Connected.
- Click Connect to QuickBooks.
- You are redirected to the QuickBooks sign-in page.
- Sign in with your Intuit account.
- Review the permissions and click Authorize or Connect.
- You are redirected back to the QuickBooks Settings page.
- A success message appears: "QuickBooks connected successfully!"
- The status updates to Connected & Active.
If authorization fails, an error message explains the reason. Click Refresh Status or try Connect to QuickBooks again after fixing the issue.
c. Activate & Deactivate
Activate
Use this when QuickBooks was previously connected but is now inactive:
- Open QuickBooks Settings.
- Click Activate.
- The status changes to Connected & Active.
Deactivate
Use this to temporarily stop QuickBooks payments without fully disconnecting:
- Click Deactivate while the status is Connected & Active.
- A success message confirms deactivation.
- QuickBooks payments will not be available until you activate or reconnect.
d. Connection Status Banner
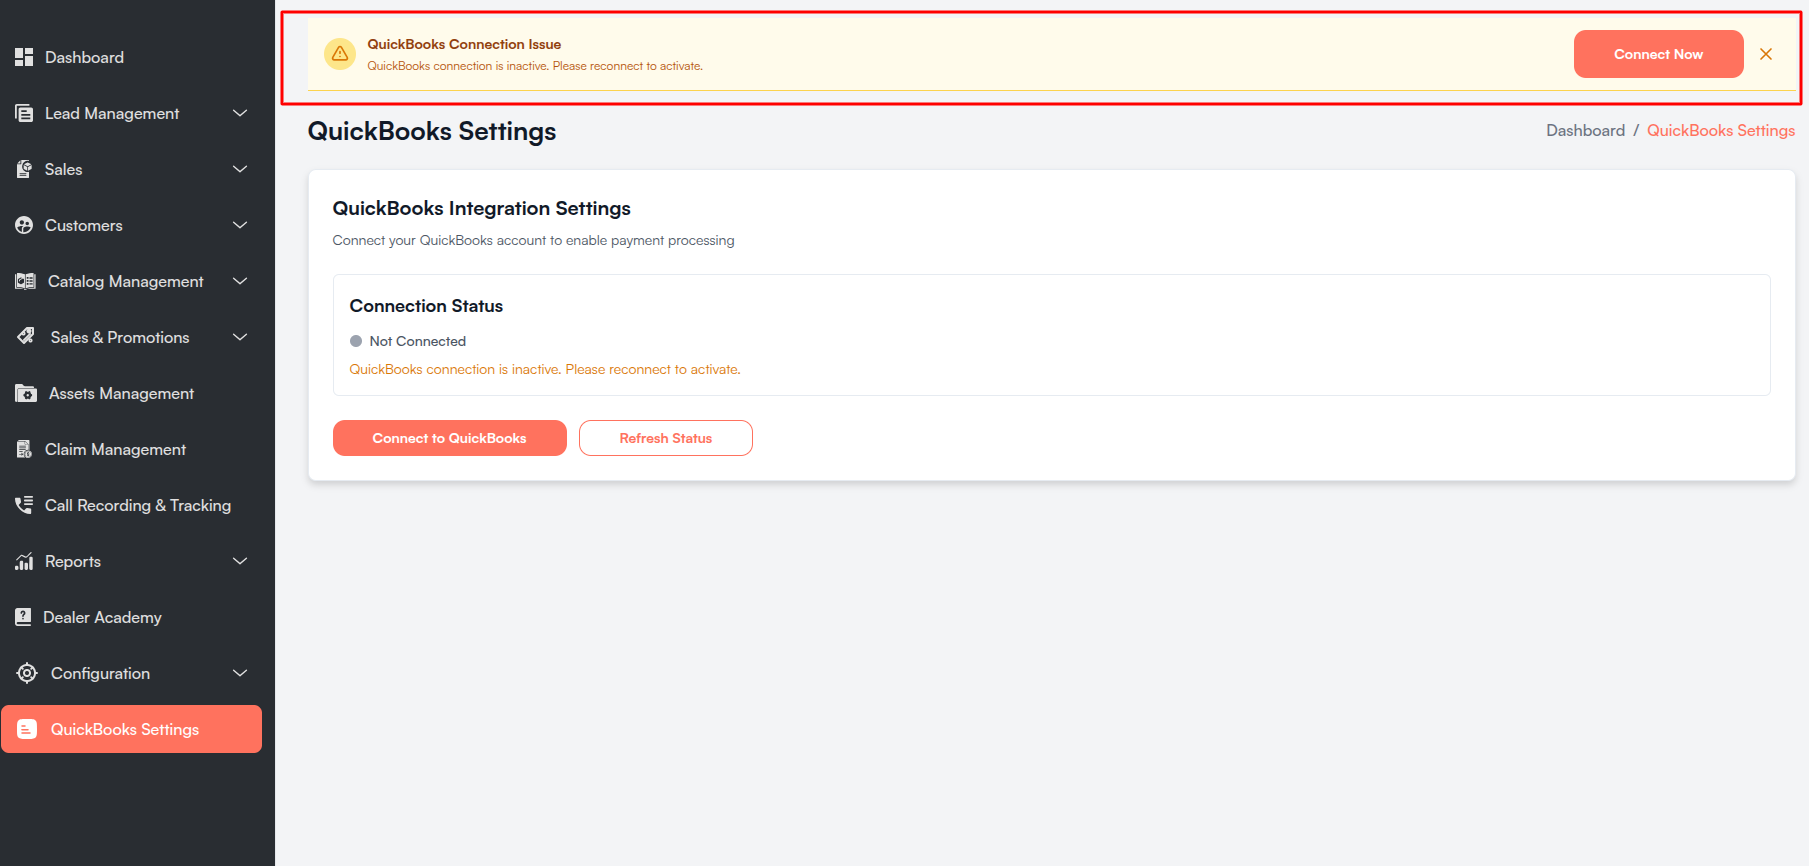
When QuickBooks payment is enabled but the connection is missing or expired, a QuickBooks Connection Issue banner appears at the top of console pages.
| Element | Description |
|---|---|
| Warning message | Explains the connection problem. |
| Failed methods | Lists any payment methods with errors (if applicable). |
| Connect Now | Opens the QuickBooks Settings page. |
| Dismiss (×) | Hides the banner for the current session. |
The banner automatically re-checks the connection every minute while the issue remains.
e. Using QuickBooks Payments
After a successful connection, QuickBooks payment options are available when collecting payments on:
| Module | Where to Pay |
|---|---|
| Order Management | Order details page — payment section. |
| Quote Management | Quote details page — payment section. |
Supported payment types:
- QuickBooks Credit Card
- QuickBooks ACH
f. Before You Connect
QuickBooks must be set up in the QuickBooks Developer Portal before connecting in the Console. Your administrator typically handles this setup.
| Requirement | Description |
|---|---|
| QuickBooks App | An app created in the QuickBooks Developer Portal. |
| Client ID & Secret | Credentials from the app Keys & Credentials tab. |
| Redirect URL | Must match your Console domain (see below). |
| Environment | Sandbox for testing or Production for live payments. |
Redirect URL
Add this Redirect URI in your QuickBooks app under Keys & Credentials → Redirect URIs:
https://[YOUR-CONSOLE-DOMAIN]/api/payment/quickbooks/oauth/callback
Replace [YOUR-CONSOLE-DOMAIN] with your actual Console domain.
Example: If your Console is at https://console.kitchen365.com, the Redirect URL is:
https://console.kitchen365.com/api/payment/quickbooks/oauth/callback
The URL must match exactly — including https:// and with no trailing slash. Add the URL separately for Sandbox and Production if needed.
Environment Settings
| Environment | Use For |
|---|---|
| Sandbox | Testing with sample QuickBooks data. |
| Production | Live payments with real company data. |
The environment in your Kitchen365 payment setup must match the environment selected in the QuickBooks Developer Portal.
g. Troubleshooting
| Problem | What to Do |
|---|---|
| QuickBooks Settings not in sidebar | QuickBooks payment is not enabled in your account. Contact your administrator. |
| "Redirect URI mismatch" error | Check that the Redirect URL in QuickBooks matches your Console domain exactly. |
| "QuickBooks credentials not configured" | Ask your administrator to verify Client ID and Client Secret are entered correctly. |
| Status shows "Not Connected" after sign-in | Click Refresh Status, wait a few seconds, and reload the page. |
| "QuickBooks connection is inactive" | Click Activate or use Connect to QuickBooks to reconnect. |
| Connection banner keeps appearing | Open QuickBooks Settings and reconnect. Review any error details in the banner. |
Security Notes
- Your QuickBooks connection is stored securely and refreshed automatically.
- You can deactivate or reconnect QuickBooks at any time from the QuickBooks Settings page.
- Only authorized Console users can manage the QuickBooks integration.