Customers
The Customers module in the Kitchen365 Console v2.0.0 lets admin users view, add, and manage customer records. Customers can be assigned to Customer Groups for tier pricing and tax rules, and their address type (Residential or Commercial) affects shipping calculations. Each customer profile also shows related orders, quotes, and digital assets.
Access
How to open Customers
- Log in to the Kitchen365 Console.
- In the left sidebar, expand Customers.
- Choose one of the sub-menu items:
| Menu Item | Navigation Path | What It Shows |
|---|---|---|
| Customers | Customers > Customers | Customer list and detail pages. |
| Customer Groups | Customers > Customer Groups | Pricing and tax groupings used when creating or editing customers. |
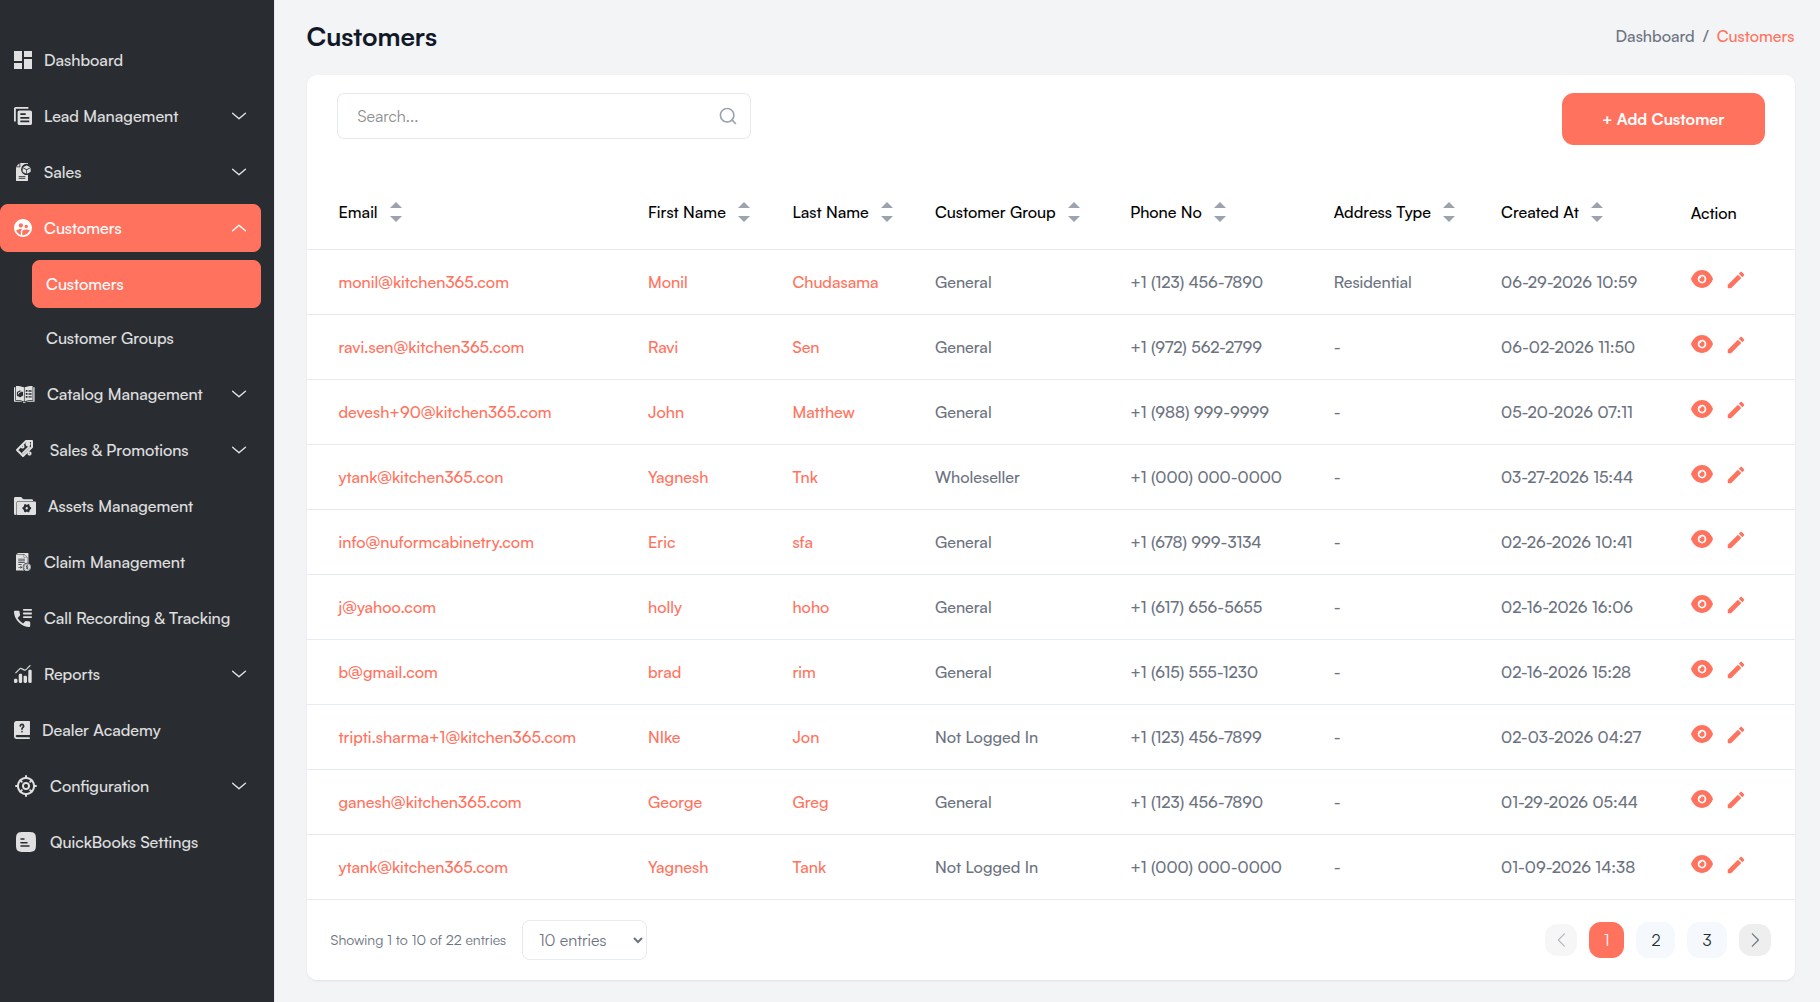
a. Customer List
The main listing table displays all customer records with sortable columns.
| Column | Description |
|---|---|
| Customer email address. Click to open the customer detail page. | |
| First Name | Customer's first name. Click to open the customer detail page. |
| Last Name | Customer's last name. Click to open the customer detail page. |
| Customer Group | Assigned customer group (e.g., General). Shown in v2 only. |
| Phone No. | Contact number formatted as +1 (555) 555-5555. |
| Address Type | Residential or Commercial from the shipping address. Shown in v2 only. |
| Created At | Date and time the record was created (displayed in EST). |
| Action | View and Edit icons for the customer record. |
All columns except Action are sortable. Click the column headers to sort ascending or descending.
i. Search Bar
- Located at the top-left of the table.
- Placeholder: "Search..."
- Filters customers by email or name in real time.
ii. Add Customer Button
- + Add Customer — Opens the Add Customer modal. Requires create permission.
- Located at the top-right of the table.
iii. Pagination
- Located at the bottom of the table.
- Shows "Showing X to Y of Z entries".
- Page size options: 10 / 25 / 50 / 75 / 100 entries.
- Navigate between pages using the pagination controls.
b. Add Customer
The Add Customer modal lets admin users manually add customers for quotes, orders, or records received through other channels.
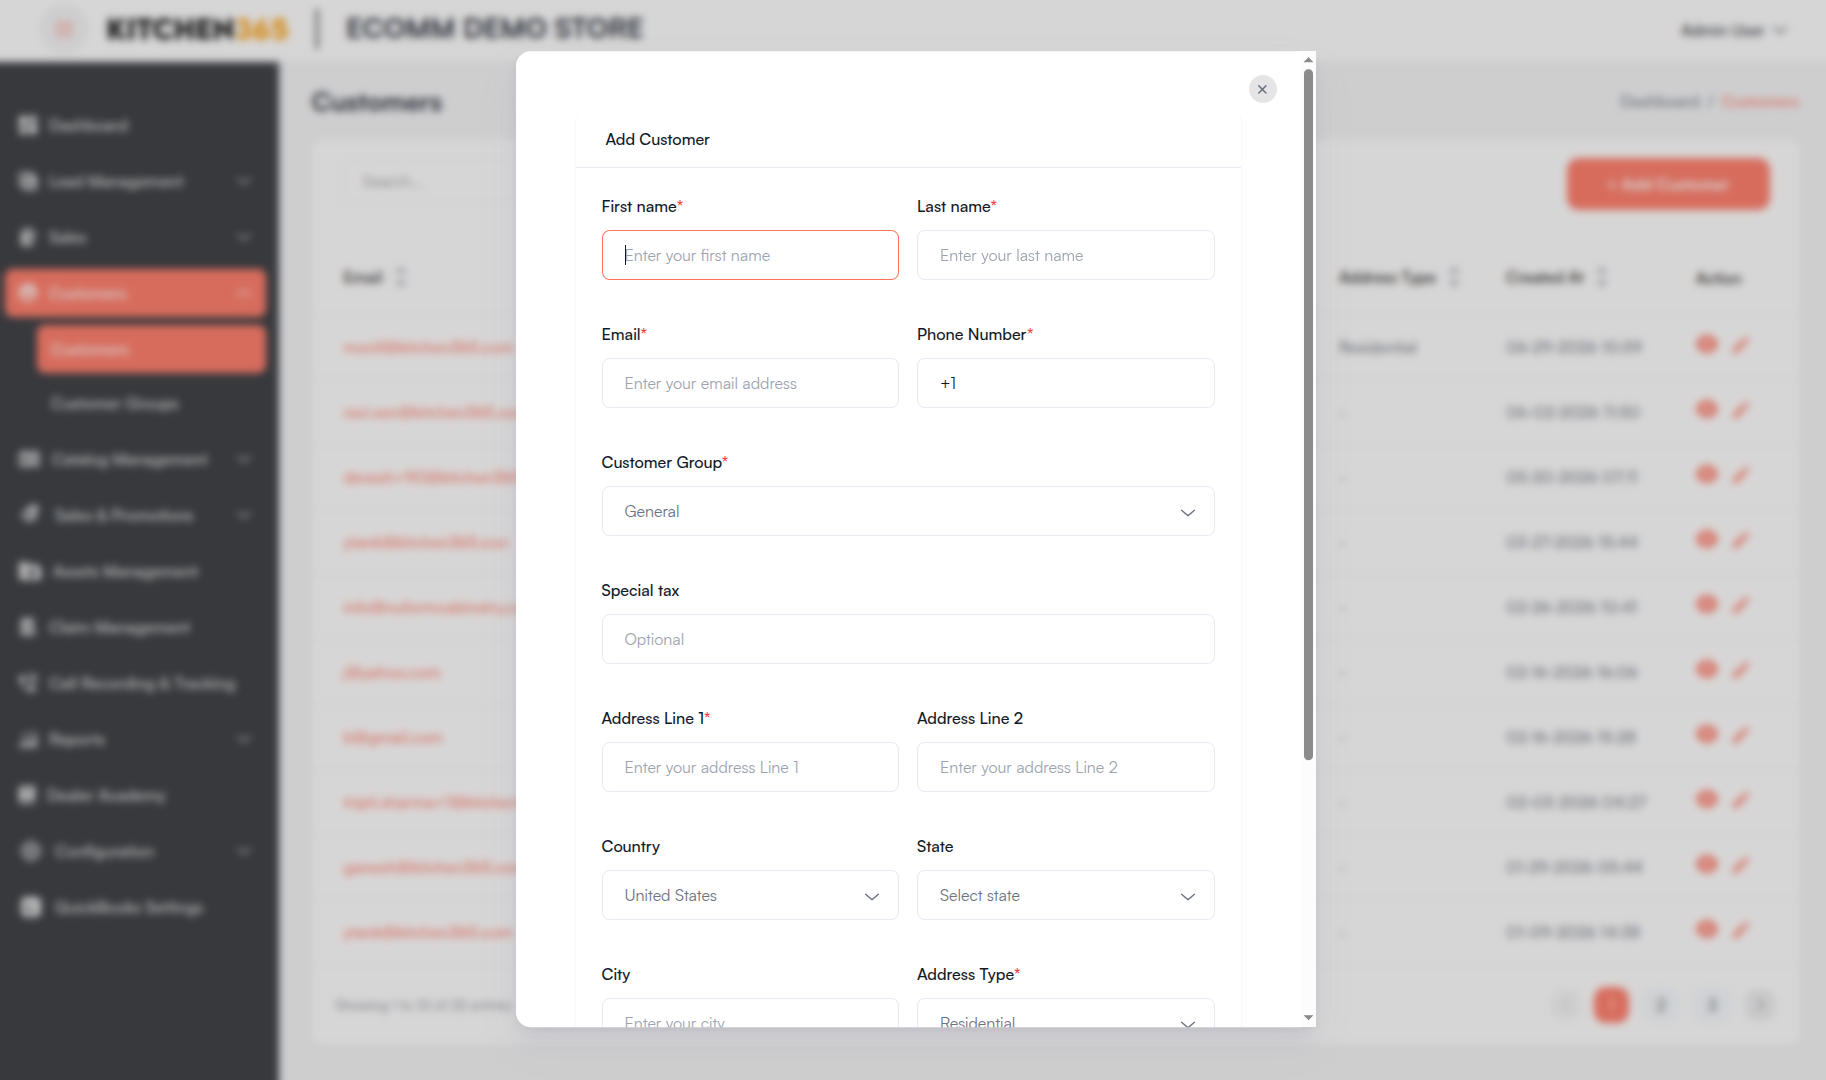
Accessing This Popup
- Navigate to Customers > Customers.
- Click + Add Customer in the top-right corner.
Form Field Descriptions
All fields marked with a red asterisk (*) are mandatory.
| Field Name | Description |
|---|---|
| First name | Customer's first name. |
| Last name | Customer's last name. |
| Valid email address used for communication. | |
| Phone Number | 10-digit US contact number. Country code +1 is shown by default. |
| Customer Group | Select the customer's pricing/tax group. Defaults to General on create. (v2) |
| Special tax | Optional decimal value (up to 4 decimal places) for customer-specific tax. (v2) |
| Address Line 1 | Primary street address or building number. |
| Address Line 2 | Optional apartment, suite, or additional address info. |
| Country | Customer country (United States only). |
| State | State dropdown based on the selected country. |
| City | City or town. |
| Address Type | Residential or Commercial. Used for shipping rate calculations. (v2) |
| Zip/Postal Code | Valid postal code (e.g., 12345 or 12345-6789). |
On submit, the same address is saved as both the billing and shipping address (including Address Type when applicable).
Click Submit to create the customer. The new record appears in the listing immediately.
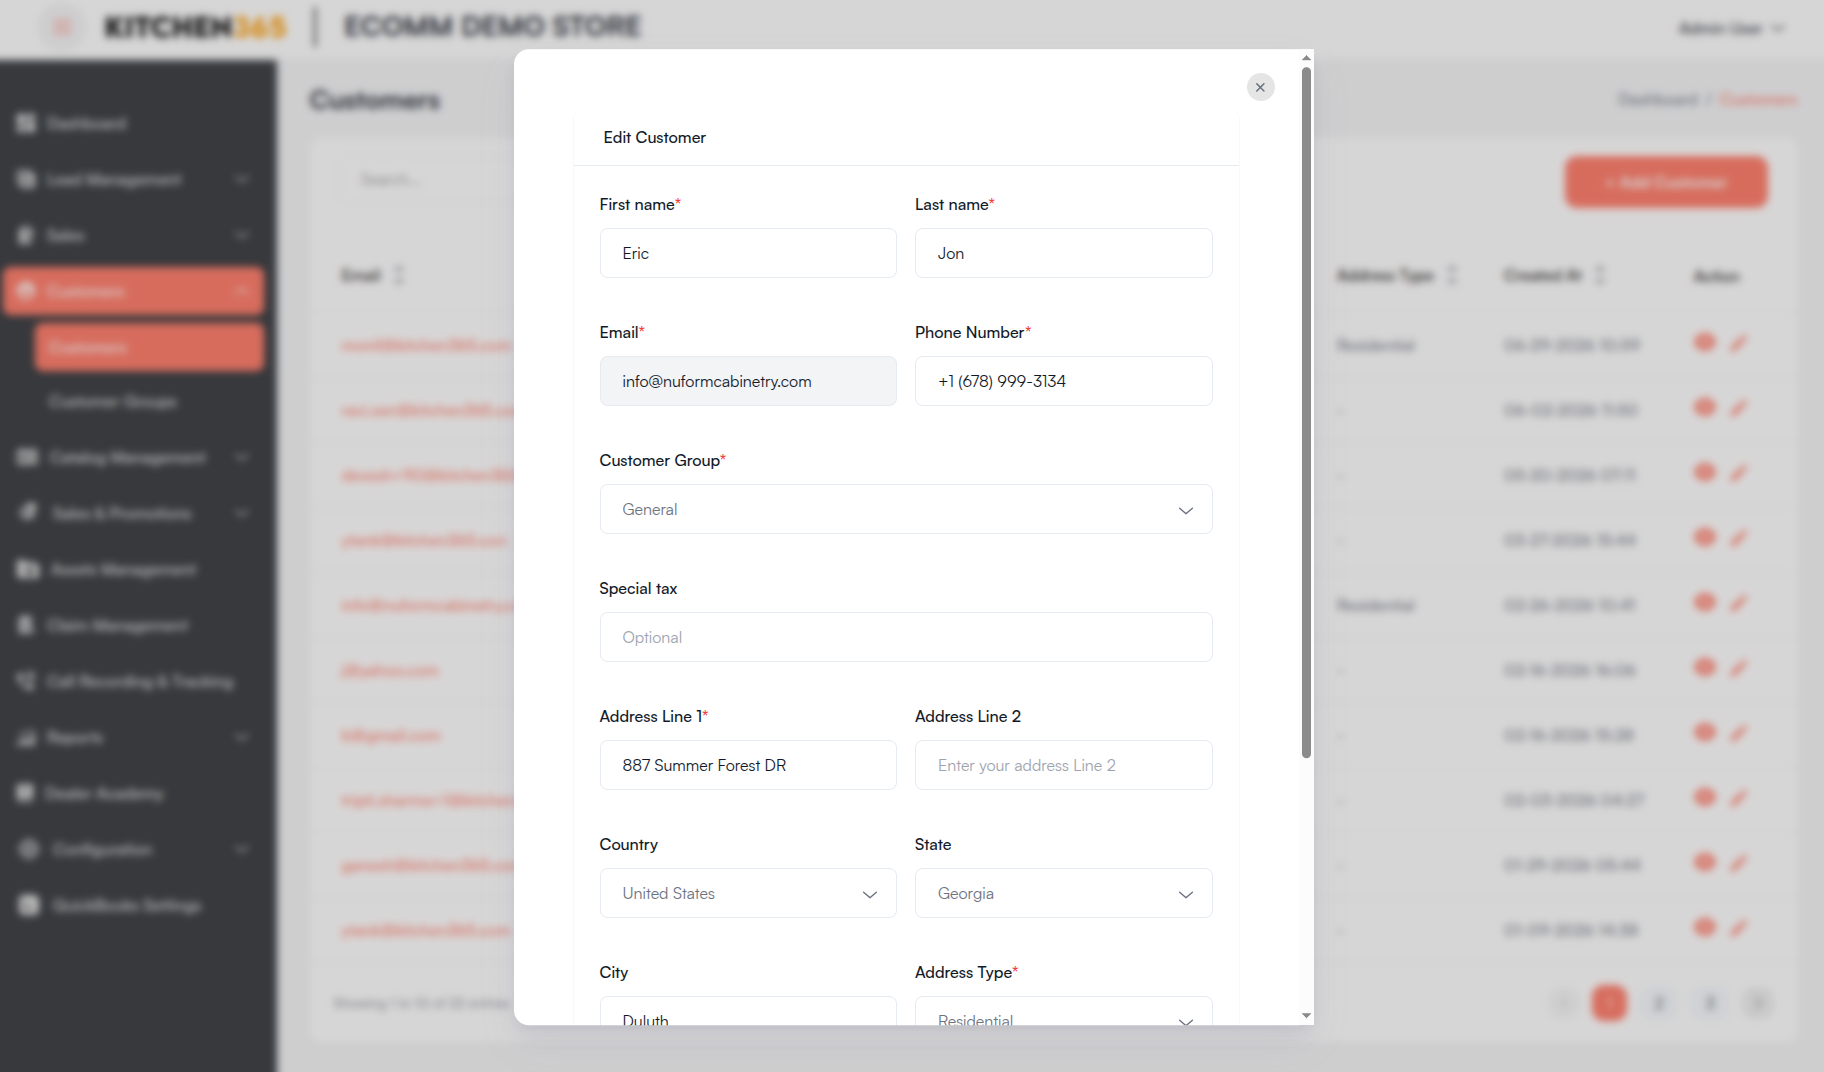
c. Edit Customer
Click the Edit icon on a customer row, or the pencil icon on the customer detail page, to open the Edit Customer modal.
You can update all fields except Email, which is read-only when editing. Click Update to save changes.
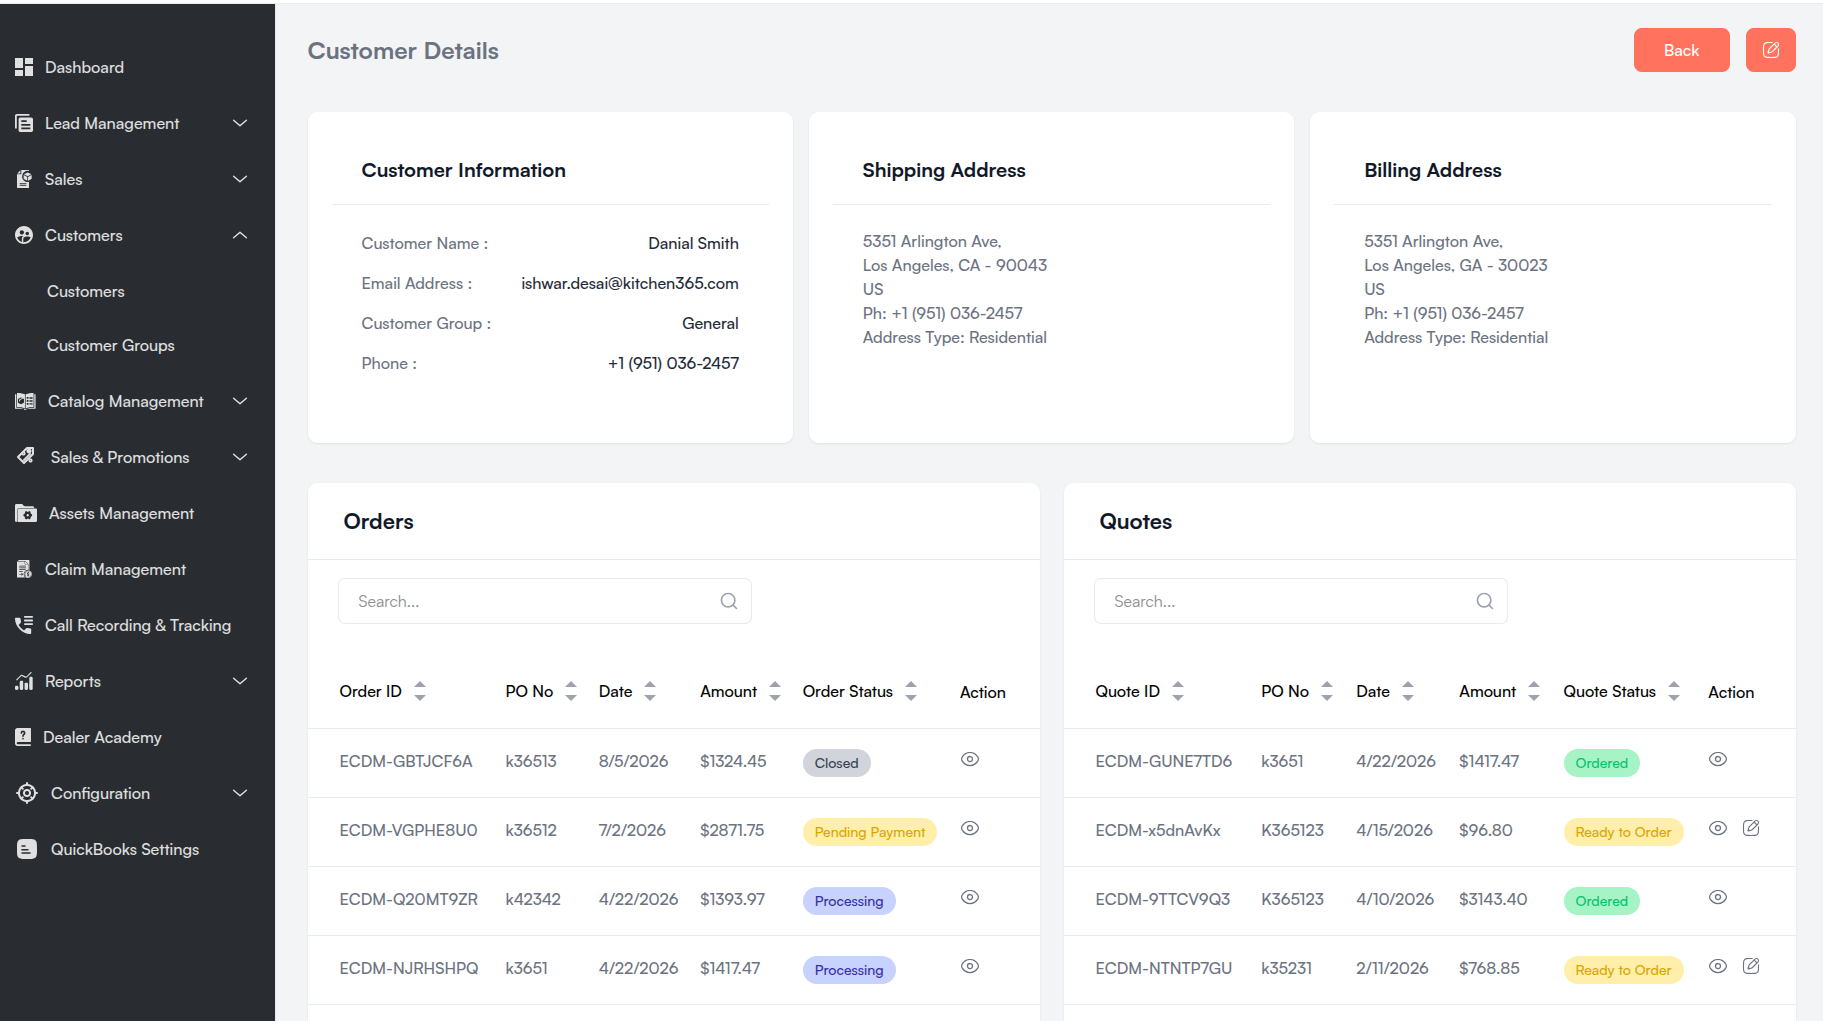
d. View Customer Details
The Customer Details page shows a customer's profile, addresses, order history, quote history, and digital assets.
Navigation
- Go to Customers > Customers.
- Click the Email, First Name, Last Name, or View icon on a row.
Customer Information
| Field | Description |
|---|---|
| Customer Name | Full name (First Name + Last Name). |
| Email Address | Customer email. |
| Customer Group | Assigned group name, or N/A. (v2) |
| Phone | Formatted phone number, or N/A. |
Shipping Address
Displays the customer's shipping location:
- Street address (Line 1 and Line 2)
- City, State, Zip Code
- Country
- Phone number
- Address Type —
CommercialorResidential(v2)
Shows N/A if no shipping address exists.
Billing Address
Same structure as the shipping address. Billing and shipping may differ if updated separately through other flows.
Orders Section
Lists all orders placed by the customer.
| Column | Description |
|---|---|
| Order ID | System-generated order identifier. |
| PO No. | Purchase Order number. Shows N/A if not provided. |
| Date | Order creation date. |
| Amount | Total order value. Shows N/A if not calculated. |
| Order Status | Current order status (colored status badge). |
| Action | View icon — opens the order details page. |
Default pagination: 5 entries per page (options: 5, 10, 20).
Quotes Section
Lists all quotes created for the customer.
| Column | Description |
|---|---|
| Quote ID | Unique quote identifier. |
| PO No. | Related purchase order number. Shows N/A if not provided. |
| Date | Quote creation date. |
| Amount | Total quoted amount. Shows N/A if not calculated. |
| Quote Status | Current quote status (colored pill tag). |
| Action | View icon — opens quote details. Edit icon — opens quote edit (hidden when status is Ordered). |
Quote Status Tags
| Status | Label | Color |
|---|---|---|
| Ready to Order | Ready to Order | Yellow |
| Ordered | Ordered | Green |
| In Cart | In Cart | Blue |
Default pagination: 5 entries per page (options: 5, 10, 20).
Assets Management
The Assets Management section at the bottom of the customer detail page shows digital files and folders tied to this customer.
- Browse folders using breadcrumb navigation.
- Switch between grid and list view.
- Search files and folders by name.
- Upload, preview, and organize customer-specific assets.
For tenant-wide asset management, use Assets Management from the main sidebar.
Action Buttons
| Button | Description |
|---|---|
| Back | Returns to the previous page (customer listing). |
| Edit | Opens the Edit Customer modal (pencil icon). |
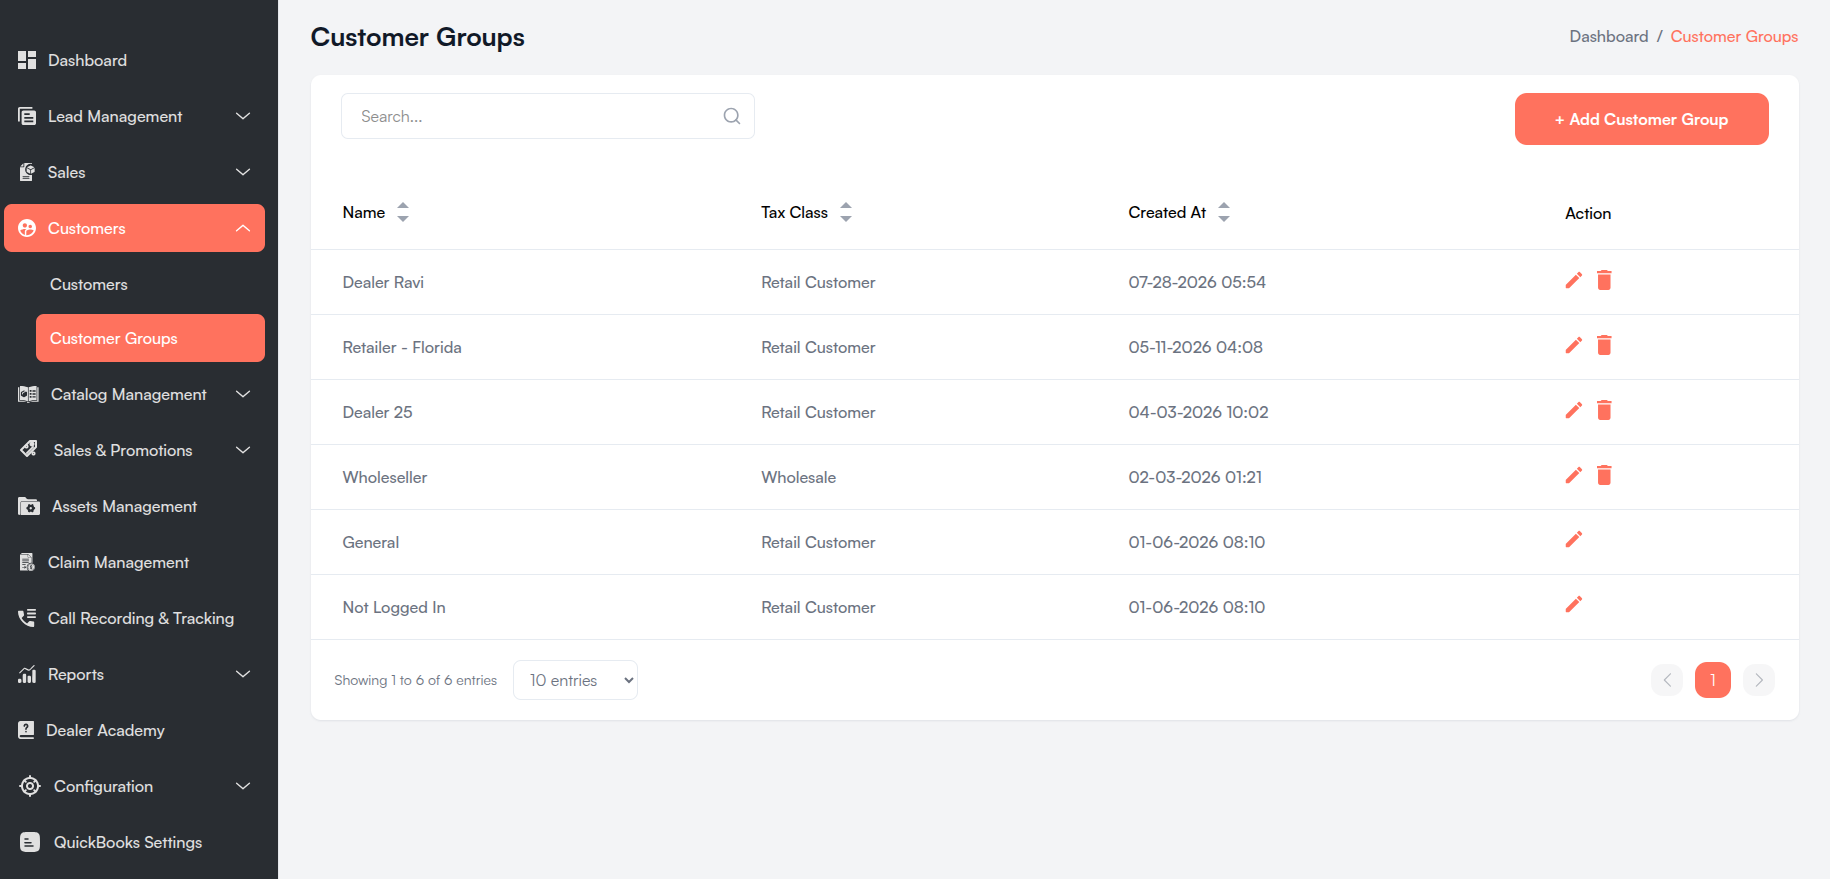
e. Customer Groups (v2)
Customer Groups control tier pricing, tax class assignment, and optional special tax rates. Customers are assigned to a group when created or edited.
Navigate to Customers > Customer Groups.
Customer Group List
| Column | Description |
|---|---|
| Name | Customer group code/name (e.g., General, Wholesale). |
| Tax Class | Linked tax class for customers in this group. |
| Created At | Date and time the group was created (EST). |
| Action | Edit and Delete (delete only when allowed). |
Add / Edit Customer Group
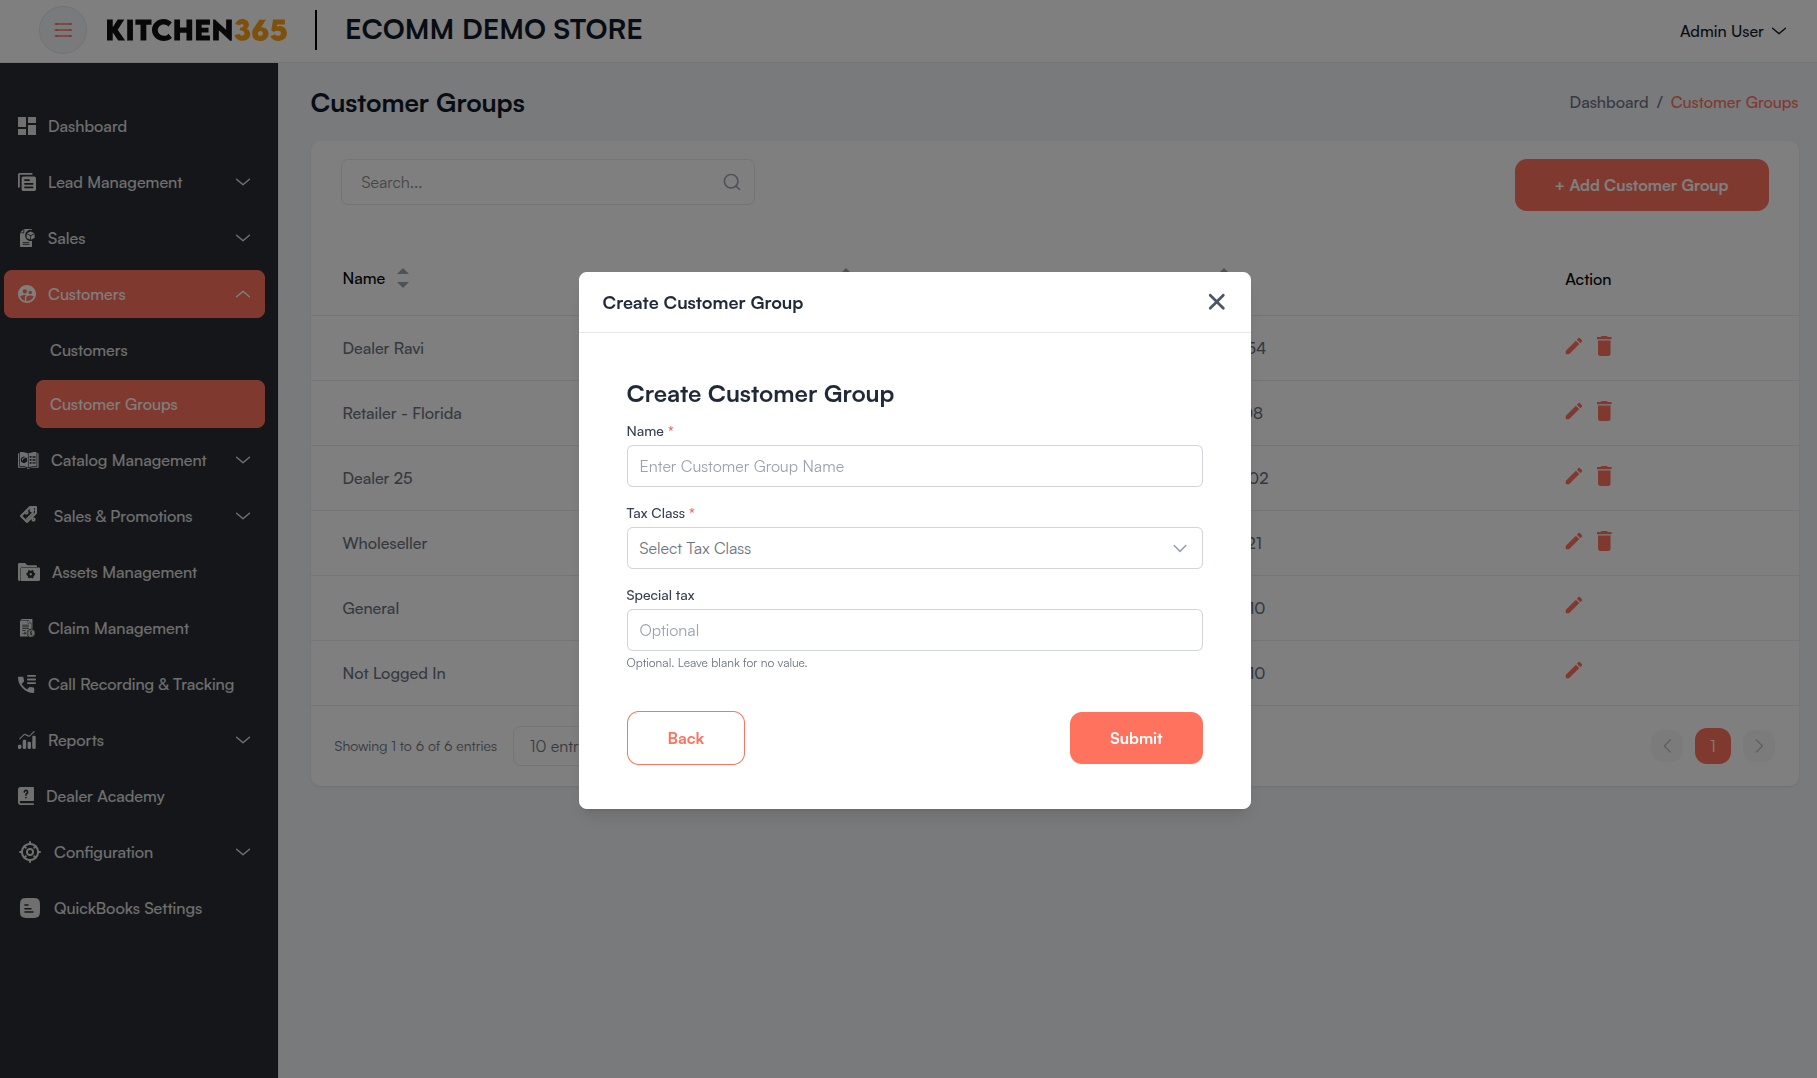
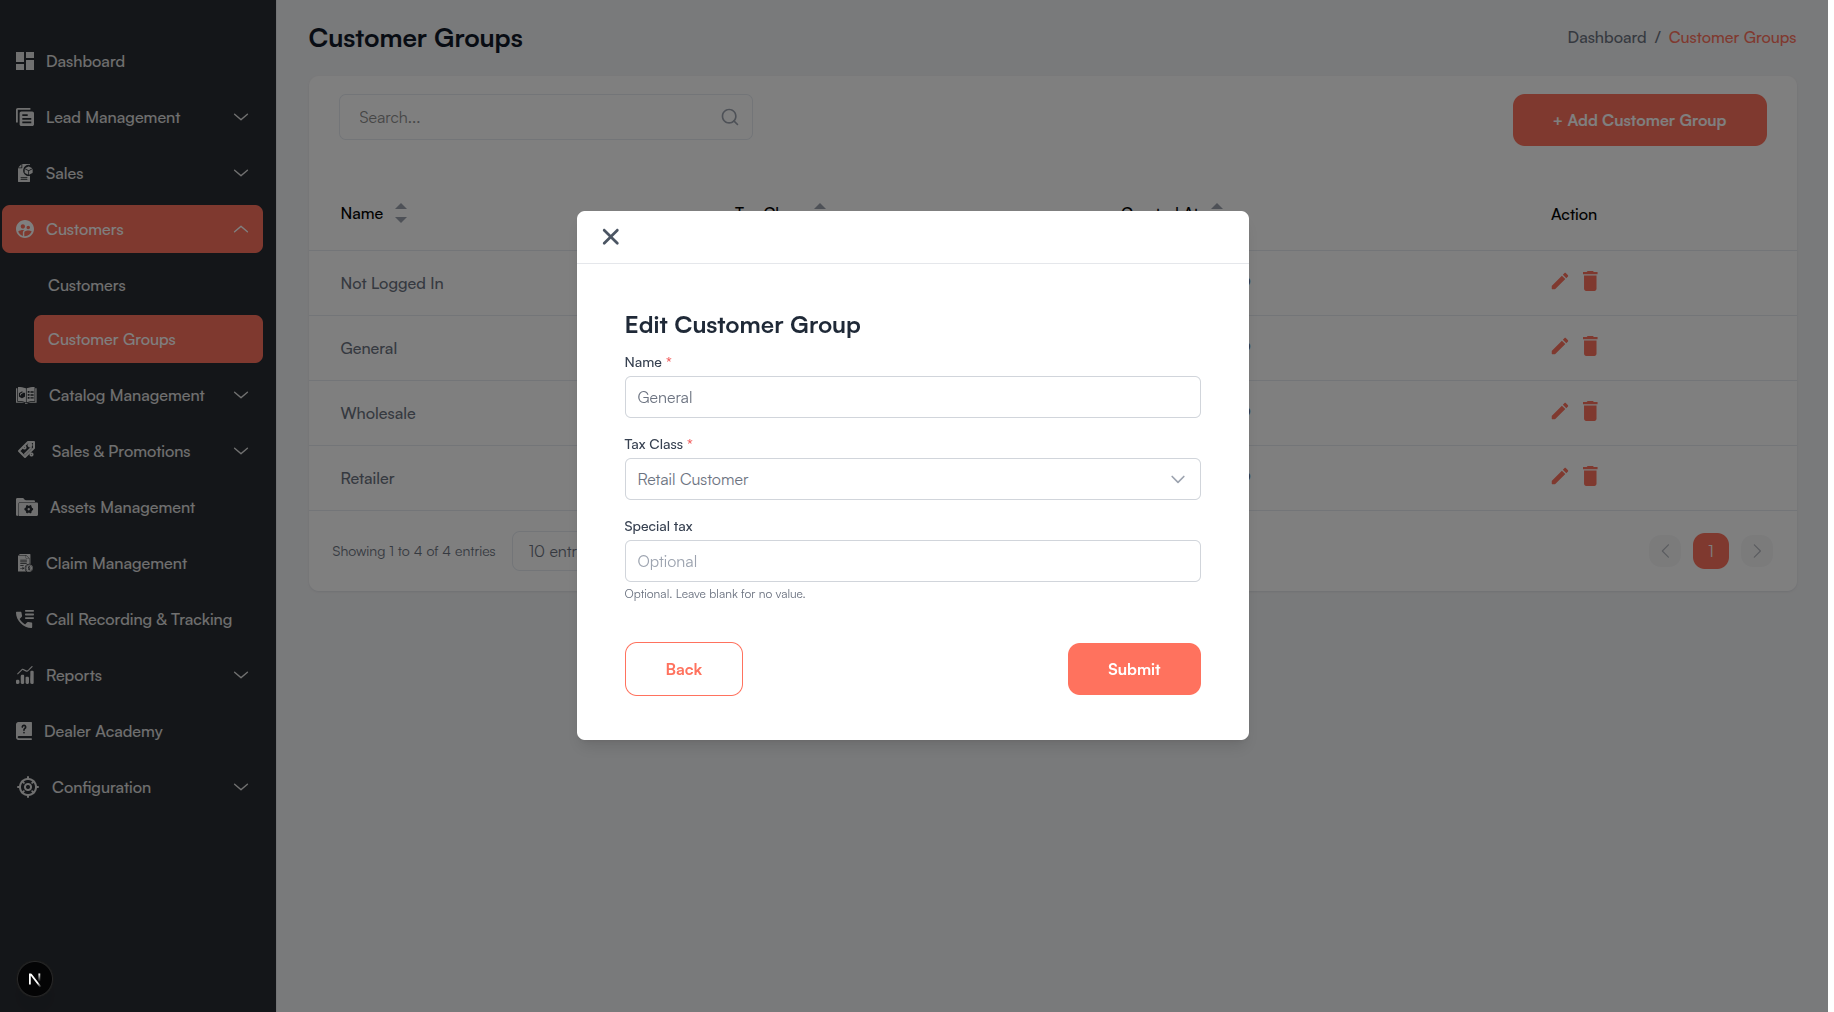
Click + Add Customer Group or the Edit icon on a row.
| Field Name | Description |
|---|---|
| Name | Unique customer group name. Required. |
| Tax Class | Tax class with type CUSTOMER. Required. |
| Special tax | Optional decimal (up to 4 decimal places). Leave blank for none. |
Click Submit to create or Update to save changes.
The default General group cannot be deleted. Groups in use by customers may also be protected from deletion.
How Customer Groups Affect Sales
- Tier Pricing (Configuration > Tier Pricing) applies price multipliers by customer group.
- When creating quotes or orders, the selected customer's group drives catalog pricing and tax calculations.
- Special tax on a customer or group overrides default tax when configured.