Order Management
The Order Management module in the Kitchen365 Console v2.0.0 provides a centralized interface to view, track, and manage all customer orders. Admins can monitor order and payment statuses, create new orders, view full order details, manage invoices, shipments, credit memos, and update order statuses.
Access
How to open Order Management
- Log in to the Kitchen365 Console.
- In the left sidebar, click Sales > Order Management.
From this section you can manage customer orders including creation, tracking, status updates, invoicing, and fulfillment.
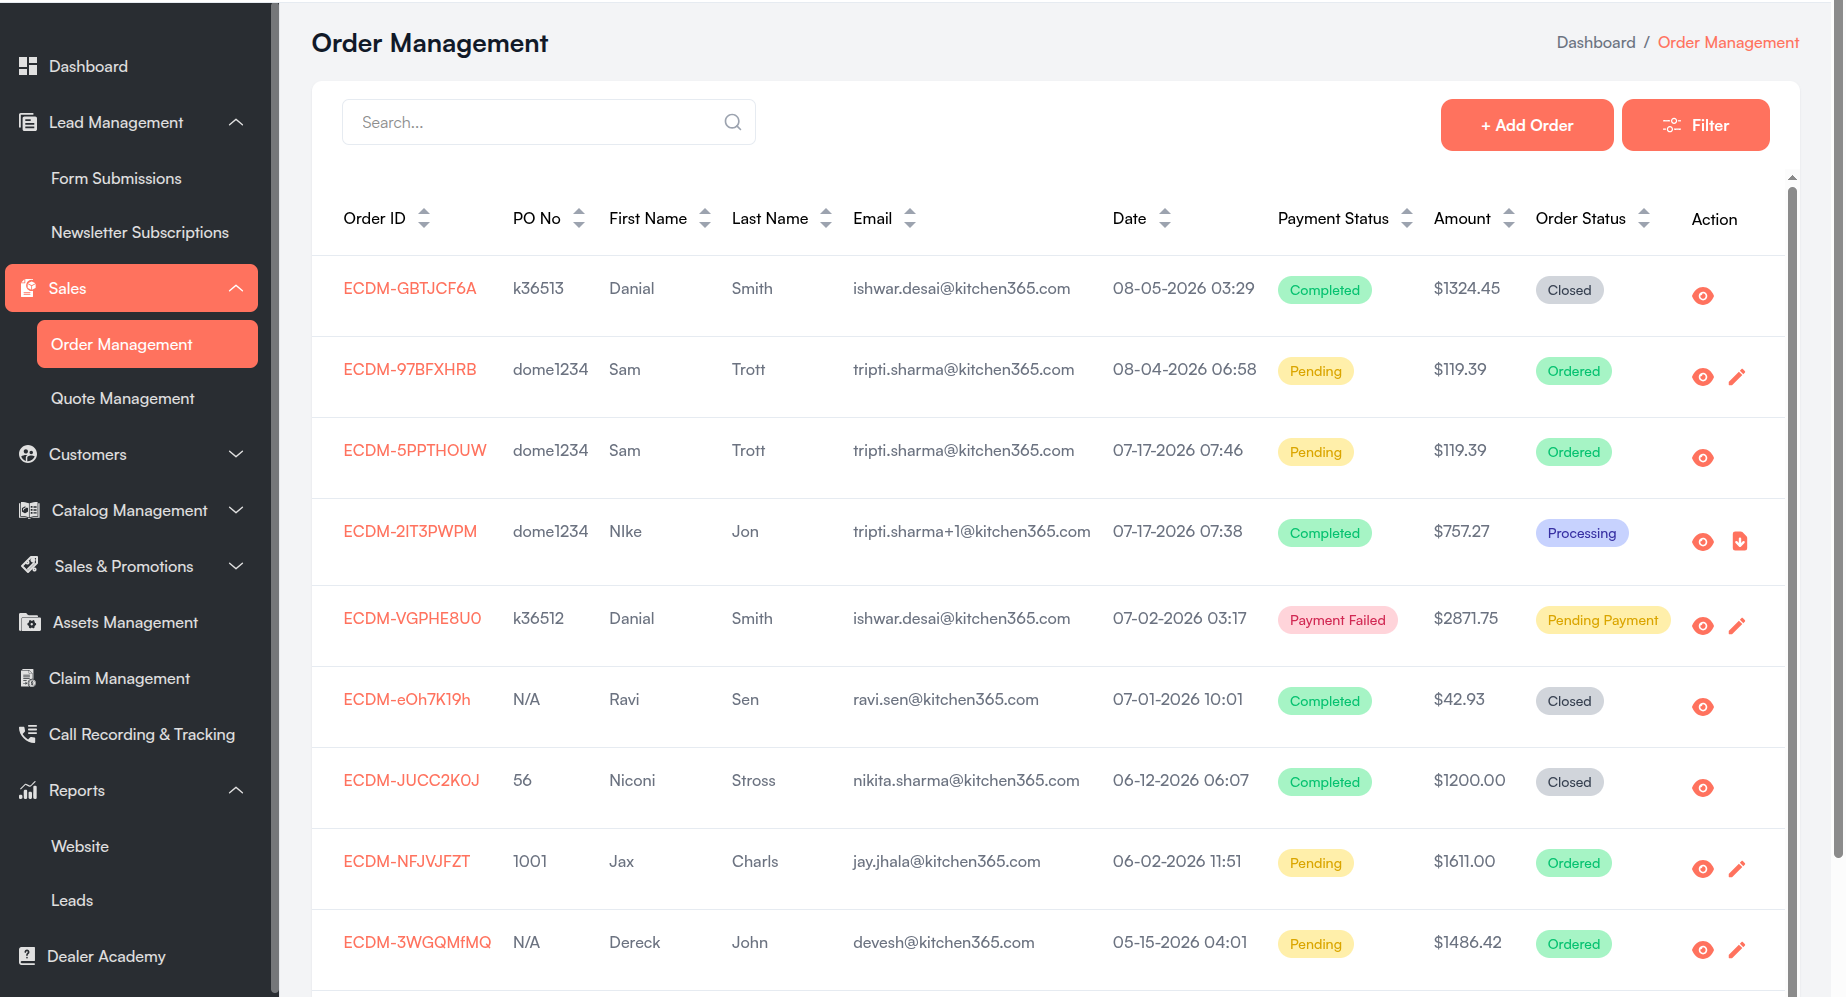
a. Order List
The main listing table displays all orders with sortable columns. Each row represents a unique order.
| Column | Description |
|---|---|
| Order ID | Unique identifier auto-generated for each order. Click to open order details. |
| PO No. | Customer's Purchase Order number. |
| First Name | Customer's first name. |
| Last Name | Customer's last name. |
| Customer's email address. | |
| Date | Timestamp when the order was created (displayed in EST). |
| Payment Status | Indicates the current payment state. |
| Amount | Total value of the order. |
| Order Status | Current fulfillment status of the order. |
| Action | Icons to view, download invoice, edit status, or send payment reminder. |
All columns except Action are sortable. Click the column headers to sort ascending or descending.
i. Search Bar
- Located at the top of the order list.
- Placeholder: "Search..."
- Allows quick searching by Order ID, PO No., Customer Name, or Email.
- Search requires a minimum of 3 characters before results are filtered.
ii. Filter
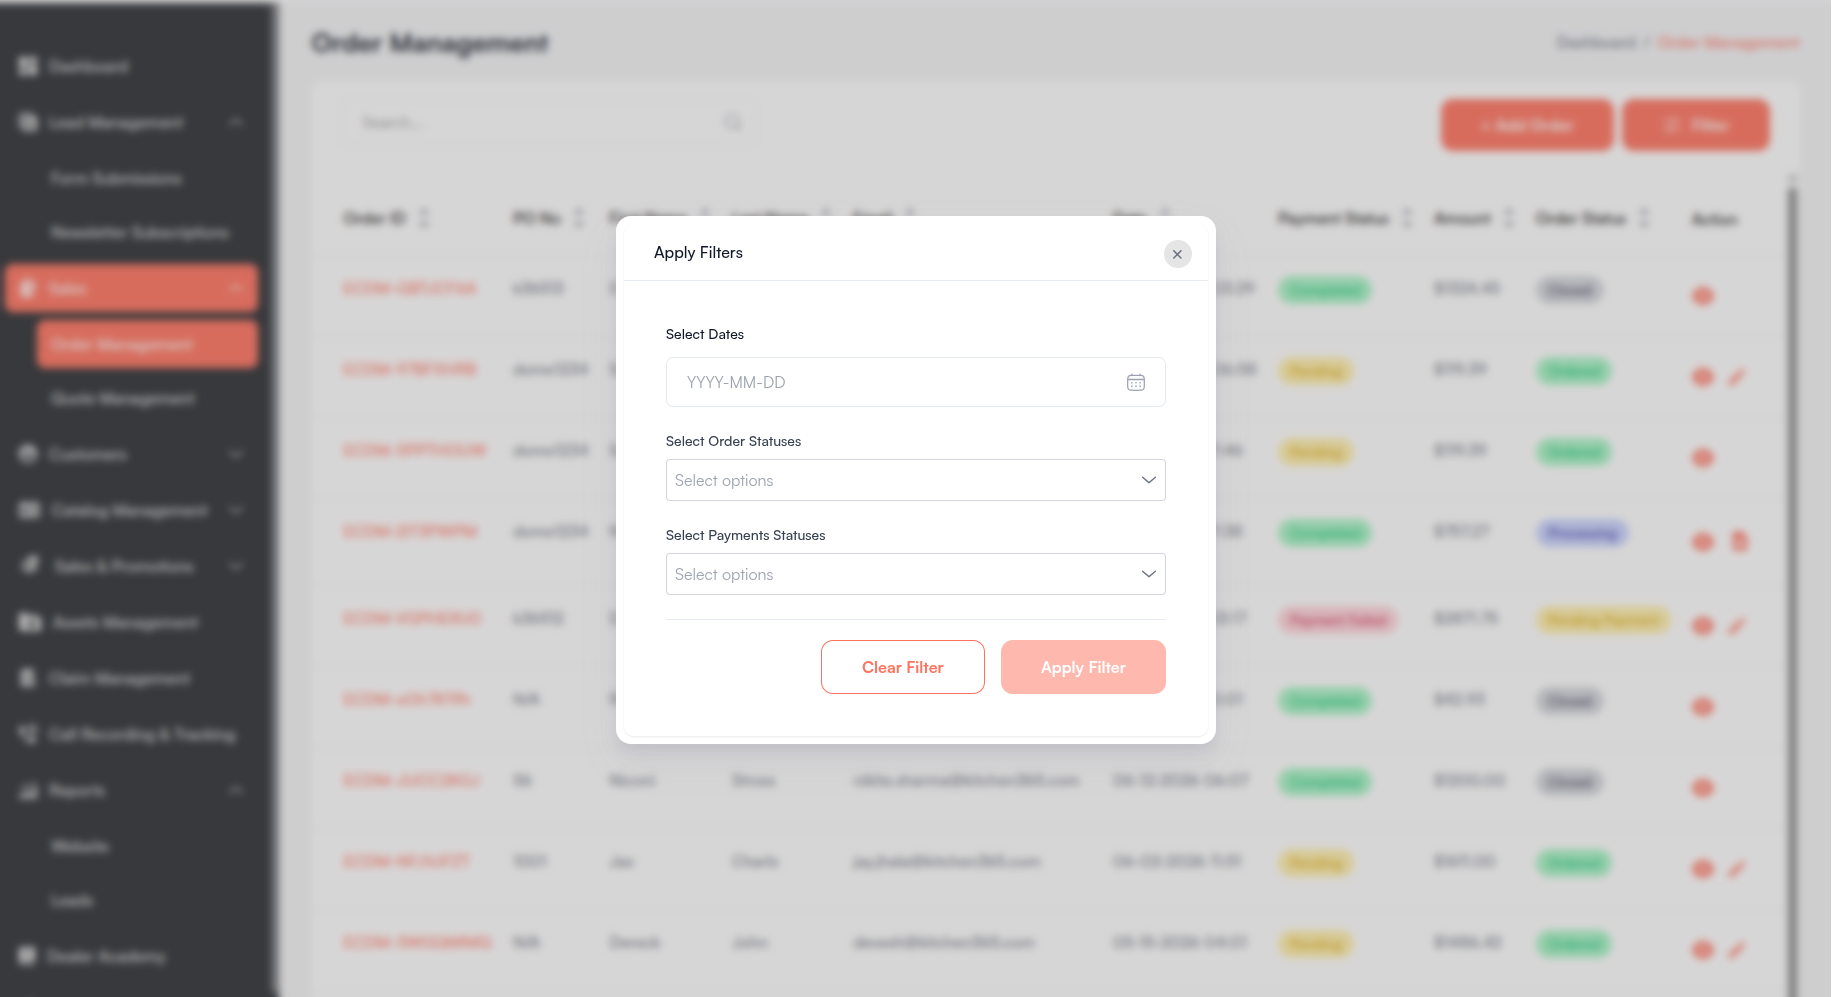
Click the "Filter" button at the top right to open the "Apply Filters" modal. A badge on the button shows how many filters are currently active.
Available filters:
| Filter | Label | Options |
|---|---|---|
| Date range | Date picker | Filter orders by start and end date. |
| Order status | Select Order Statuses | Pending, Ordered, Processing, Completed, Closed, Pending Payment |
| Payment status | Select Payments Statuses | Pending, Completed, Failed |
Filter actions:
- Clear Filter — Resets all selected filters.
- Apply Filter — Applies the selected filters and closes the modal. A success toast "Filters Applied Successfully!" is shown.
When no orders match the applied filters, the table displays: "No data available for the selected filters."
iii. Status Tags
Payment Status
| Status | Description |
|---|---|
| Pending | Payment not yet received or processed. |
| On Hold | Payment is temporarily on hold. |
| Completed | Payment has been successfully completed. |
| Payment Failed | Online payment attempt failed. |
Order Status
Orders can display various statuses including: Pending, Ordered, Processing, Shipped, Completed, Closed, Pending Payment, Partially Paid, and Canceled.
iv. Pagination
- Located at the bottom of the table.
- Shows "Showing X to Y of Z entries".
- Page size options: 10 / 25 / 50 / 75 / 100 entries.
- Navigate between pages using the pagination controls.
v. Header Actions
| Action | Description |
|---|---|
| + Add Order | Opens the create order form. Requires order creation permission. |
| Filter | Opens the filter modal (shows active filter count badge when filters are applied). |
vi. Row Actions
Under the "Action" column:
| Action | Icon / Label | When Available |
|---|---|---|
| View order | 👁️ View Order Details | Always available. |
| Download invoice | 📄 Download Invoice | Order status is Processing, Complete, or Completed. |
| Edit order status | ✏️ Edit Order Status | Order is Ordered or Pending Payment with payment status Pending or Failed. Not available for ACH payments. |
| Payment reminder | 🔔 Bell icon | Split payment is enabled and order status is Partially Paid or Pending Payment. |
b. Create New Order
Click "+ Add Order" from the Order Management list to open the Create New Order screen. This form uses the same interface as quote creation, adapted for direct order placement.
Orders can also be created by converting a quote from Quote Management using the Place Order button on the quote edit or detail page. See Creating Orders from Quotes.
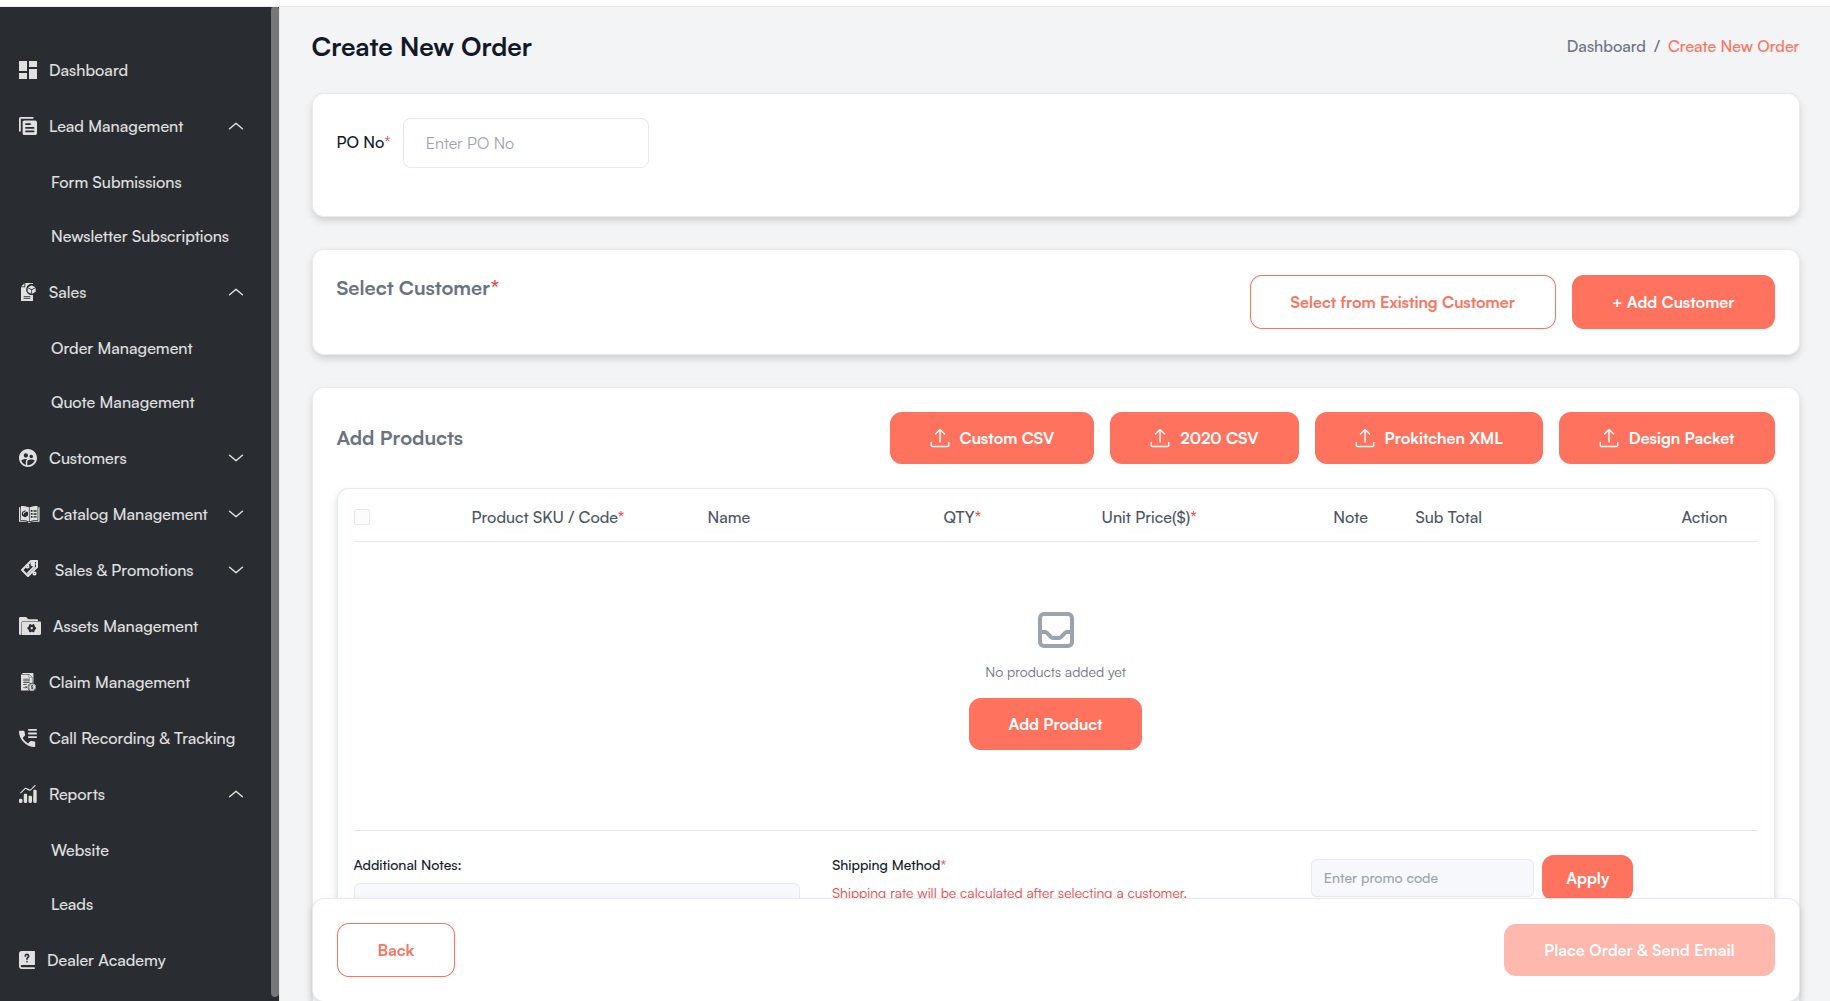
i. Overview
The Create New Order screen allows admins to:
- Select or create a customer profile
- Add products manually or import from 2020 CSV / ProKitchen (XML) files
- Configure shipping, taxes, and discounts
- Add custom notes
- Select a payment method and place the order
ii. Required Fields
| Field | Description |
|---|---|
| PO No. | Unique purchase order number. |
| Select Customer | A customer must be selected from existing records or added as new. |
| Product SKU / Code | Required when adding products manually. |
| Unit Price(s) | Required when adding products manually. |
| Shipping Method | One option must be selected. |
| Tax | Calculated automatically once customer, shipping, and products are selected. |
| Payment Method | Required to place the order. |
iii. Add Products
The Add Products section appears below the customer selection on the Create New Order screen. Use it to add line items before placing the order.
When no products have been added yet, the section displays "No products added yet" with an "Add Product" button.
Once products are added, the following action buttons appear at the top right of the section:
| Button | Description |
|---|---|
| Add Product | Opens the product selection modal to search and add catalog items. |
| Custom CSV | Upload a custom CSV file with SKU, Description, Qty, and Unit Price. |
| 2020 CSV | Upload a CSV file exported from 2020 Design software. |
| Prokitchen XML | Upload an XML file exported from ProKitchen software. |
| Design Packet | Upload a PDF design document to attach to the order. |
| Delete Selected | Removes selected products from the list (visible when one or more are checked). |
Search by Style
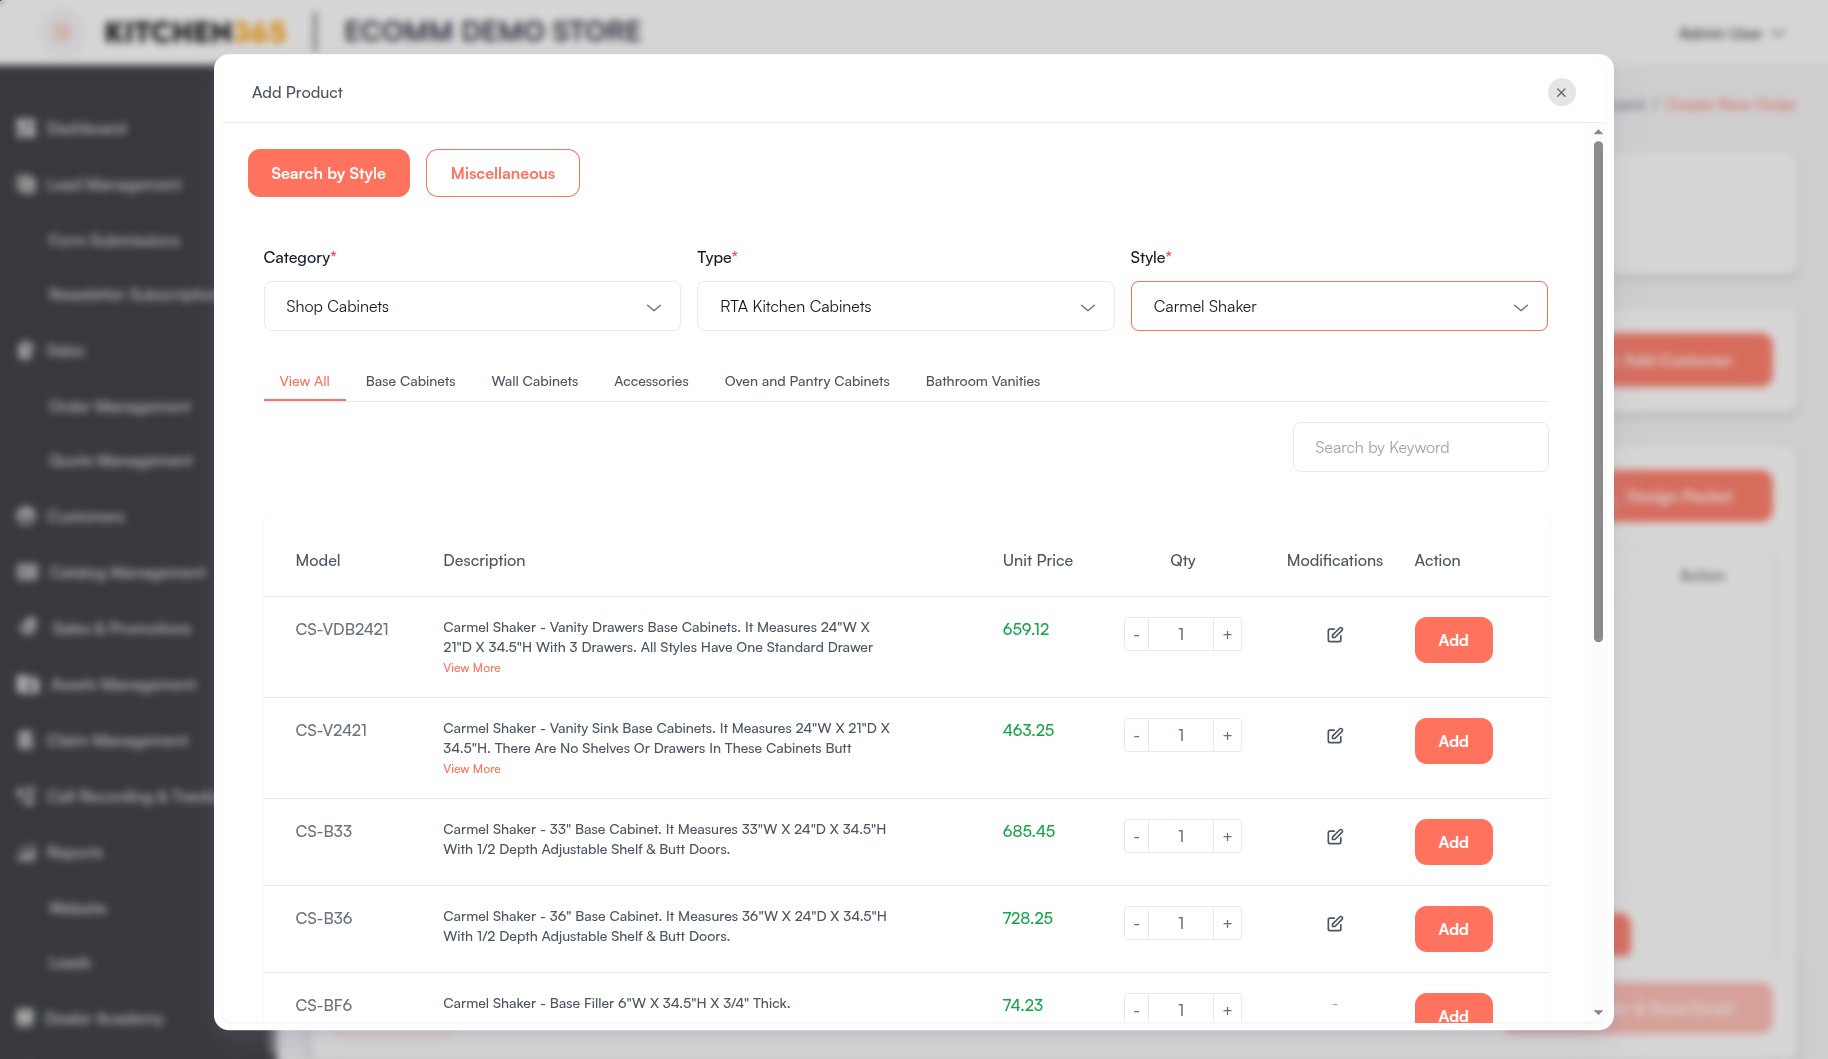
Click "Add Product" to open the Add Product modal. The Search by Style tab lets you browse and add products from the catalog.
- Select Category, Type, and Style from the dropdown filters (required fields).
- Use the sub-category links (e.g., View All, Base Cabinets, Wall Cabinets) to narrow results.
- Optionally search by keyword using the Search by Keyword field.
- Set the Qty for the desired product using the +/- controls.
- Use the Modifications icon to add product-level notes or customizations.
- Click Add on the product row to add it to the order.
Miscellaneous Items
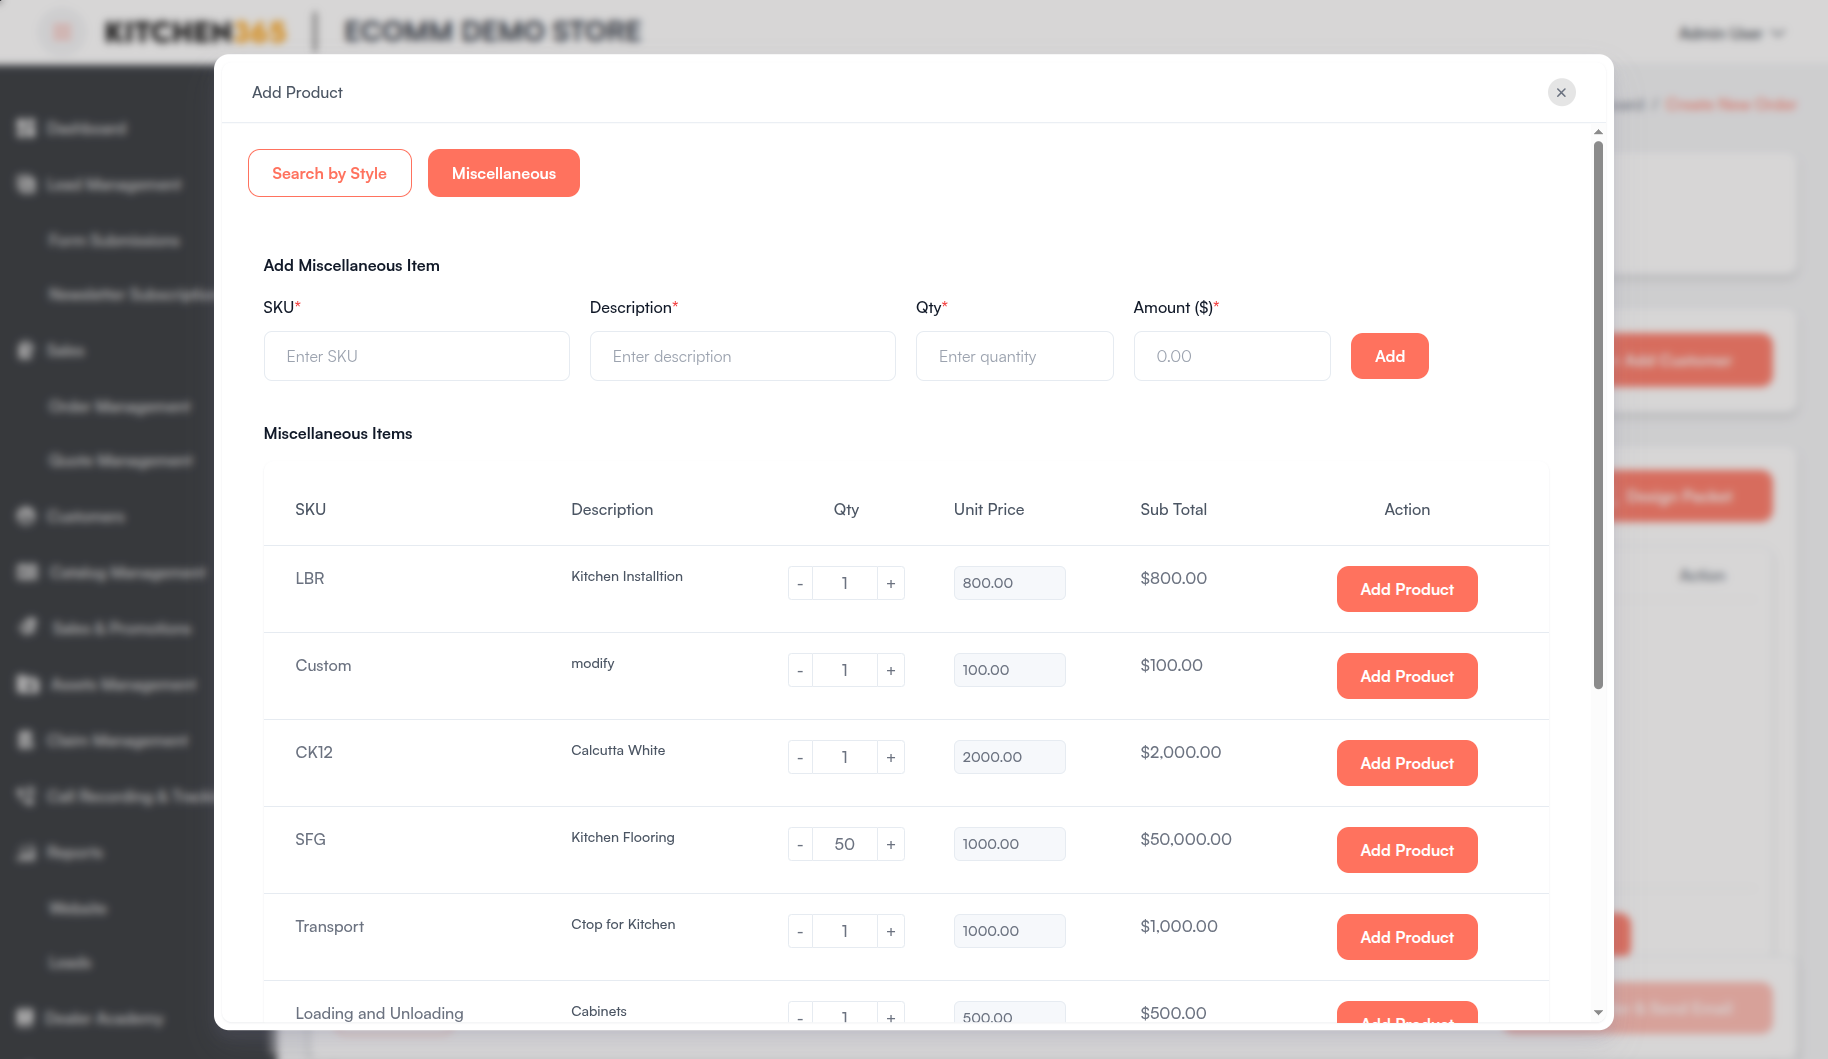
Switch to the Miscellaneous tab in the Add Product modal to add custom or non-catalog items.
Add a new miscellaneous item manually:
| Field | Description |
|---|---|
| SKU | Enter the item SKU. |
| Description | Enter a short description. |
| Qty | Enter the quantity. |
| Amount ($) | Enter the unit price. |
Click Add to save the item to the miscellaneous list.
Add from existing miscellaneous items:
The table below lists previously saved miscellaneous items with columns for SKU, Description, Qty, Unit Price, Sub Total, and Action. Adjust the quantity or price if needed, then click Add Product on the row to add the item to the order.
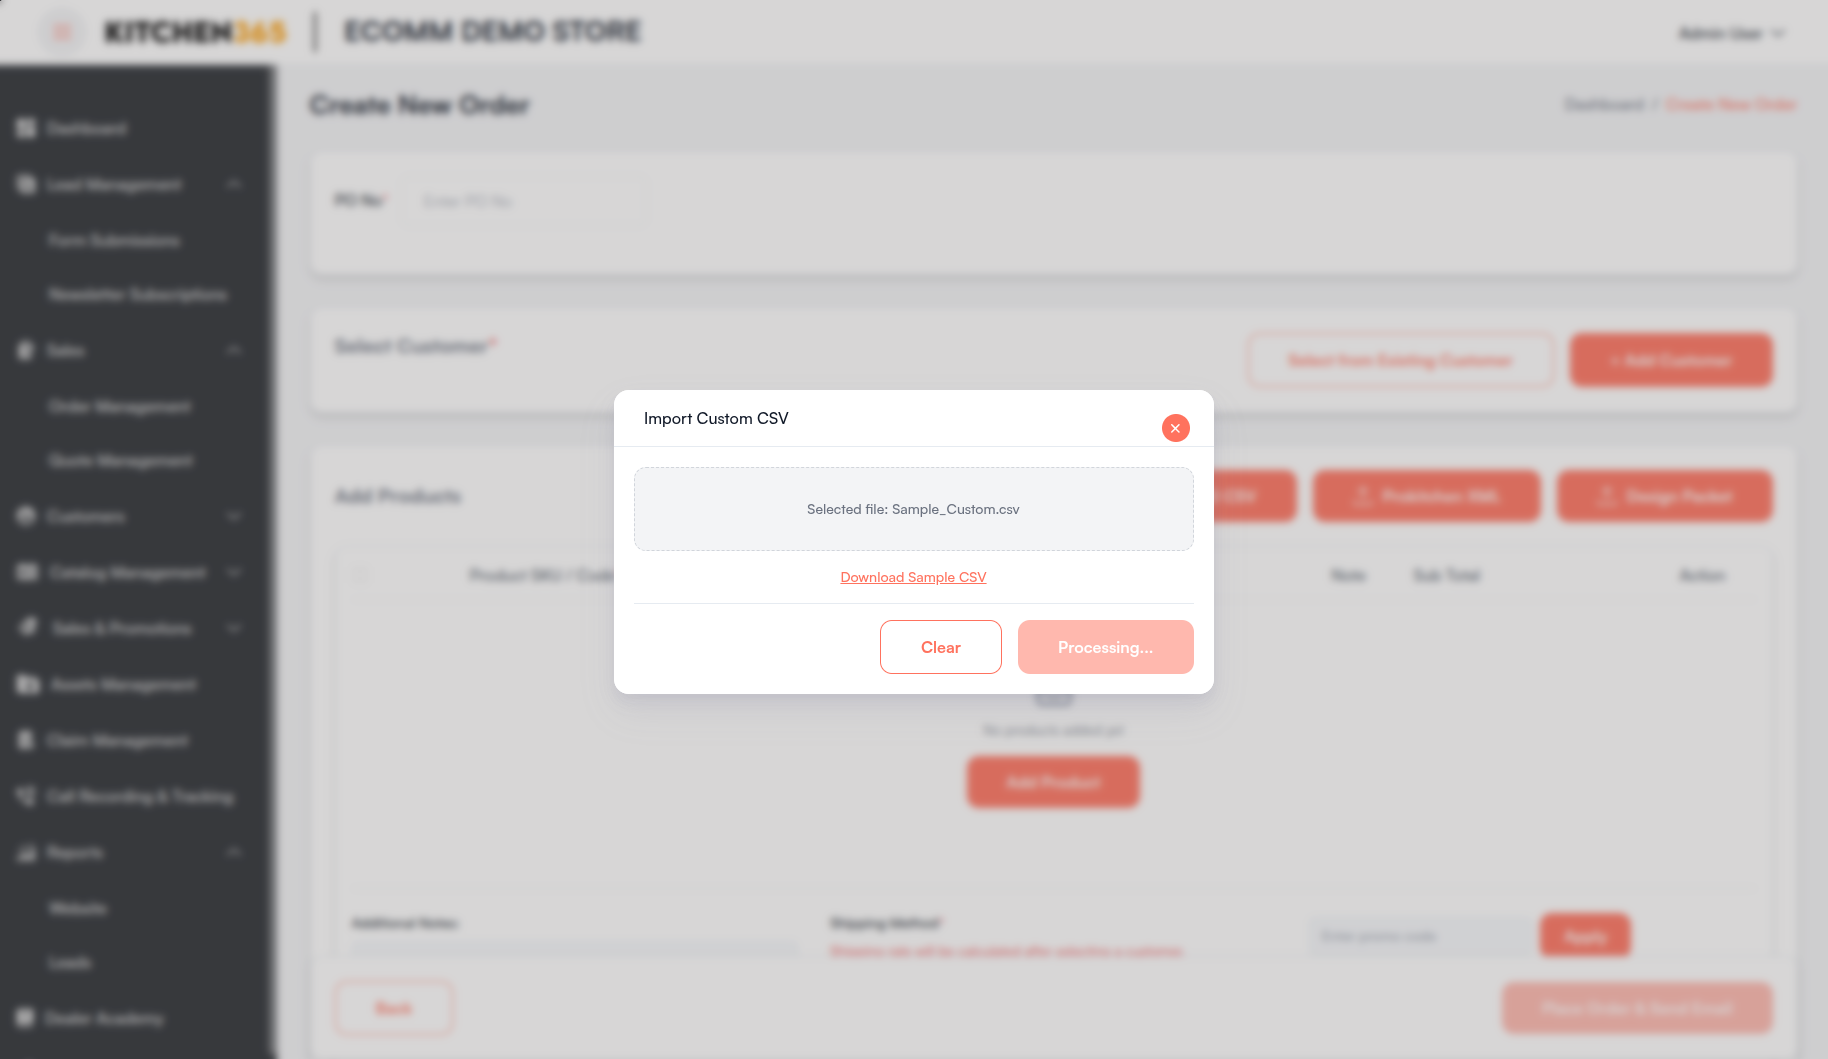
Import Custom CSV
Click Custom CSV to open the Import Custom CSV modal.
- Select a CSV file containing product details (SKU, Description, Qty, Unit Price).
- Click Download Sample CSV to view the expected file format.
- Click Proceed to import the products into the order.
- Use Clear to remove the selected file and start over.
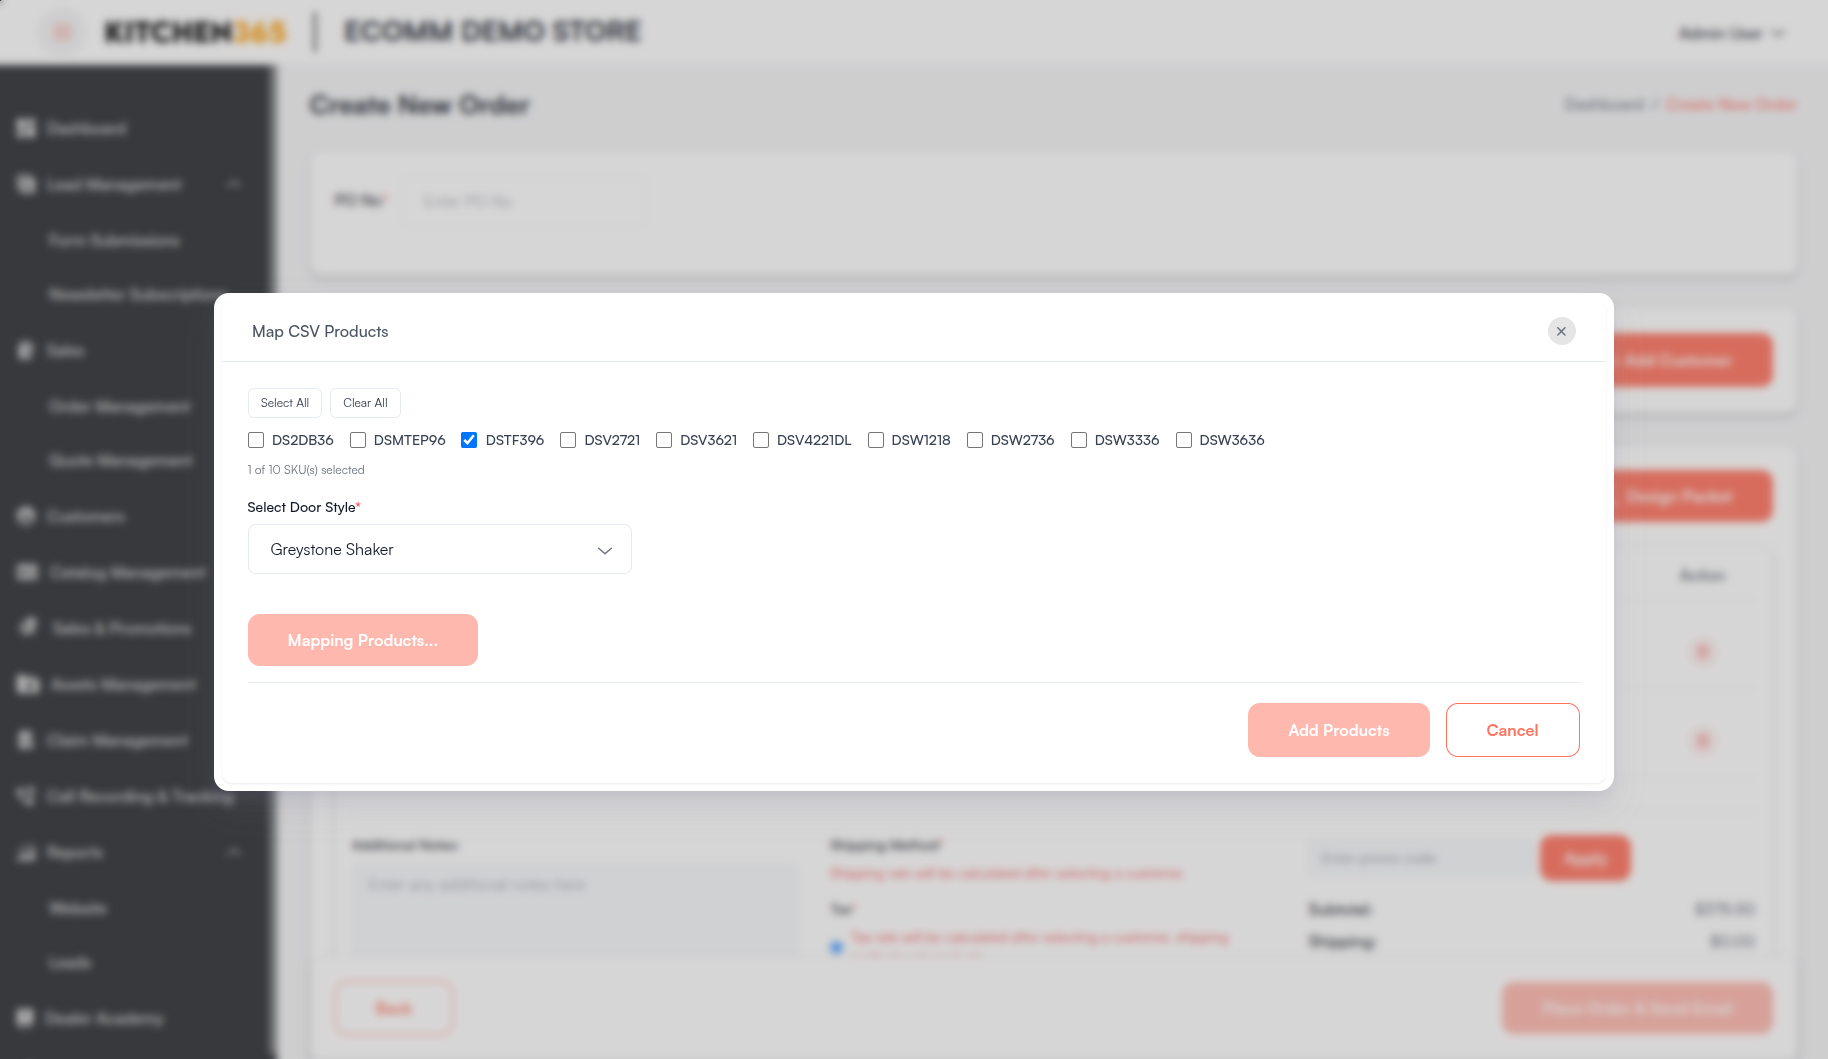
Import from 2020 CSV
Click 2020 CSV to upload a CSV file exported from the 2020 Design tool. The Map CSV Products modal opens:
- Select the SKUs to import using the checkboxes (use Select All or Clear All for bulk selection).
- Choose the Select Door Style from the dropdown.
- Click Map Product to match the SKUs to catalog products.
- Review the mapped products in the results table and adjust quantities if needed.
- Click Add Products to add them to the order, or Cancel to close without adding.
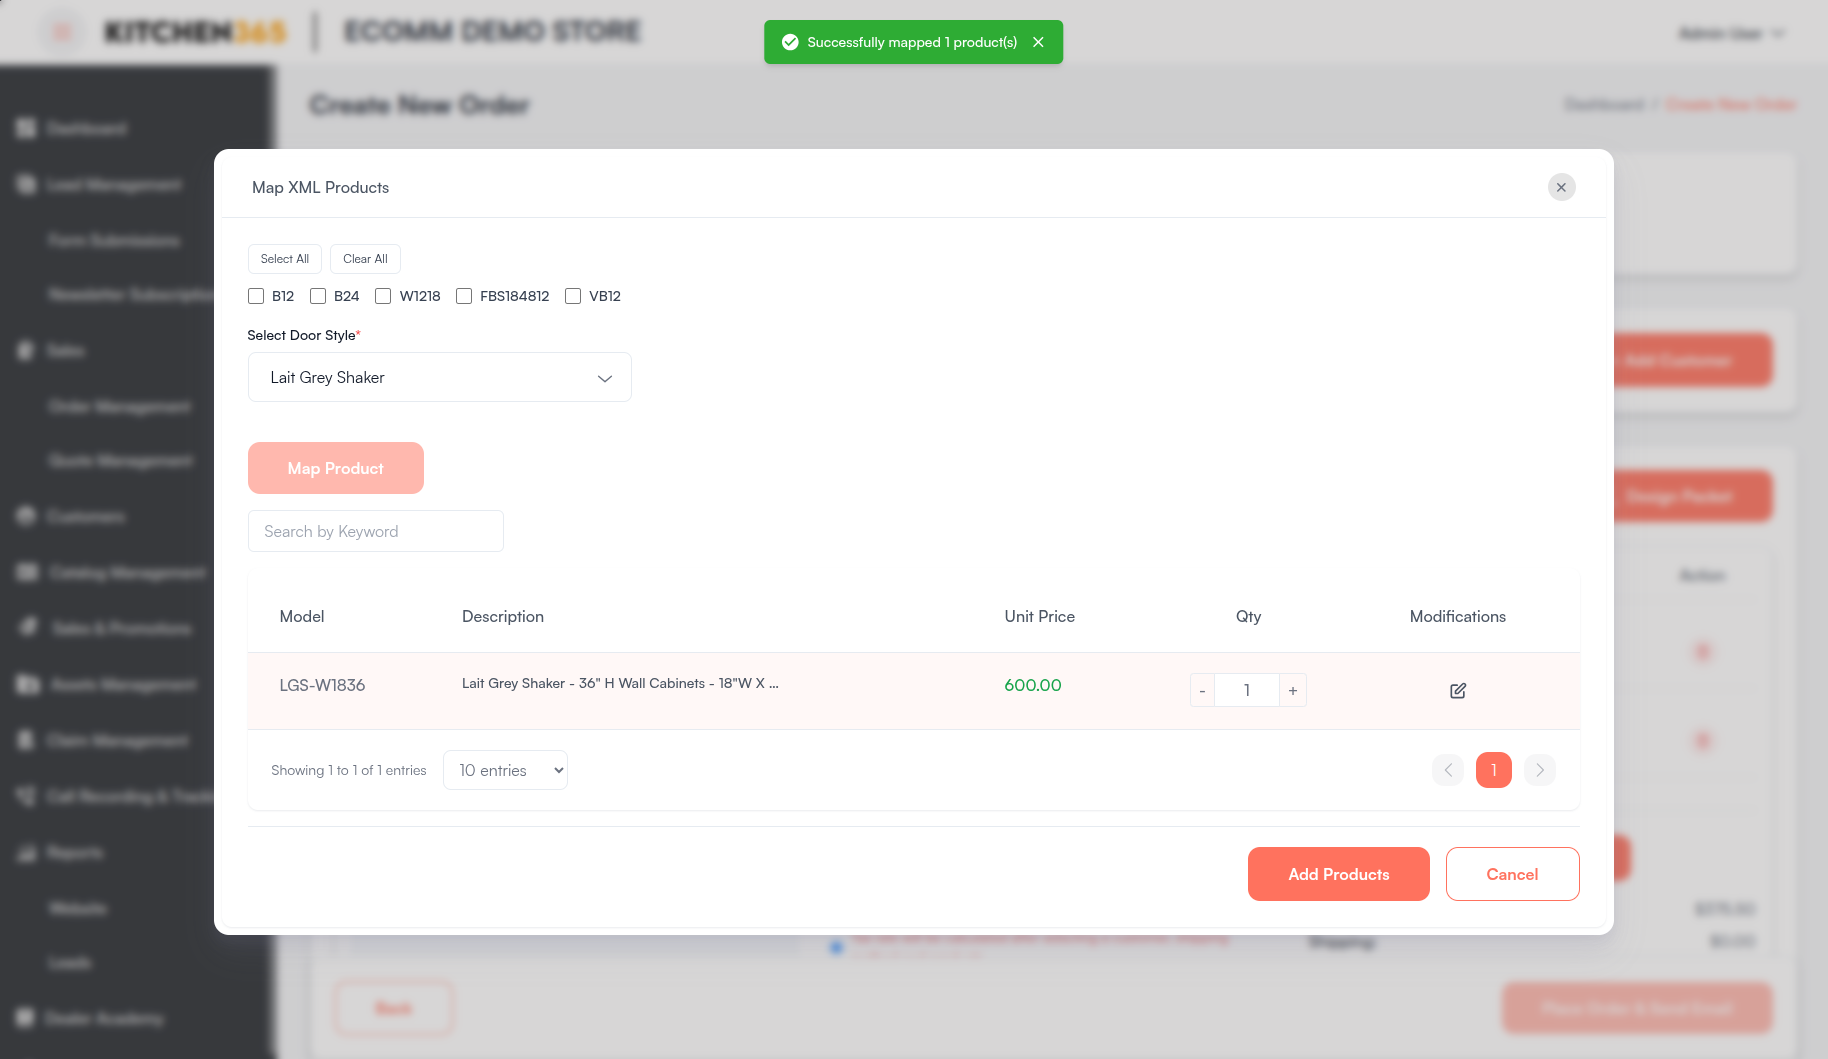
Import from ProKitchen XML
Click Prokitchen XML to upload an XML file exported from ProKitchen. The Map XML Products modal works similarly to the 2020 CSV flow:
- Select product codes using the checkboxes.
- Choose the Select Door Style from the dropdown.
- Click Map Product to match products to the catalog.
- Review mapped results, adjust quantities, and click Add Products to confirm.
Upload Design Packet
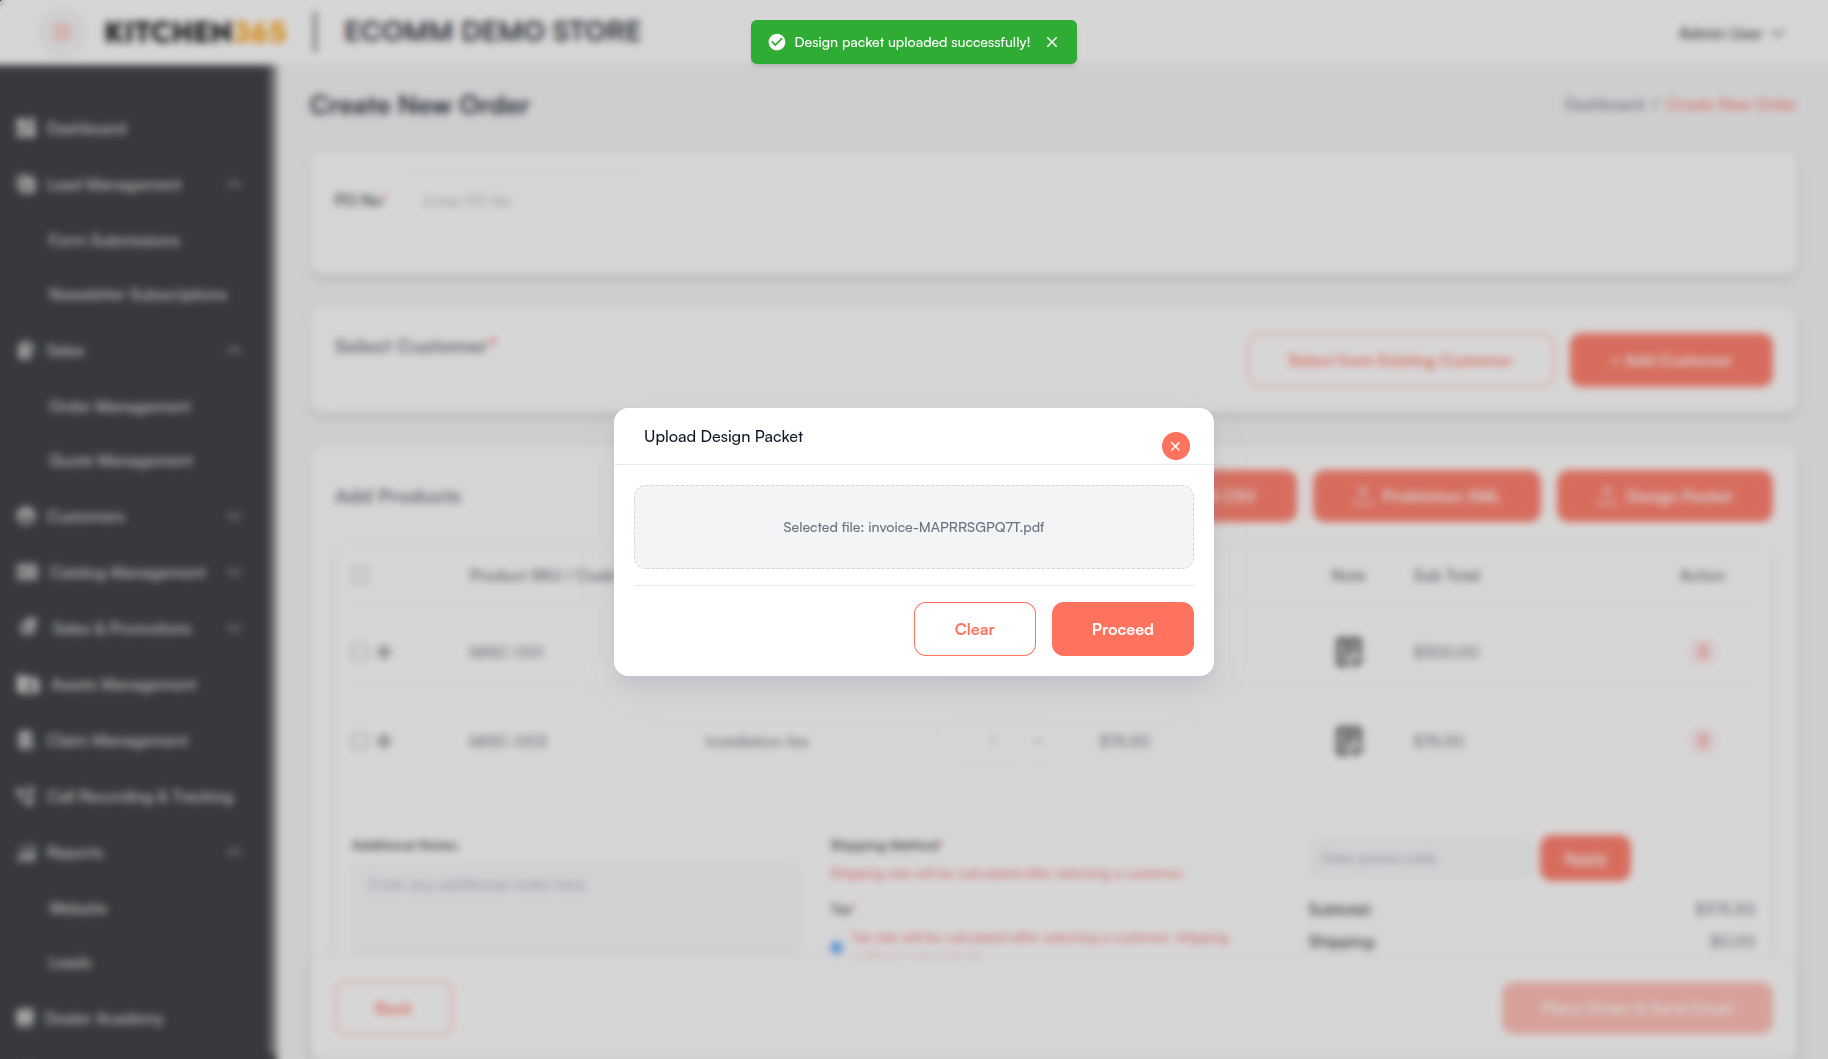
Click Design Packet to attach a PDF design document to the order. The Upload Design Packet modal opens:
- Select a PDF file from your computer.
- Click Proceed to upload the file.
- Use Clear to remove the selected file before uploading.
Once uploaded, a success message "Design packet uploaded successfully!" is displayed. The design packet can be shared with the customer and downloaded from the order detail page.
Product Notes and Deletion
- Each product row includes a note icon to add product-level notes specific to that line item.
- To remove products, select the checkbox on one or more rows and click Delete Selected.
- Individual rows can also be removed using the delete action on each line.
iv. Optional Fields
- Product Name — Helps identify the product when adding items manually.
v. Select Existing Customer or Add New Customer
You can either:
-
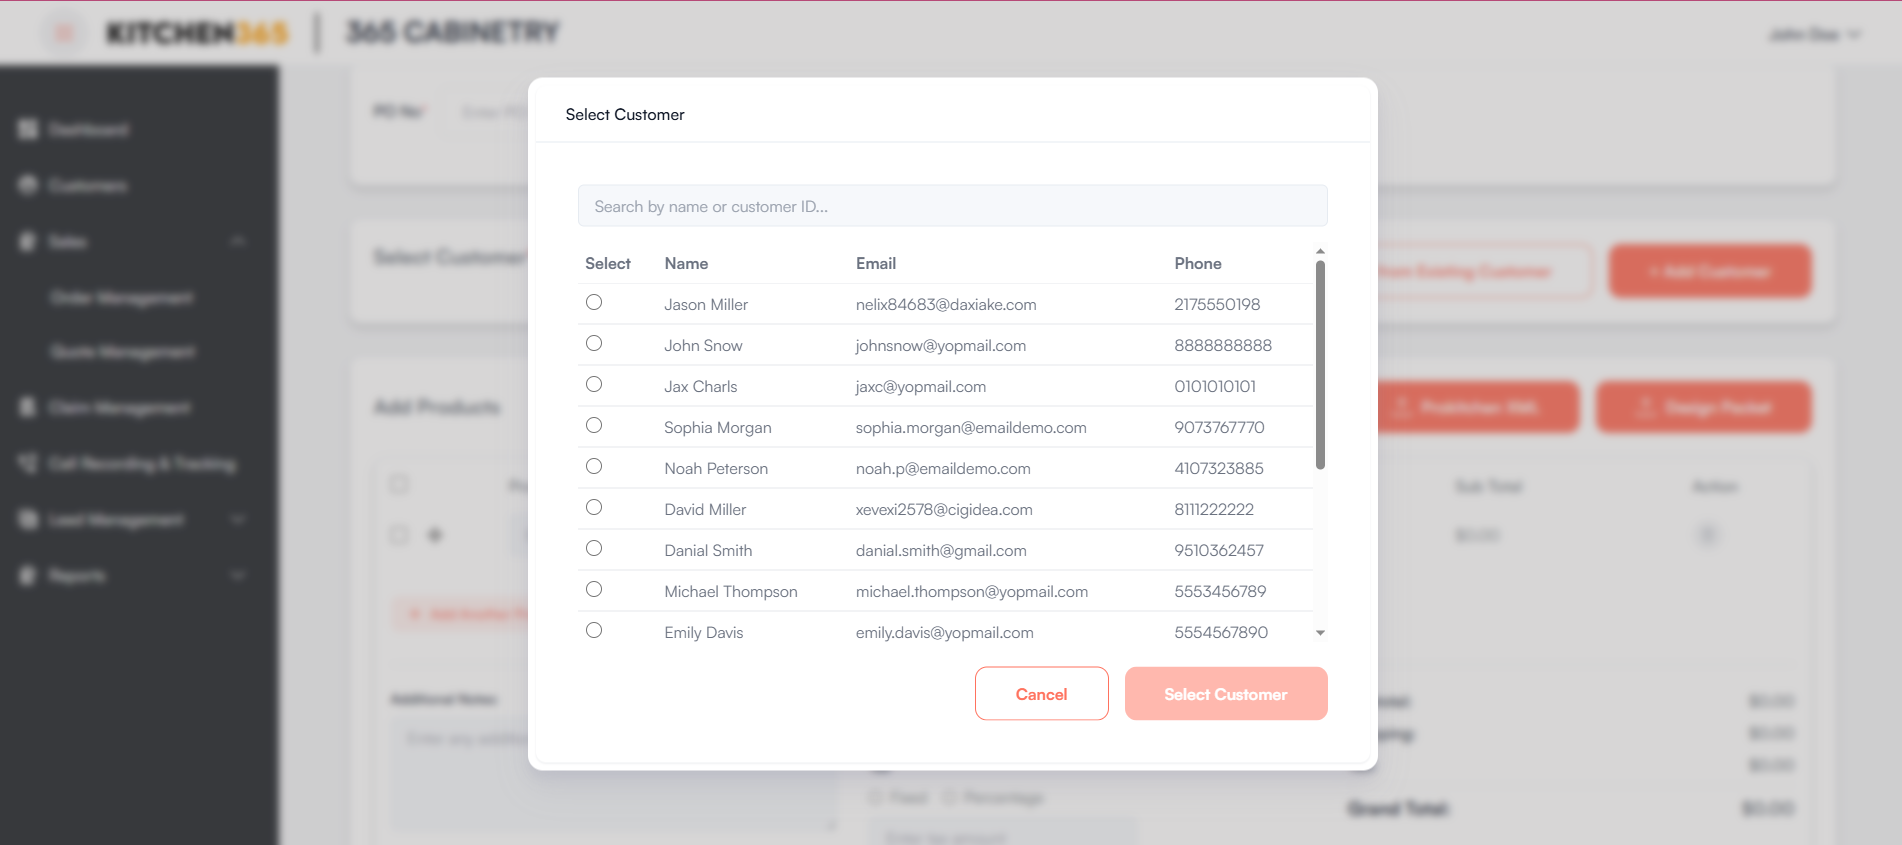
Click "Select from Existing Customer" to choose an existing customer from a searchable popup (columns: Select, Name, Email, Phone).
-
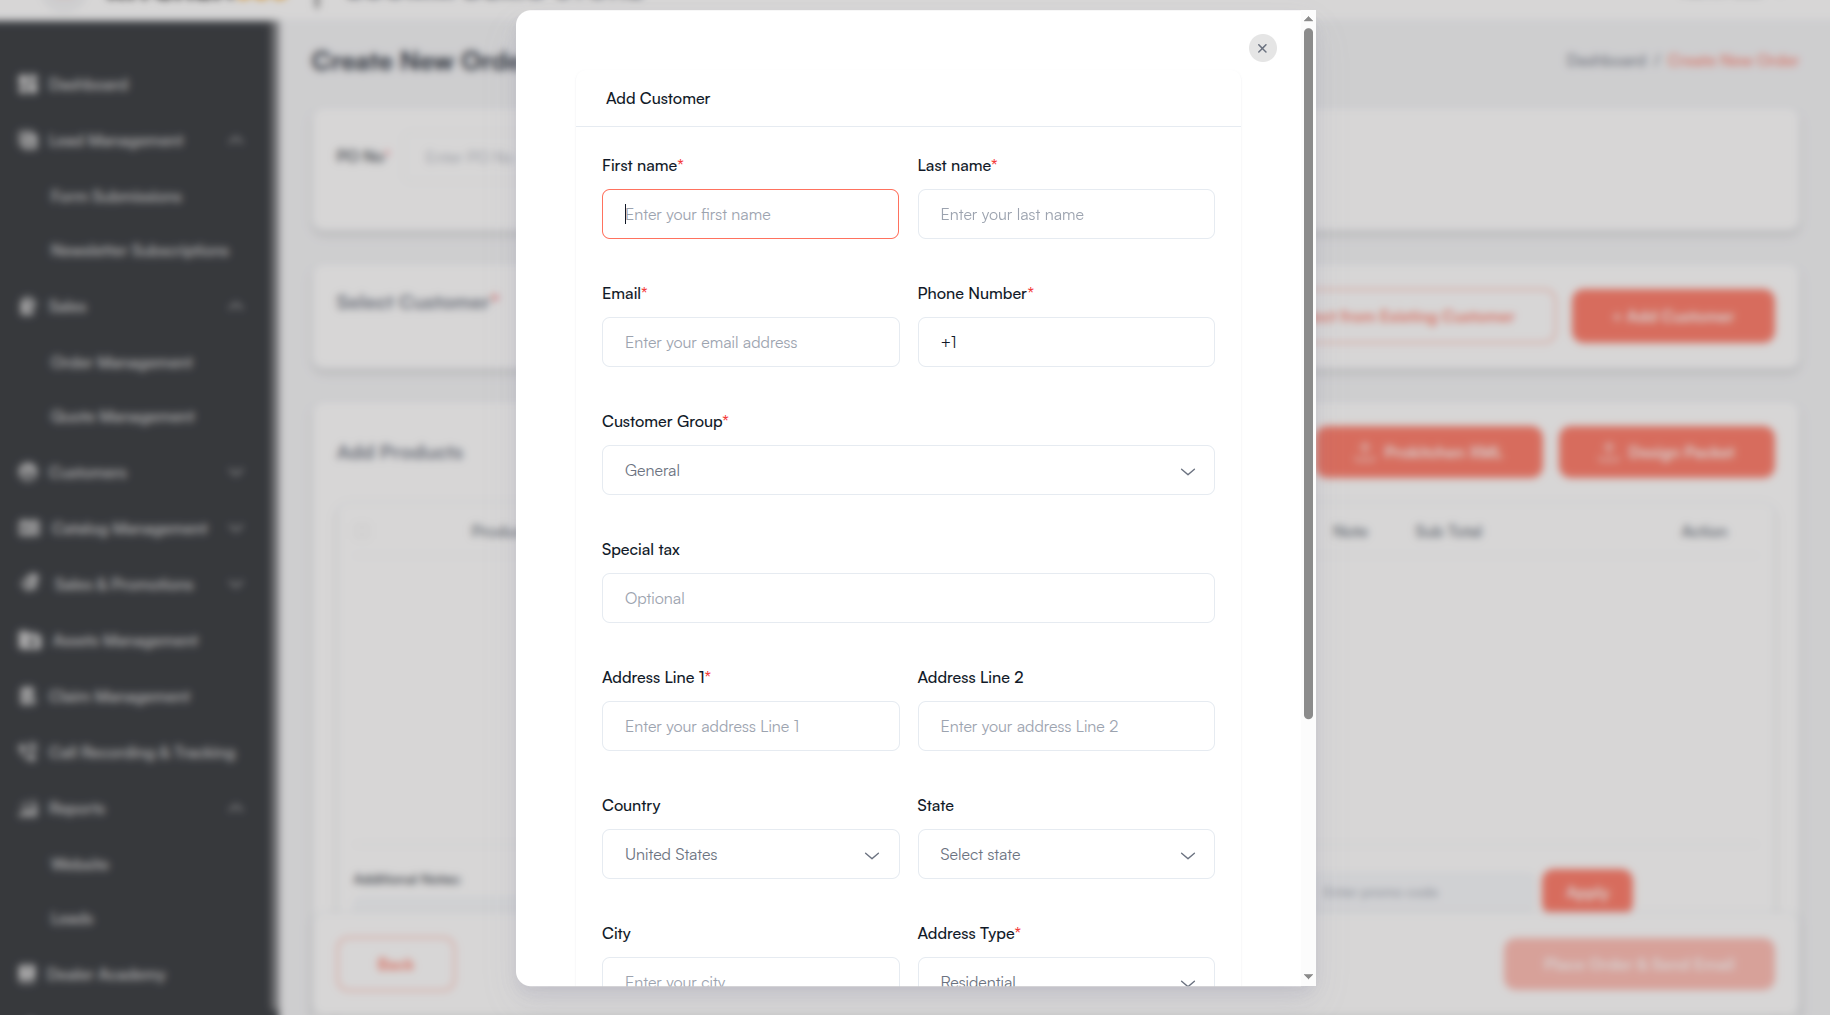
Click "+ Add Customer" to create a new customer inline.
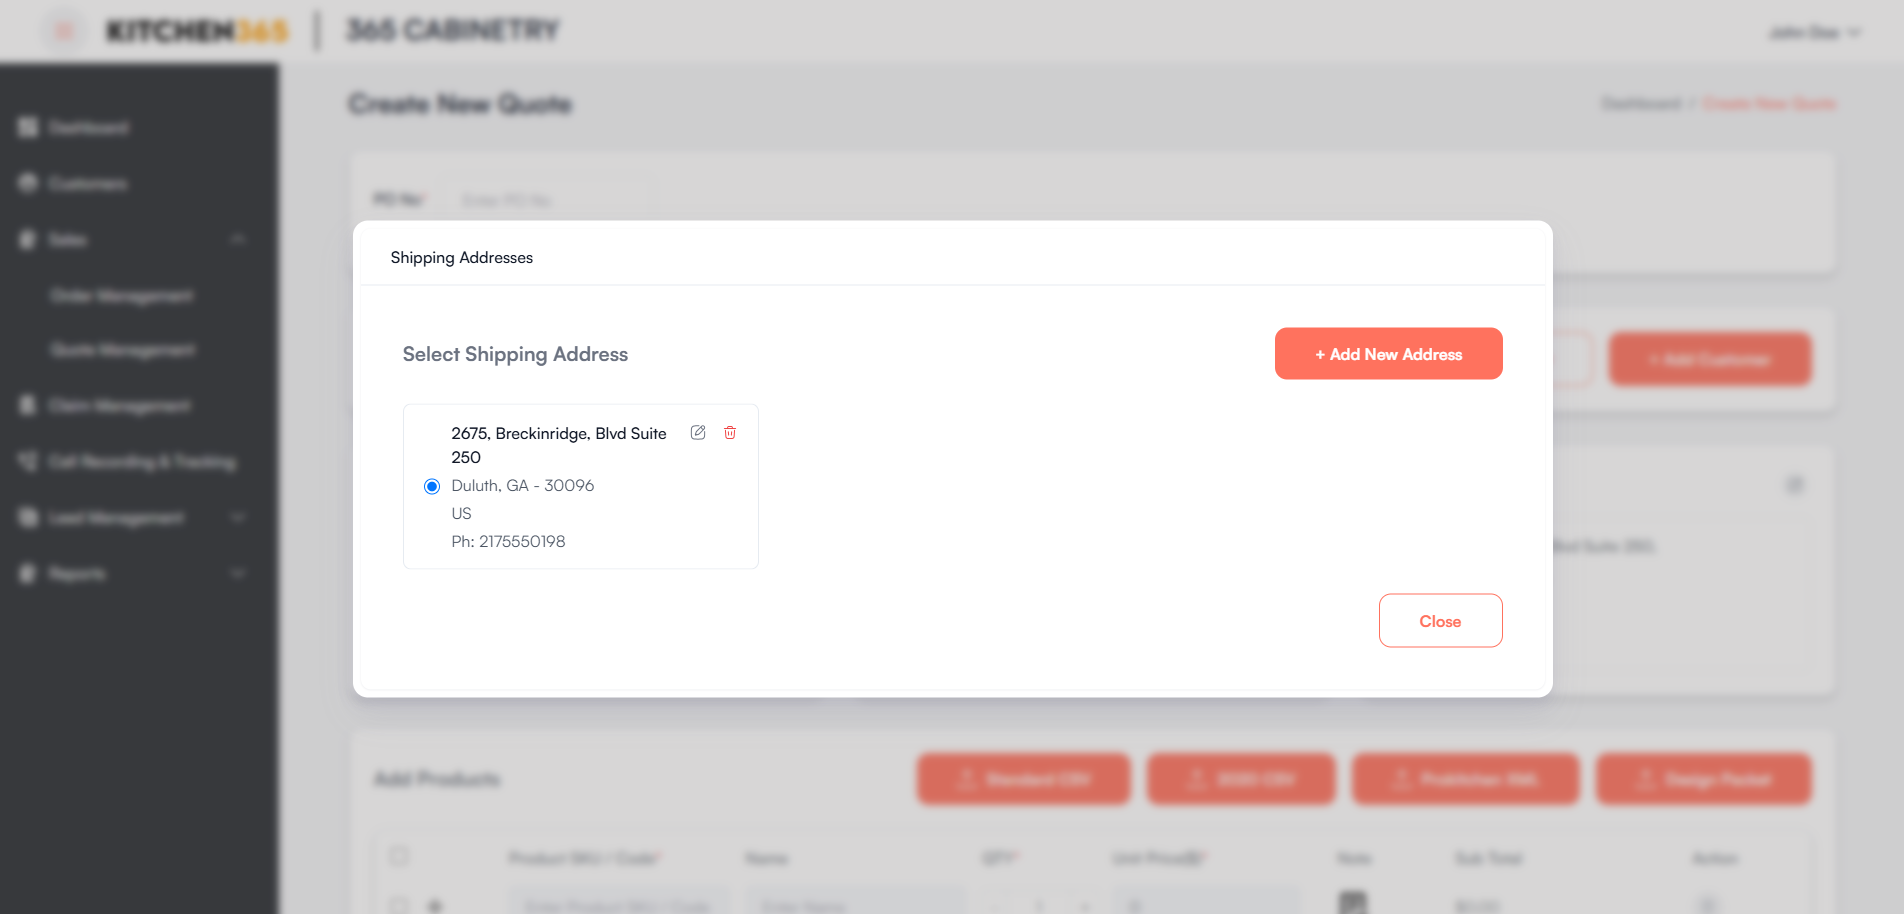
vi. Shipping Address
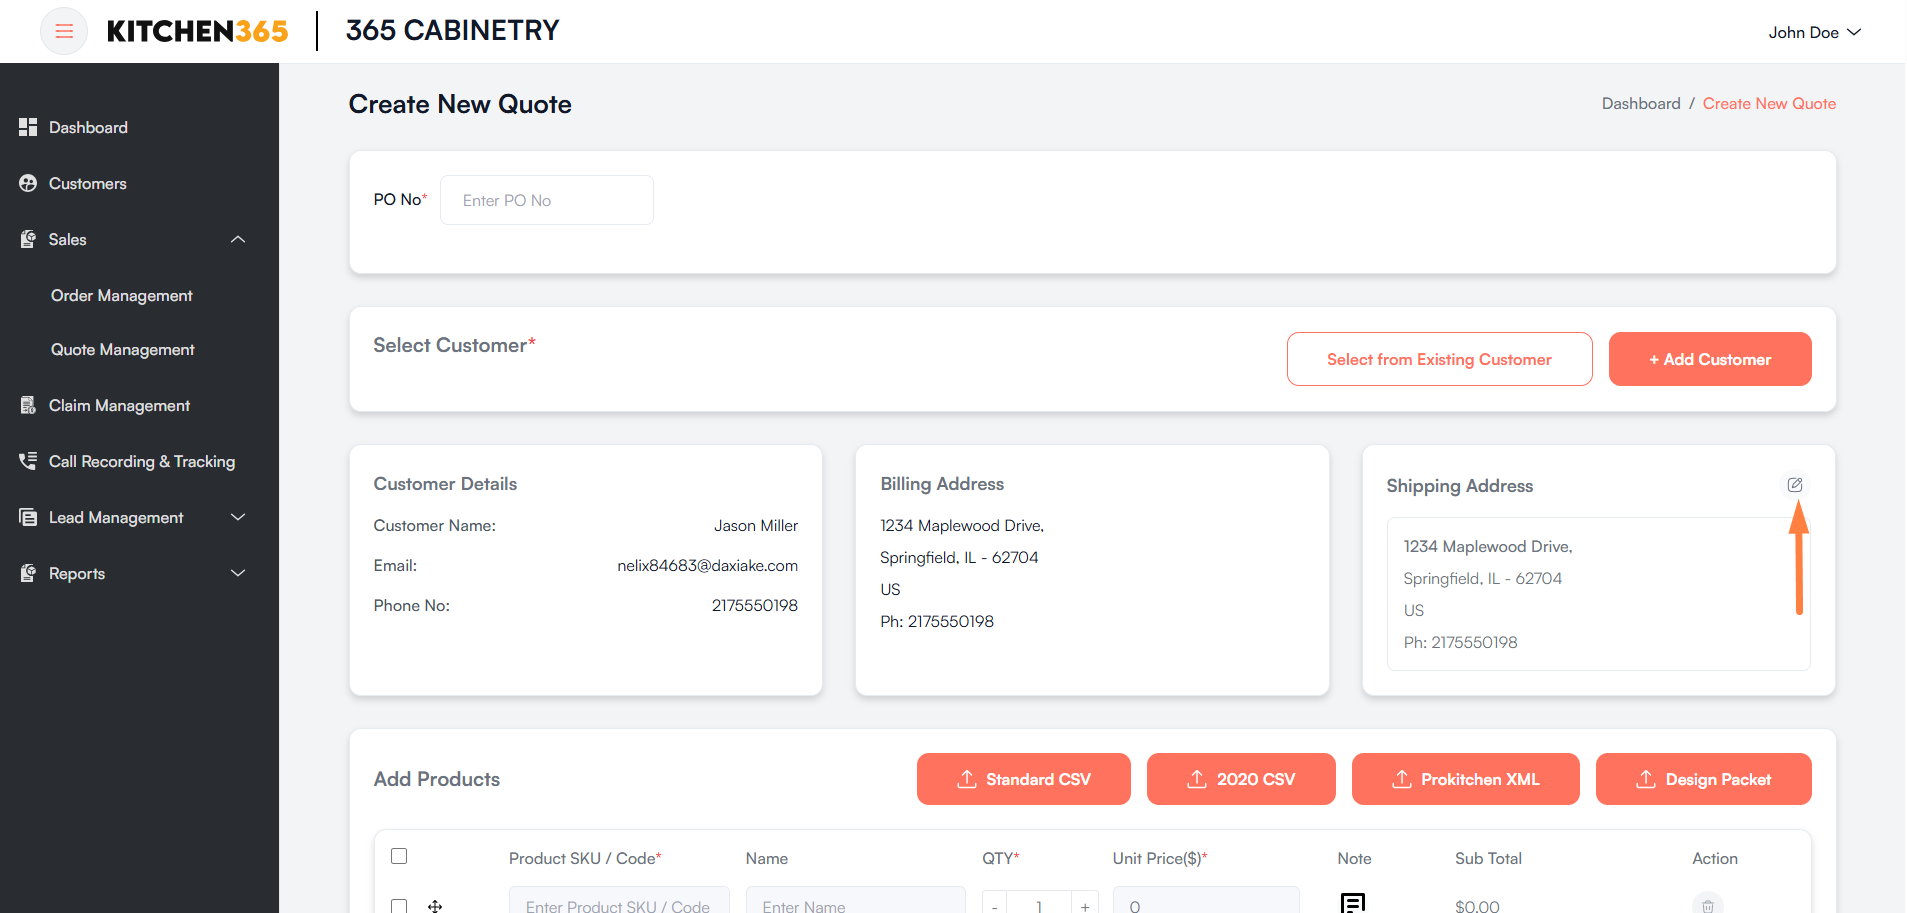
Once a customer is selected, choose from their existing shipping addresses or add a new one using the edit icon in the Shipping Address section.
vii. Additional Notes, Shipping, Tax & Promo Code
After adding products, complete the pricing and order details section below the product list before selecting a payment method.
Additional Notes
Use the Additional Notes field to enter any order-level remarks or instructions for internal reference.
| Property | Value |
|---|---|
| Label | Additional Notes: |
| Placeholder | Enter any additional notes here |
| Required | No (optional) |
Shipping Method
Shipping Method is a required field. Available options are loaded based on the selected customer's shipping address and the products in the order.
| Option | Description |
|---|---|
| Configured shipping methods (e.g., Pickup, Flat Rate Shipping) | Predefined shipping methods configured for the store. Each option displays the method name and calculated rate, e.g., Pickup ($55.00) or Flat Rate Shipping ($10.50). |
| Custom Shipping Rate | Allows manually entering a custom shipping charge in the Enter Shipping Amount field. |
Notes:
- Shipping rates are calculated after a customer is selected. Until then, the message "Shipping rate will be calculated after selecting a customer." is shown.
- While rates are being recalculated, a "Recalculating shipping rates..." indicator appears.
- One shipping method must be selected before placing the order.
Tax
Tax is a required field. In version 2.0, tax is automatically calculated based on the customer, shipping method, and products added to the order.
- The calculated tax amount is displayed once all prerequisites are met (e.g., $125.50).
- Until a customer, shipping method, and products are selected, the message "Tax rate will be calculated after selecting a customer, shipping method and products." is shown.
- There is no manual Custom tax option in version 2.0 — tax is always auto-calculated from the configured tax provider.
Promo Code / Discount
Apply a promotional discount using the promo code field in the order summary panel on the right:
- Enter the promo code in the Enter promo code field.
- Click Apply to validate and apply the discount.
- If successful, the Discount line appears in the order summary showing the applied amount.
- Click Remove to clear an applied promo code and recalculate totals.
Requirements to apply a promo code:
- A customer must be selected.
- At least one product must be added.
- Tax must be calculated (customer, shipping method, and products selected).
- A shipping method must be selected.
Order Summary
The order summary panel displays the calculated totals:
| Line Item | Description |
|---|---|
| Subtotal | Total of all product line items. |
| Shipping | Selected shipping charge. |
| Tax | Auto-calculated tax amount. |
| Discount | Applied promo code discount (when active). |
| Payment fee | Additional fee based on the selected payment method (if configured). |
| Grand Total | Final order total. |
viii. Payment Method
Scroll down to the Payment Method section after completing shipping, tax, and promo code details.
- Check the Payment Method checkbox to enable payment selection.
- Select one payment method from the available options configured for the store.
Payment methods may include:
| Type | Examples |
|---|---|
| Online payments | Credit Card, Pay Online (Stripe), PayPal, Square, Authorize.Net, Clover, NMI, ACH, QuickBooks |
| Offline payments | Cash on Delivery (COD), Cheque, Money Order, Bank Transfer |
Behavior by payment type:
| Payment Type | Behavior |
|---|---|
| Credit card / online | Displays the payment form (card number, expiry, CVV, etc.). The place-order button changes to Pay Now. |
| Offline payment | No card details required. The order is placed with pending payment status. |
| ACH payment | May require bank account connection before placing the order. |
| Split Payment | If enabled for the tenant, regular payment methods are disabled and the Split Payment Enabled notice is displayed. Customers can make partial payments per configured terms. |
Validation:
- "Please Select Payment Method" is shown if the payment checkbox is enabled but no method is selected.
- The place-order button remains disabled until a payment method is selected.
ix. Place Order
After all required fields are completed — customer, products, shipping method, tax, and payment method — use the action buttons at the bottom of the screen:
| Button | When Used |
|---|---|
| Back | Returns to the previous page without saving. |
| Place Order & Send Email | Places the order and sends an order confirmation email to the customer. Used for offline and most payment methods. |
| Pay Now | Shown when a credit card or online payment method is selected. Processes payment and creates the order. |
While the order is being submitted:
| State | Shown For |
|---|---|
| Placing Order... | Offline payment methods. |
| Processing Payment... | Online/credit card payments. |
The Place Order & Send Email / Pay Now button is disabled until a payment method is selected.
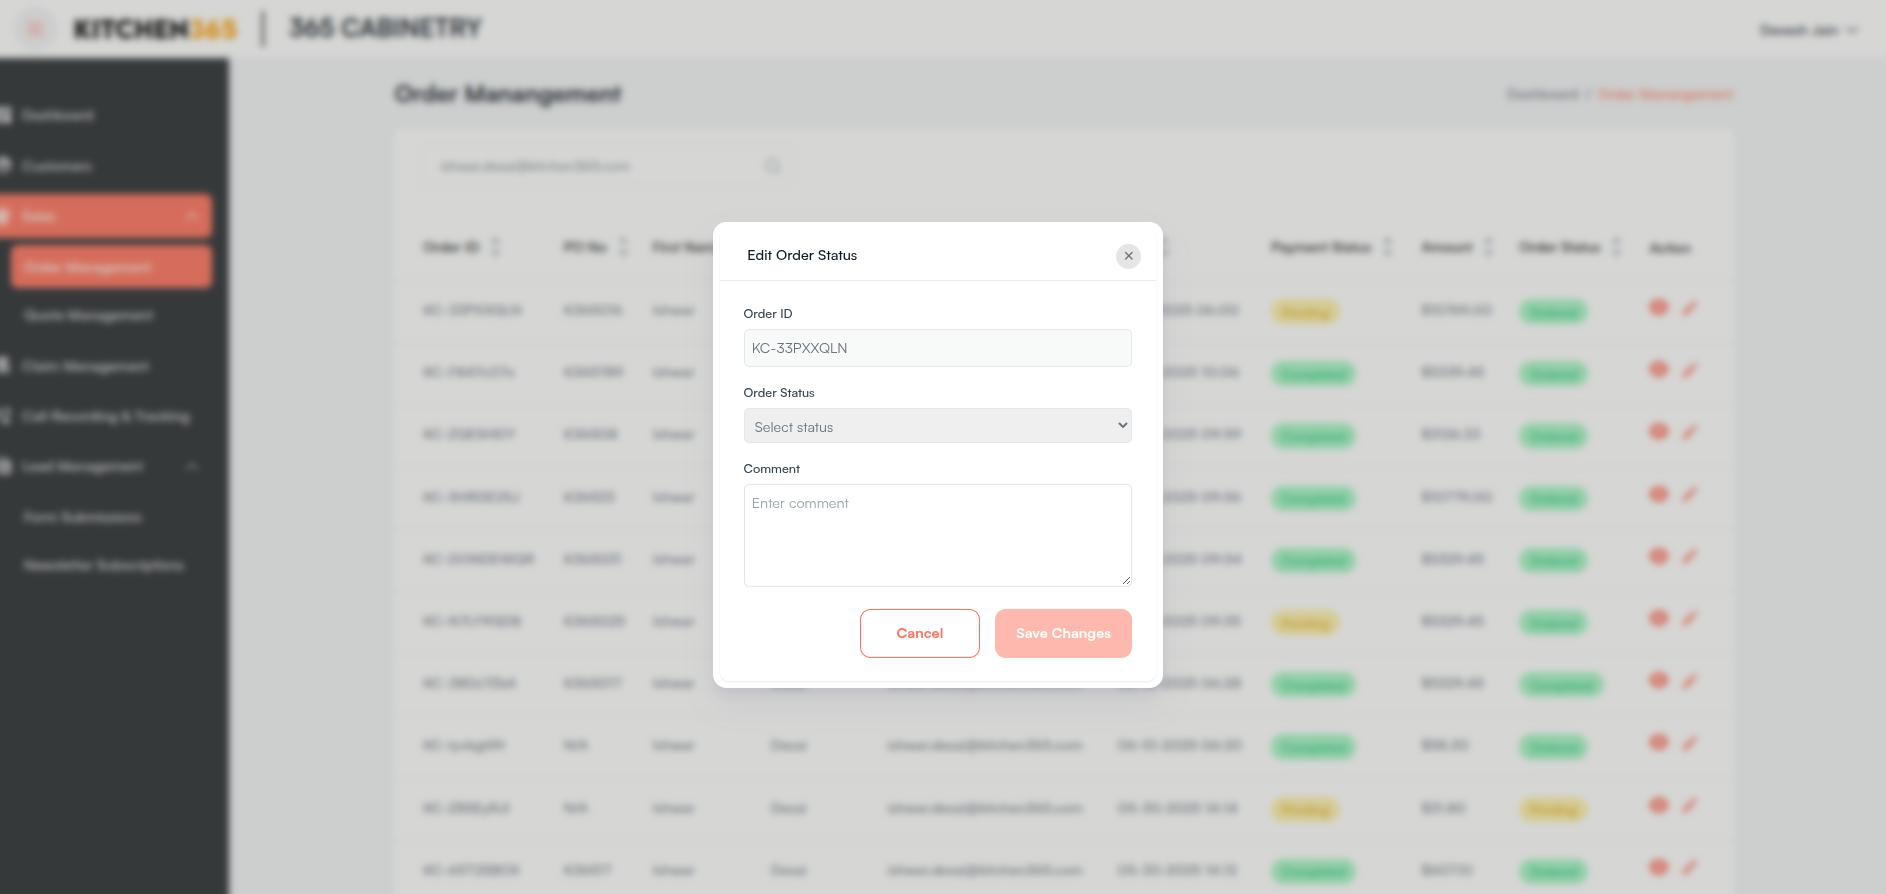
c. Edit Order Status
The Edit Order Status popup is used to manually update the order status, record offline payment details, and add related comments.
i. How to Access
- Navigate to Sales > Order Management.
- Click the ✏️ Edit icon in the Action column of an eligible order row.
- The Edit Order Status popup appears.
ii. Edit Availability
The edit icon is shown only when:
- Order status is Ordered or Pending Payment, and
- Payment status is Pending or Failed, and
- Payment method is not ACH.
If the order does not meet these conditions, you may see one of these messages:
| Message | Condition |
|---|---|
| "Orders with ACH payment cannot be edited here. Use order details to check payment status." | ACH payment method. |
| "You can only edit status when the order is ordered or pending payment, and payment is pending or failed." | Ineligible status combination. |
| "Order is canceled. You cannot change the status." | Canceled order. |
| "Payment is complete and invoice generated. Go and check in order page." | Payment already completed. |
iii. Form Fields
| Field | Description |
|---|---|
| Order ID | Read-only display of the order identifier. |
| Order Status | Select Processing (default) or Canceled. |
| Payment Status | Select Completed to mark payment as received. |
| Payment Mode | Required when Payment Status is set. Select the offline payment method used. |
| Payment fields | Dynamic fields based on the selected payment mode (e.g., transaction ID, cheque number). |
| Comment | Optional comment recorded in the order history. Placeholder: "Enter comment". |
When Canceled is selected as the order status, payment fields are automatically cleared.
iv. Validation
- "You must provide either Order Status or Payment Status."
- "Payment Mode must be selected when Payment Status is provided."
v. Action Buttons
| Button | Description |
|---|---|
| Cancel | Closes the popup without saving changes. |
| Save Changes | Saves the updated order status, payment details, and comment. |
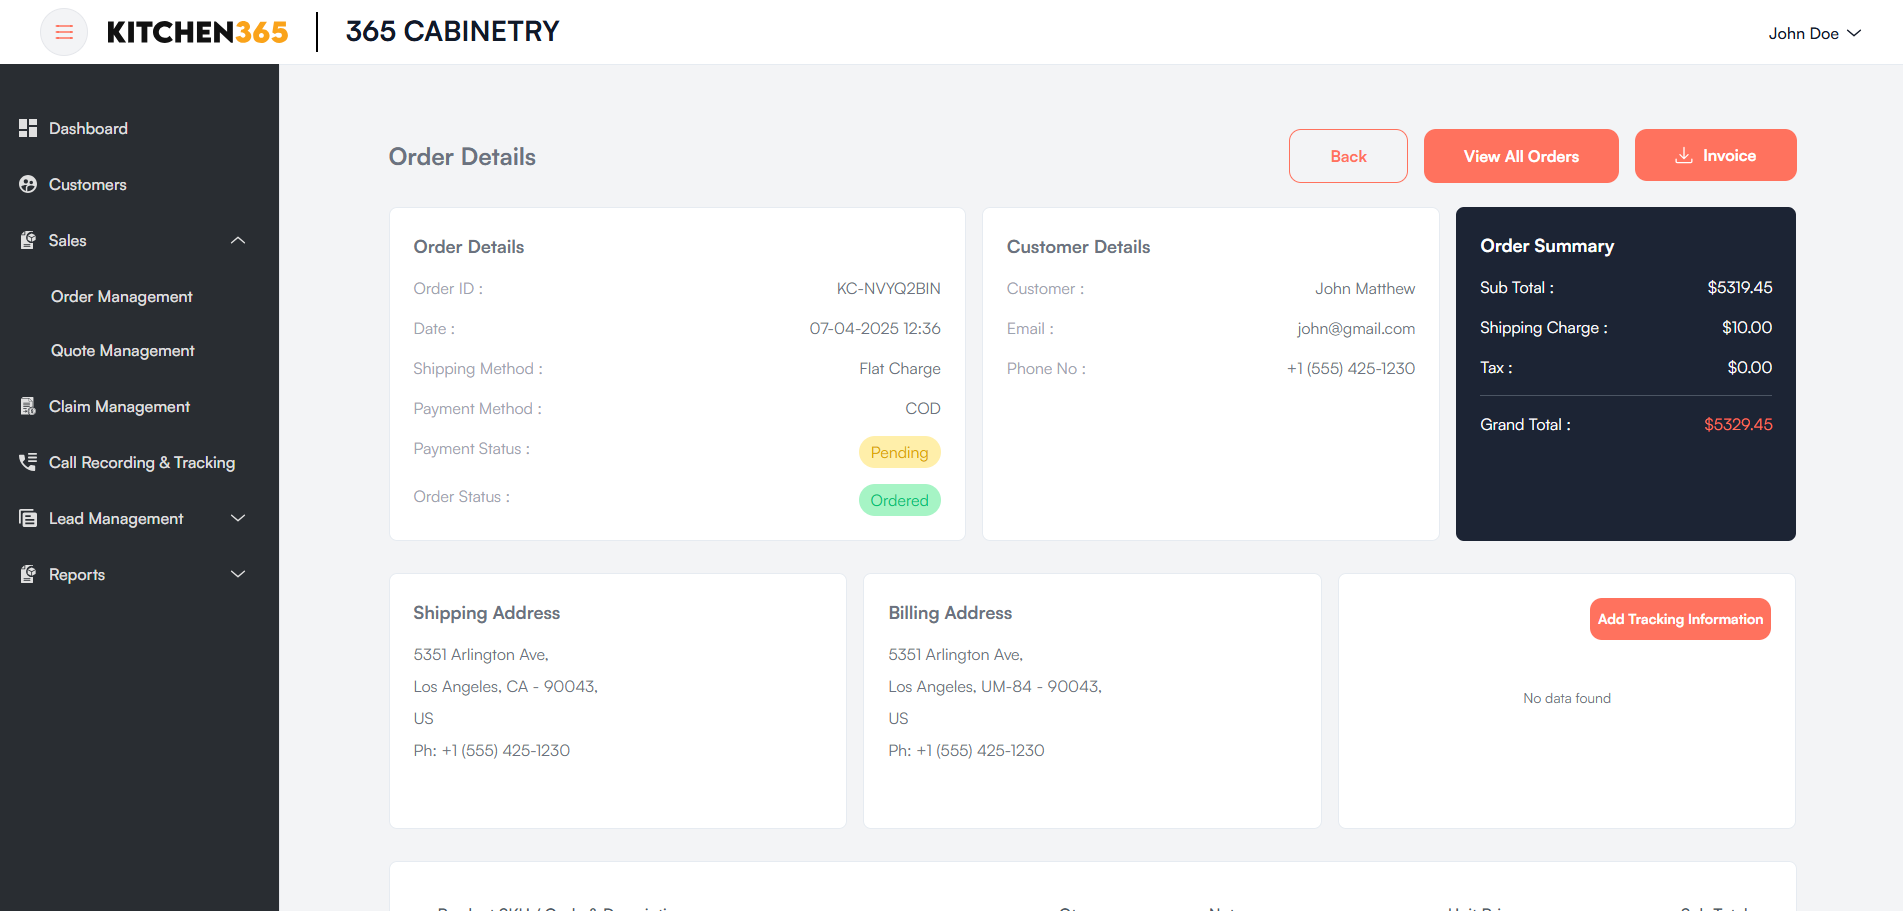
d. Order Details
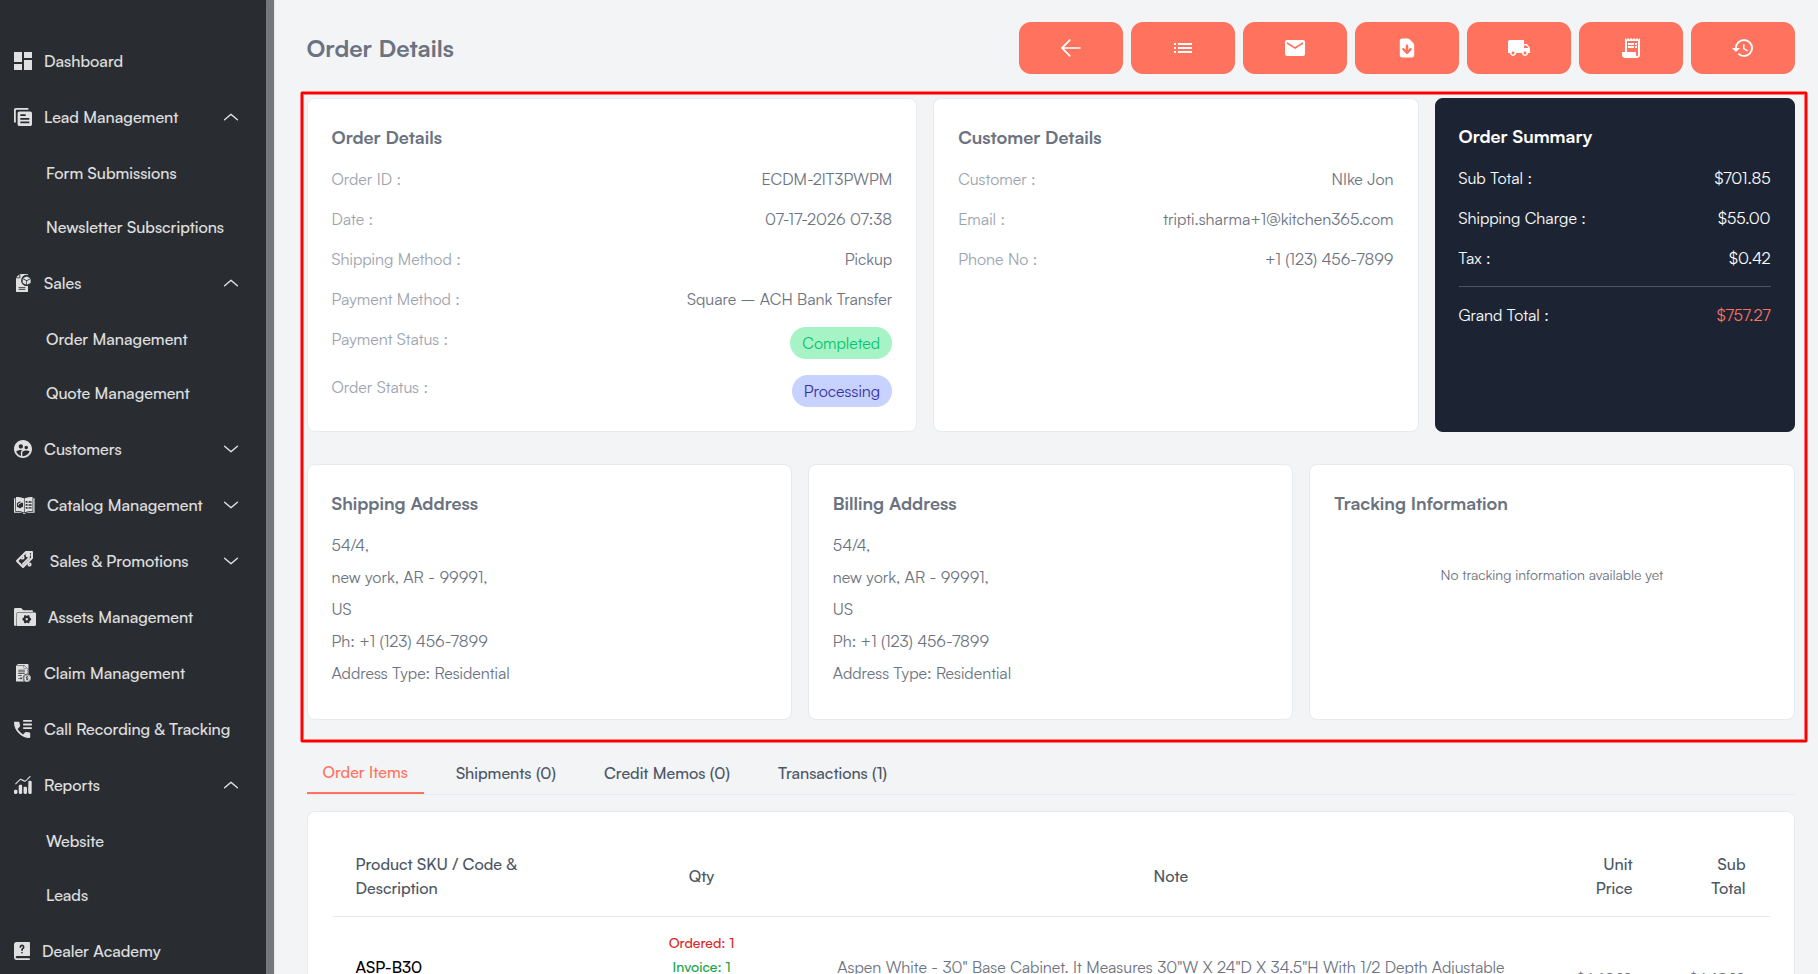
The Order Details screen displays a comprehensive breakdown of a selected order including customer information, shipping and billing addresses, itemized products, payment details, and fulfillment actions.
How to open:
- Click 👁️ View Order Details under the Action column, or
- Click the Order ID link in the list.
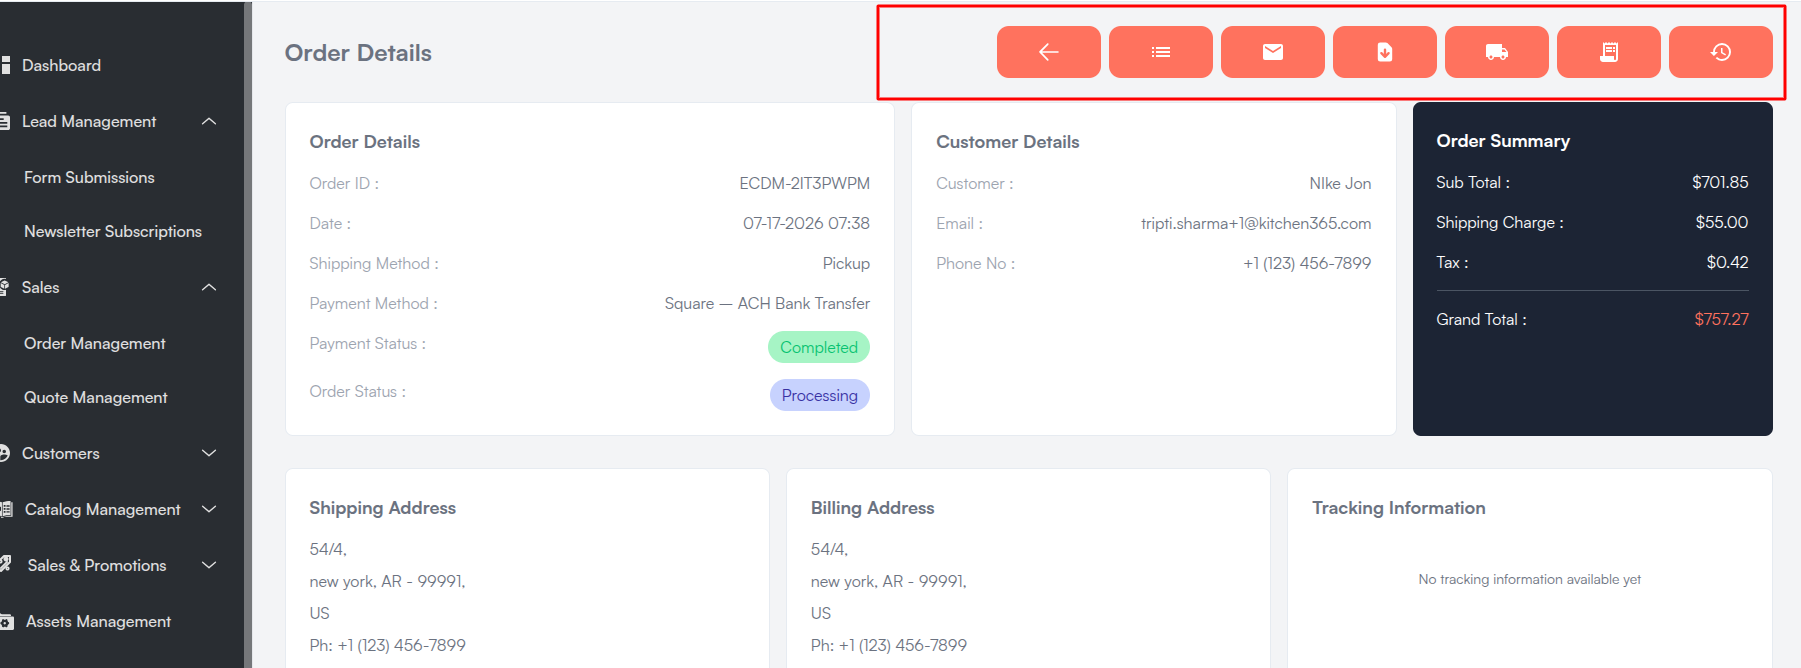
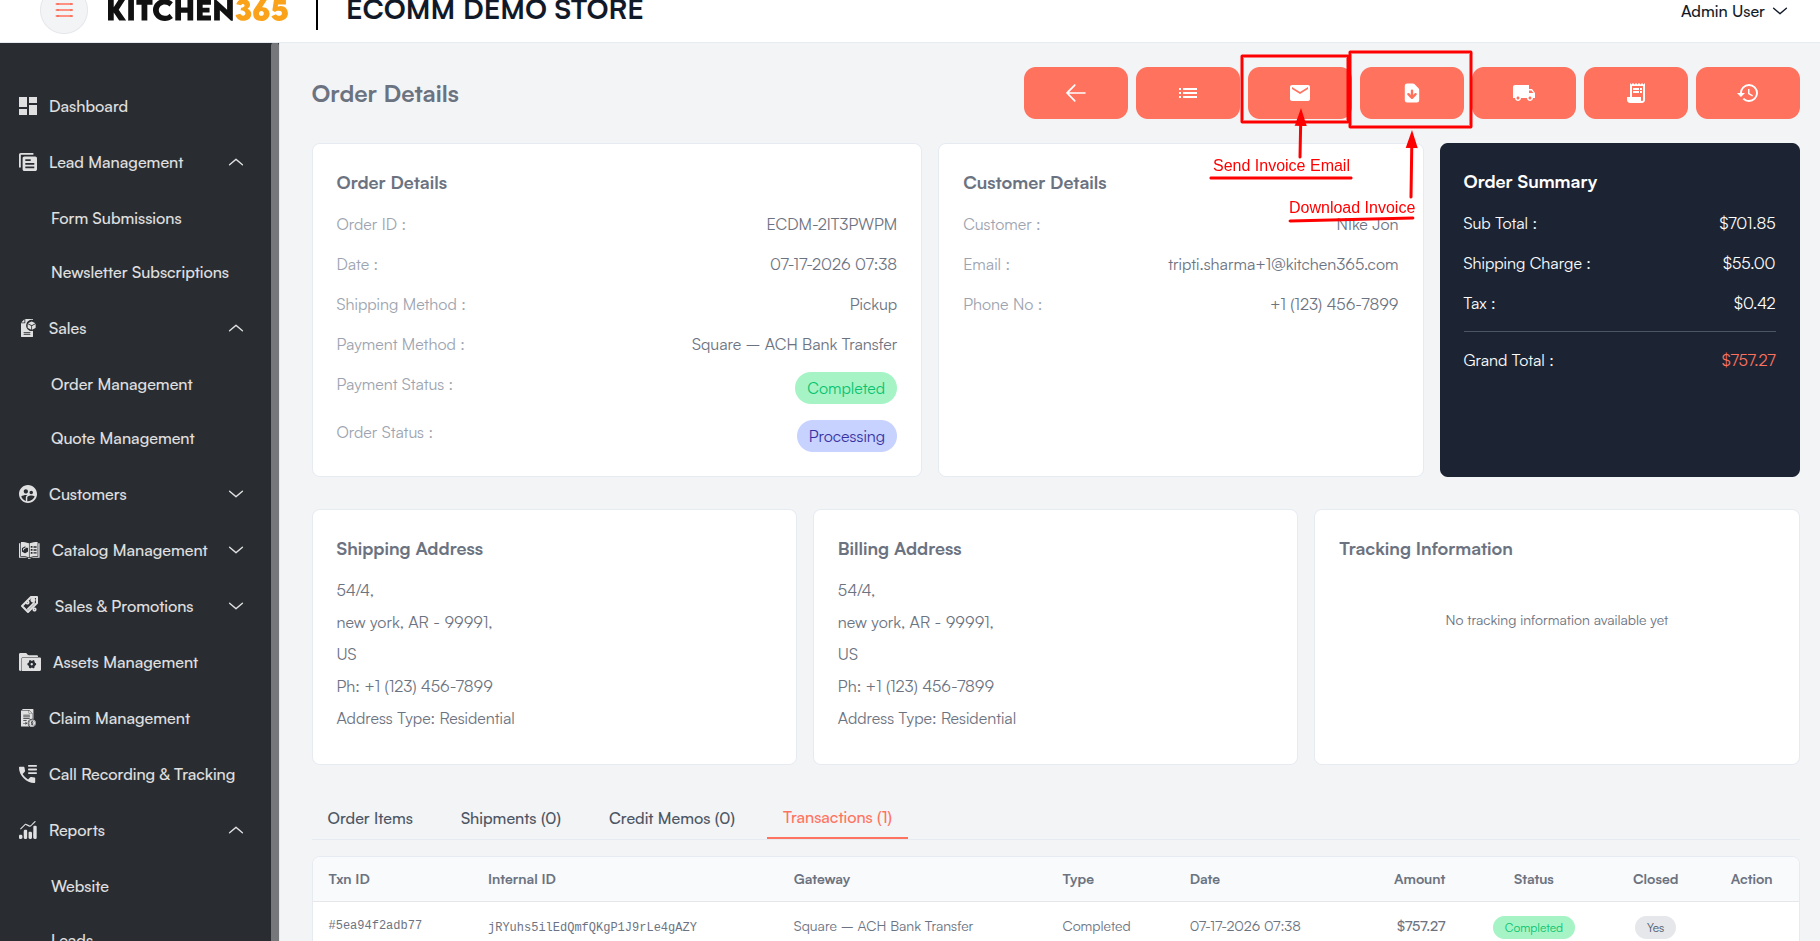
i. Header Actions
The top-right toolbar provides quick actions (displayed as icon buttons with tooltips):
| Action | Tooltip Label | When Available |
|---|---|---|
| Back | Back to Order List | Always. |
| Payment reminder | Send Payment Reminder | Offline payment (non-ACH) with pending payment status. |
| View all orders | View All Orders | Always. |
| Generate invoice | Generate Invoice | Offline payment, order status Ordered or Pending Payment. |
| Send invoice email | Send Invoice Email | Order status Processing, Complete, or Completed. |
| Download invoice | Download Invoice | Order status Processing, Complete, or Completed with invoice. |
| Create shipment | Create Shipment | Order status Processing. |
| Create credit memo | Create Credit Memo | Order status Processing or Completed, invoice exists, payment complete. |
| Order history | Order History | Always. |
ii. Order Information Sections
Order Details
- Order ID
- Date
- Shipping Method
- Payment Method (or Split Payment when enabled)
- Payment Status — includes Retry button for failed online payments and Check Status for ACH payments
- Order Status
- Split Payment — Enabled / Disabled
Customer Details
- Customer
- Phone No.
Order Summary
- Sub Total
- Shipping Charge
- Tax (with percentage if applicable)
- Discount
- Payment fee (if applicable)
- Grand Total
Addresses
- Shipping Address
- Billing Address
iii. Detail Tabs
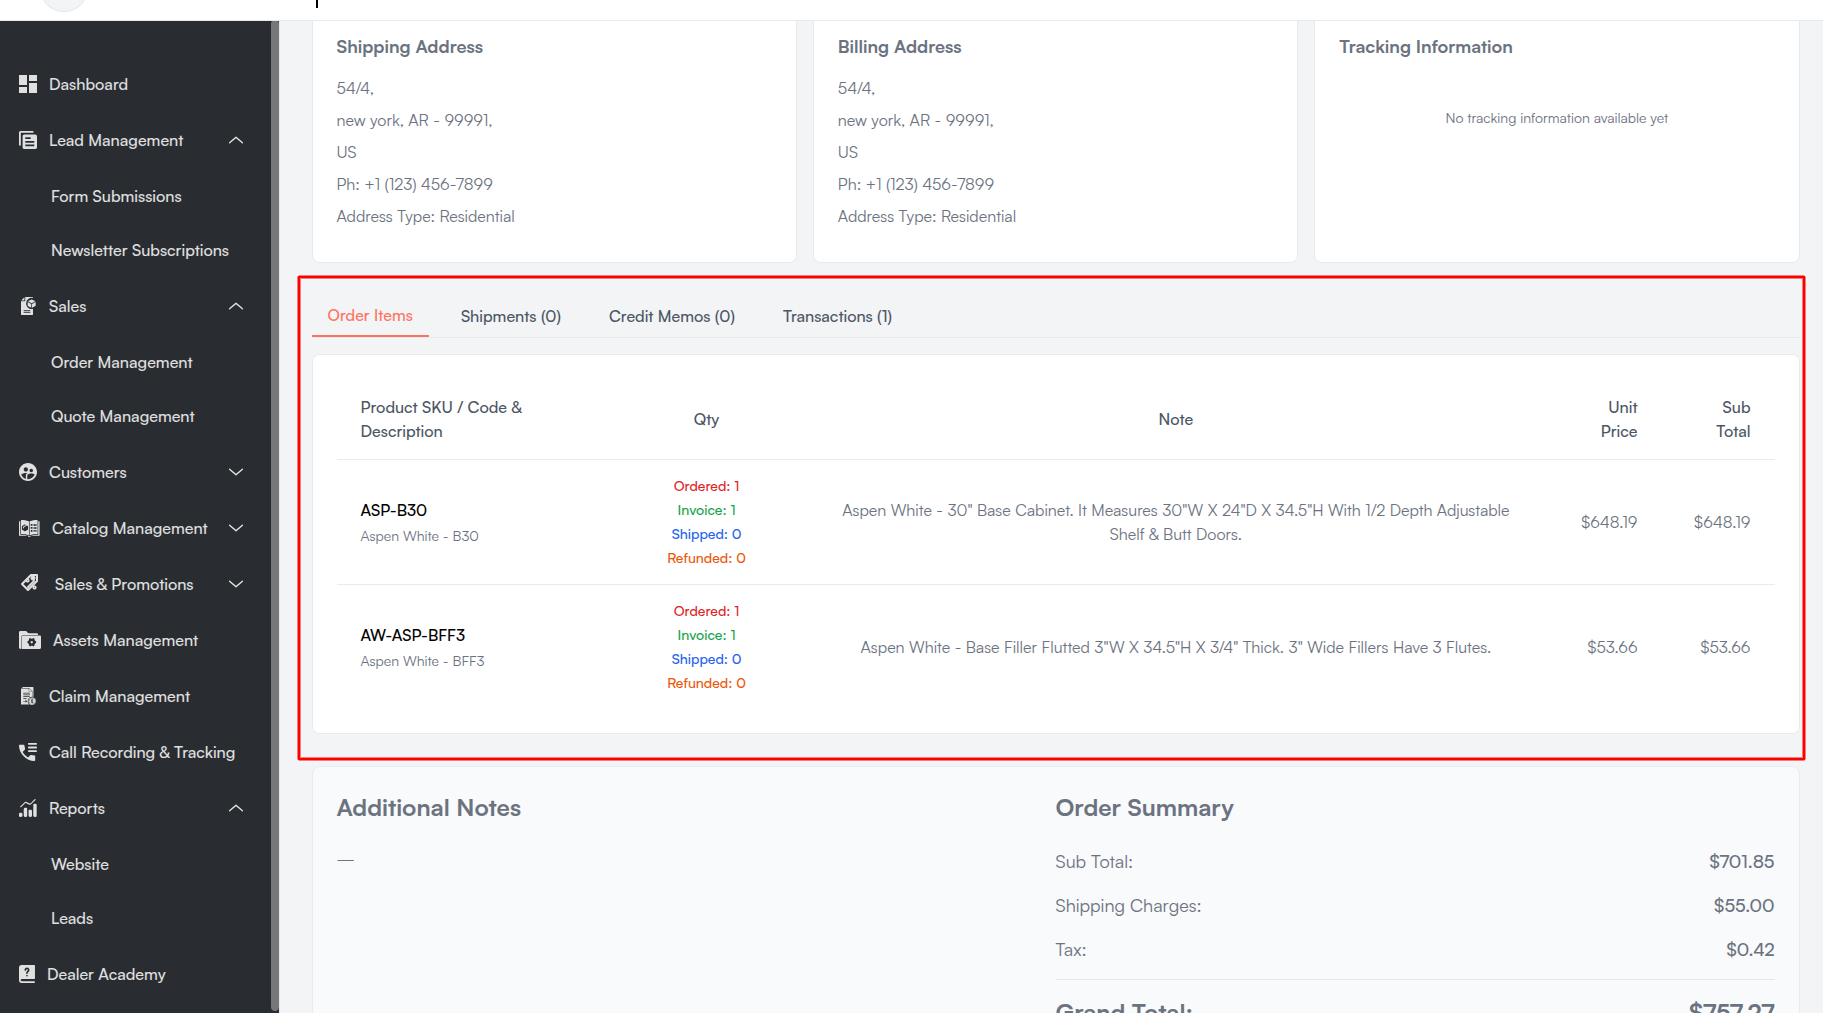
The order detail page is organized into tabs:
| Tab | Label | Description |
|---|---|---|
| Items | Order Items | Line items with Ordered, Invoice, Shipped, and Refunded quantities. |
| Shipments | Shipments (N) | List of shipments created for the order. |
| Credit Memos | Credit Memos (N) | List of credit memos (refunds) for the order. |
| Transactions | Transactions (N) | Payment transactions (hidden for offline-only payments). |
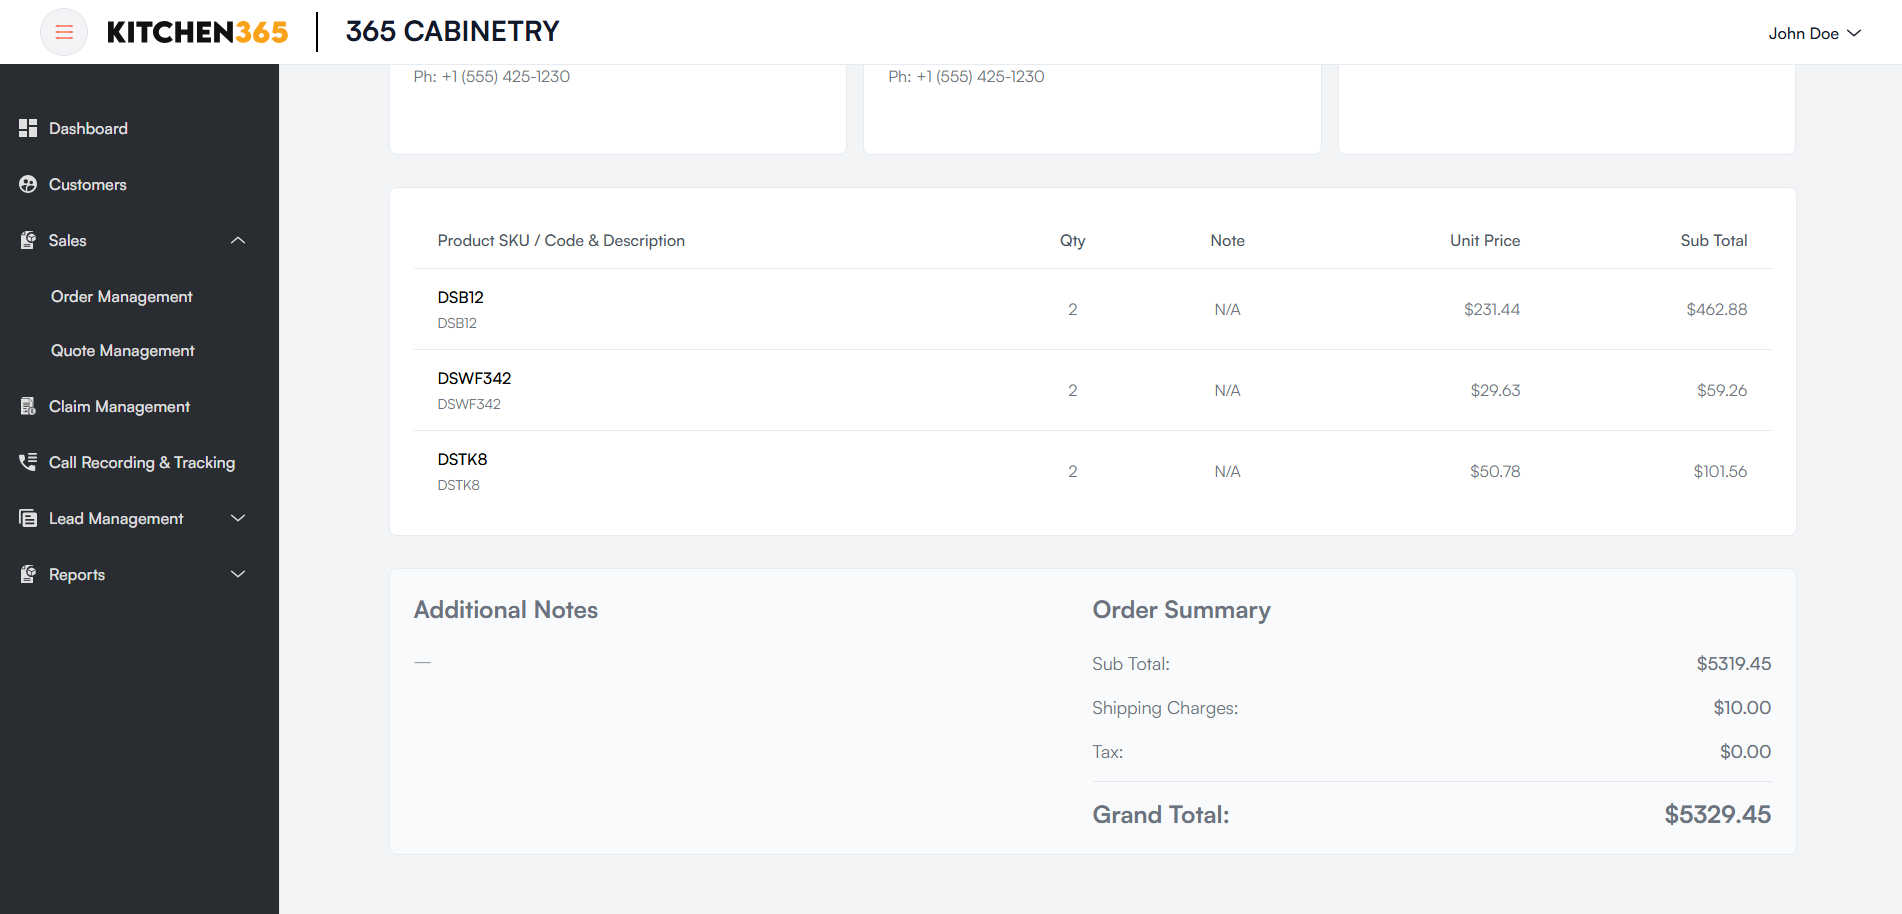
Order Items Tab
Displays the line items table with columns:
| Column | Description |
|---|---|
| Product SKU / Code & Description | Product name, SKU, and description. |
| Qty | Quantity with breakdown: Ordered, Invoice, Shipped, Refunded. |
| Note | Product-level note added during order creation. |
| Unit Price | Price per unit. |
| Sub Total | Line item total. |
Shipments Tab
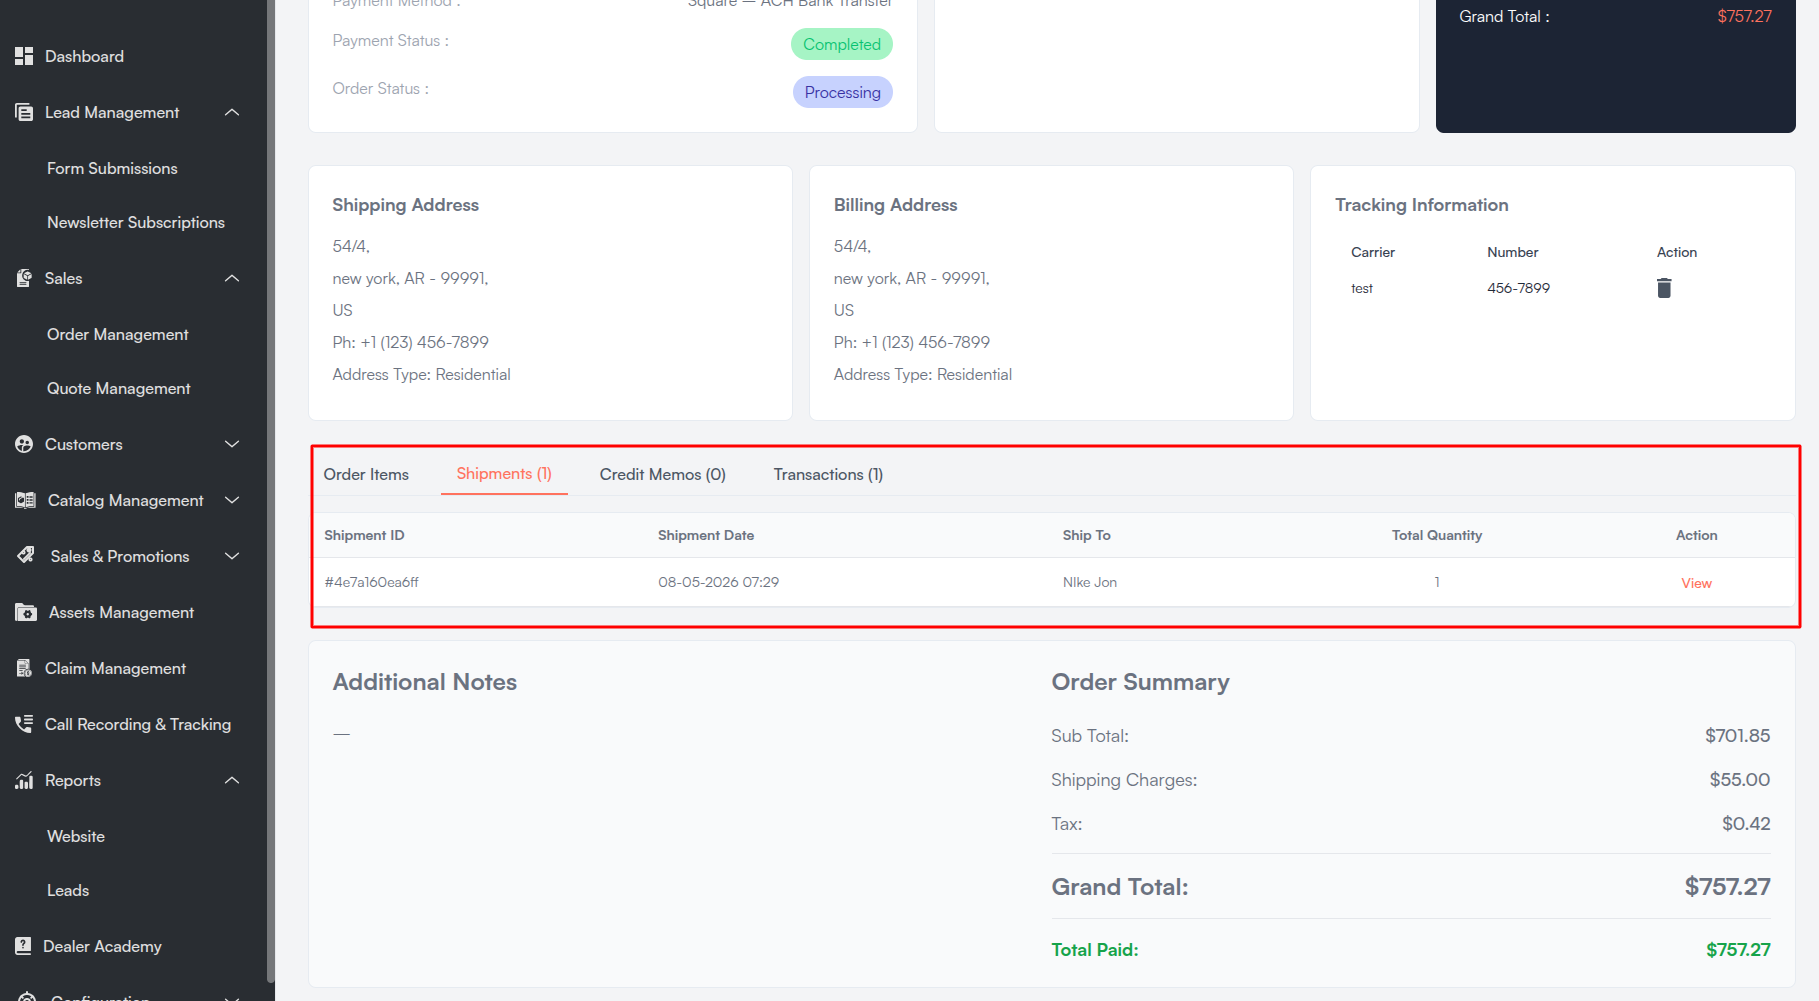
Lists all shipments for the order:
| Column | Description |
|---|---|
| Shipment ID | Unique shipment identifier. |
| Shipment Date | Date the shipment was created. |
| Ship To | Destination customer name. |
| Total Quantity | Total items shipped. |
| Action | View — Opens the shipment detail page. |
Empty state: "No shipments have been created for this order yet".
For the full shipment workflow, see Shipments — Create, View & Tracking.
Credit Memos Tab
Lists all credit memos for the order:
| Column | Description |
|---|---|
| Credit Memo ID | Unique credit memo identifier. |
| Date | Credit memo creation date. |
| Order Date | Original order date. |
| Bill To | Billing address name. |
| Items Refunded | Number of items refunded. |
| Total Amount | Refund amount. |
| Action | View — Opens the credit memo detail page. |
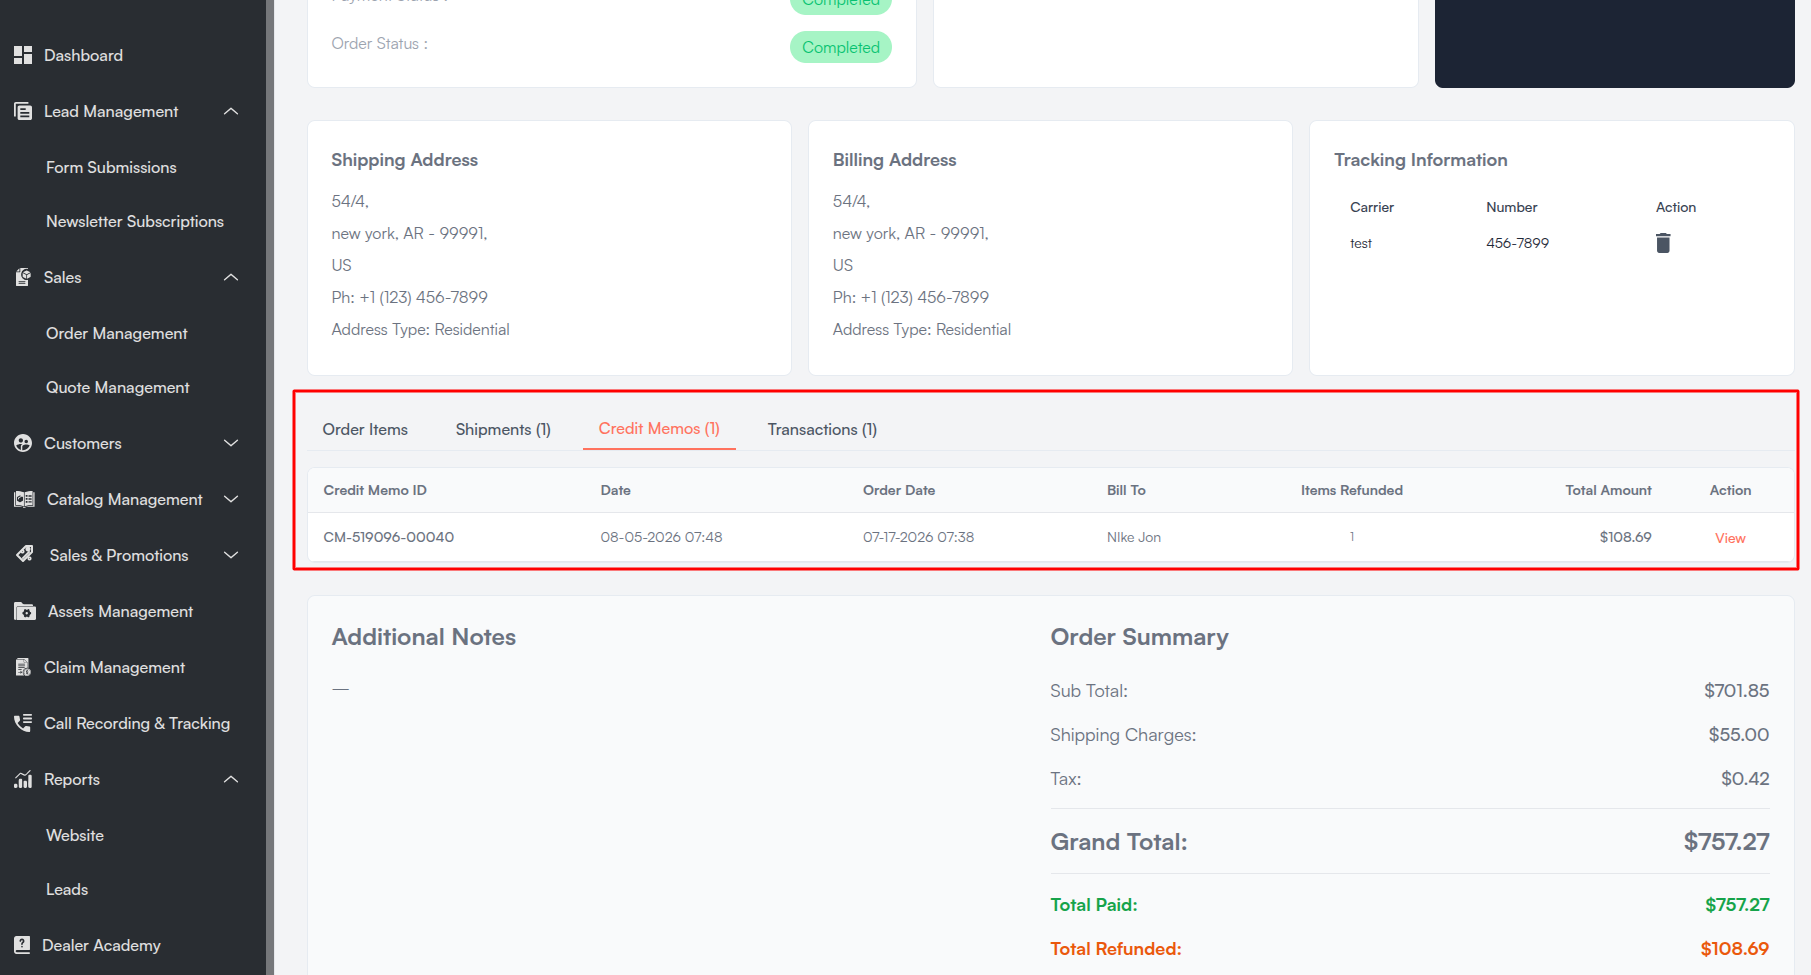
For the full credit memo workflow, see Credit Memos — Create & View.
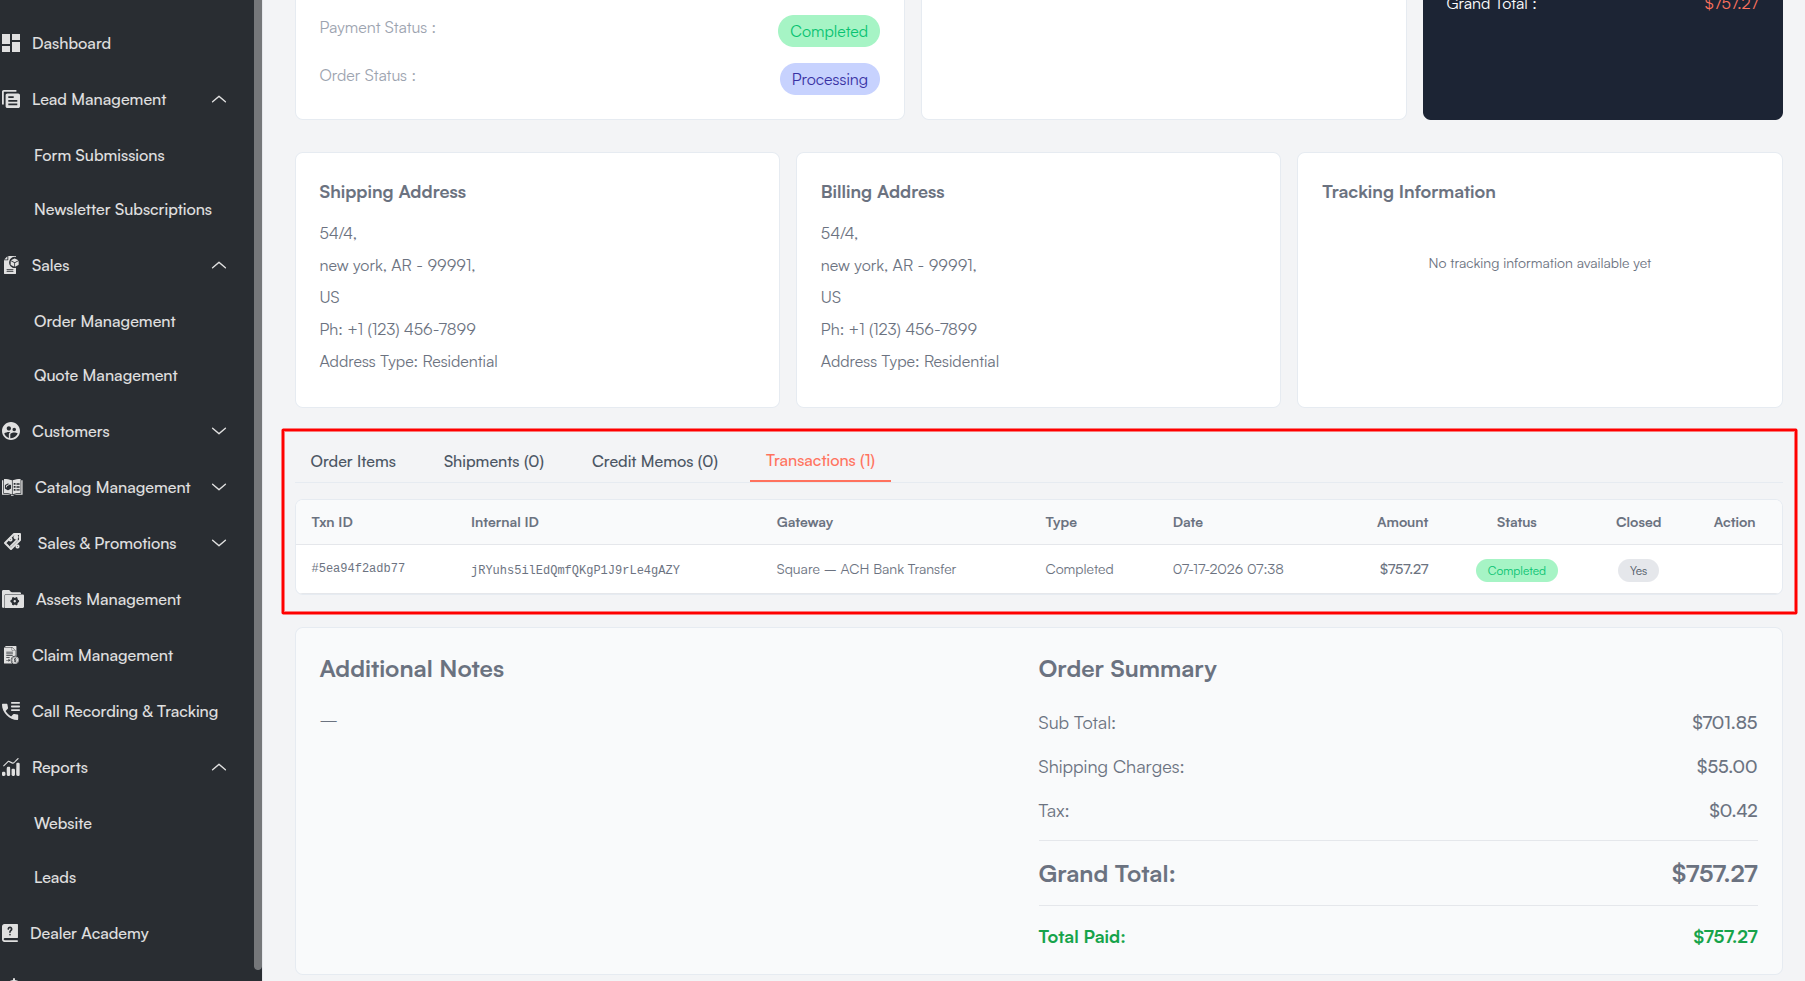
Transactions Tab
Lists all payment transactions for the order:
| Column | Description |
|---|---|
| Txn ID | External transaction identifier. |
| Internal ID | Internal system identifier. |
| Gateway | Payment gateway used. |
| Type | Transaction type. |
| Date | Transaction date. |
| Amount | Transaction amount. |
| Status | Completed, Pending, or Failed |
| Closed | Whether the transaction is closed. |
| Action | View transaction details. |
Empty state: "No payment transactions found for this order yet".
For detailed workflows on invoices, shipments, and credit memos, see the sections below.
iv. Invoice Management
Invoices are required before creating shipments. Invoice actions are available from the Order Details header toolbar and the Order Management list.
When Invoice Actions Are Available
| Action | Tooltip | When Available |
|---|---|---|
| Generate Invoice | Generate Invoice | Offline payment, order status Ordered or Pending Payment, no invoice yet. |
| Send Invoice Email | Send Invoice Email | Order status Processing, Complete, or Completed. |
| Download Invoice | Download Invoice | Order status Processing, Complete, or Completed, and invoice exists. |
| Download Invoice (list) | Download Invoice | From Order Management list when status is Processing, Complete, or Completed. |
Generate Invoice
- Open Order Details for an eligible order.
- Click the Generate Invoice icon in the header toolbar.
- On success, the toast "Invoice has been created successfully." is displayed.
- The order status updates and invoice actions (Send Invoice Email, Download Invoice) become available.
Send Invoice Email
- Click the Send Invoice Email icon in the header toolbar.
- On success, the toast "Invoice email has been sent successfully." is displayed.
- The customer receives the invoice via email.
Download Invoice
Download is available from the Order Details page or the Order Management list (download icon in the Action column).
- Click Download Invoice.
- The Download Invoice modal opens with the message "Choose how you want to download the invoice."
- Select a download option:
- Full Invoice — Includes all pricing details.
- Excluding price — Invoice without price information.
- Click Download to save the PDF, or Cancel to close.
On success, the toast "Invoice PDF downloaded successfully" is displayed. The file is saved as invoice-[Order ID].pdf.
v. Shipments — Create, View & Tracking
Shipments track which items have been fulfilled and shipped to the customer. An invoice must exist before a shipment can be created.
Prerequisites
- Order status must be Processing.
- An invoice must be generated for the order.
- If no invoice exists, the Shipments tab shows: "Please create an invoice first before creating shipments".
Create Shipment
- Open Order Details for an order in Processing status.
- Click the Create Shipment icon in the header toolbar.
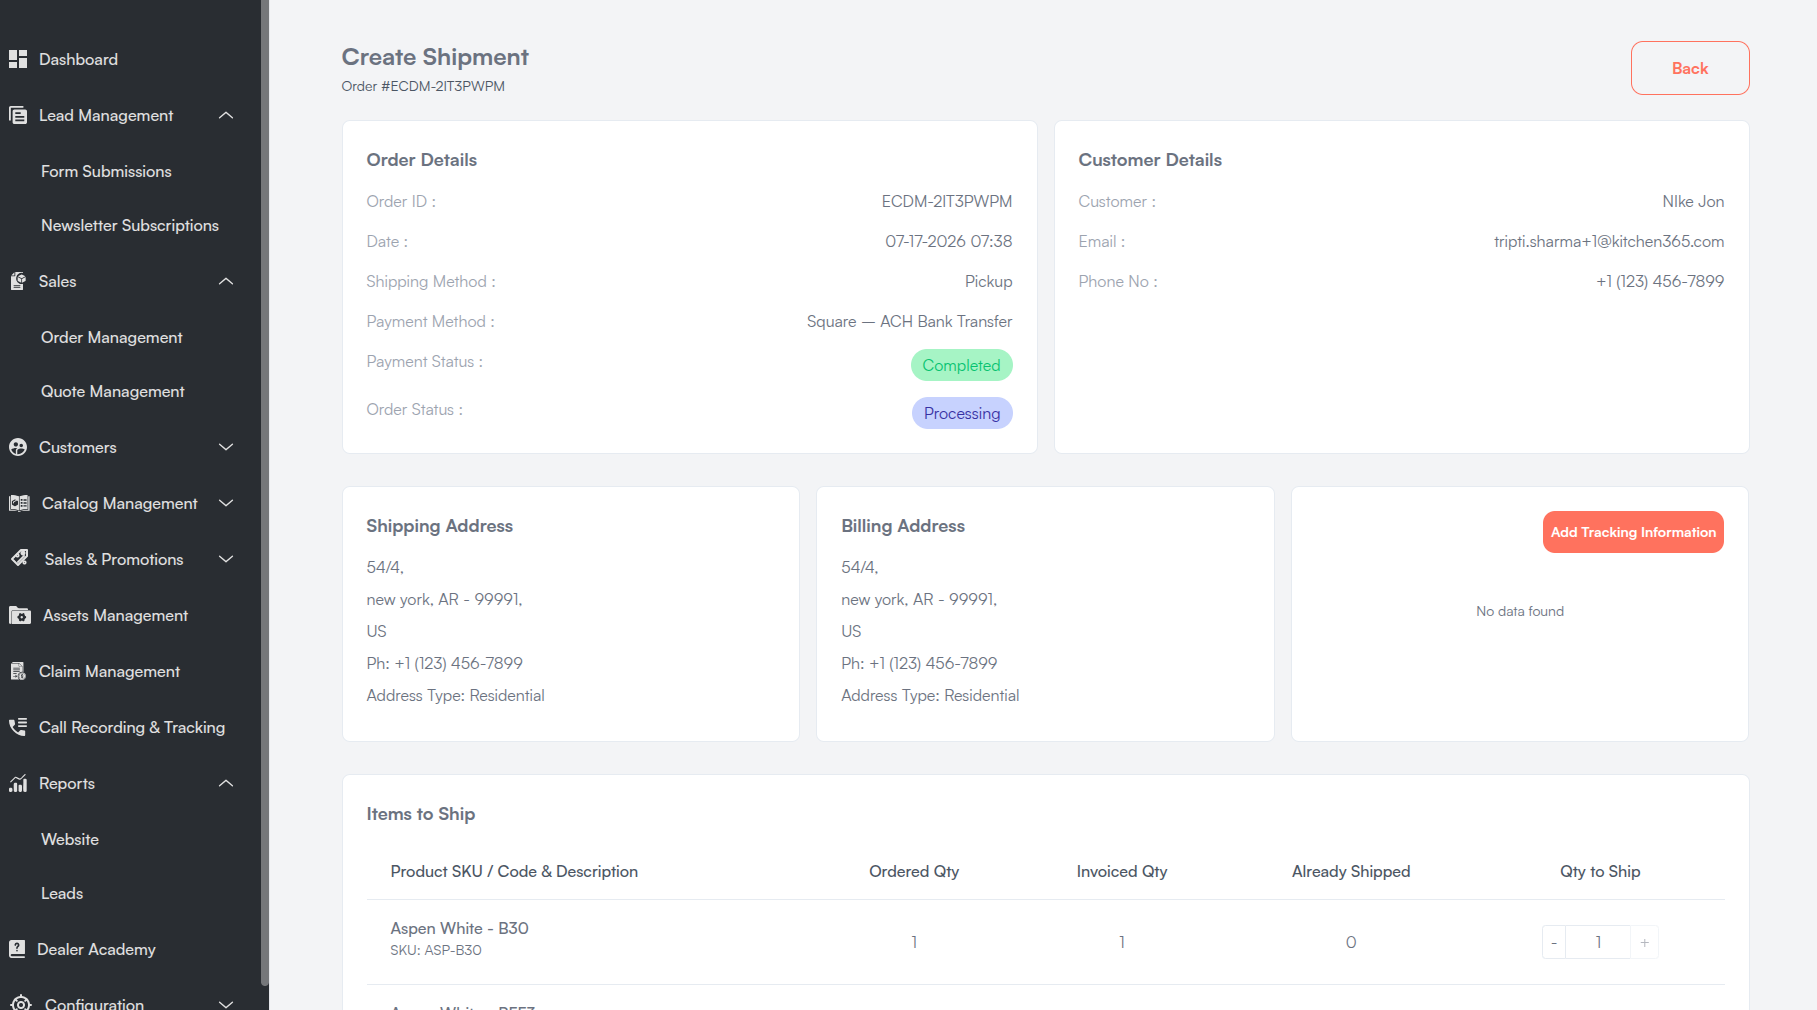
- The Create Shipment page opens showing:
- Order Details — Order ID, Date, Shipping Method, Payment Method, Payment Status, Order Status
- Customer Details — Customer name, Email, Phone No.
- Shipping Address and Billing Address
- Tracking Information panel (see below)
- Items to Ship table
Items to Ship table columns:
| Column | Description |
|---|---|
| Product SKU / Code & Description | Product name, SKU, and custom options. |
| Ordered Qty | Total quantity ordered. |
| Invoiced Qty | Quantity included on the invoice. |
| Already Shipped | Quantity already shipped in previous shipments. |
| Qty to Ship | Quantity to include in this shipment (editable with +/- controls). |
- Optionally add Shipment Comments in the text area (placeholder: Add any comments about this shipment...).
- Click Create Shipment to confirm, or Cancel / Back to return without saving.
On success, the toast "Shipment created successfully!" is displayed and you are redirected to Order Details.
Validation: "Please enter quantities to ship" if no quantities are entered.
Add Tracking Information (Create Shipment Page)
Before or after creating a shipment, you can add tracking numbers on the Create Shipment page:
-
Click Add Tracking Information in the Tracking Information panel.
-
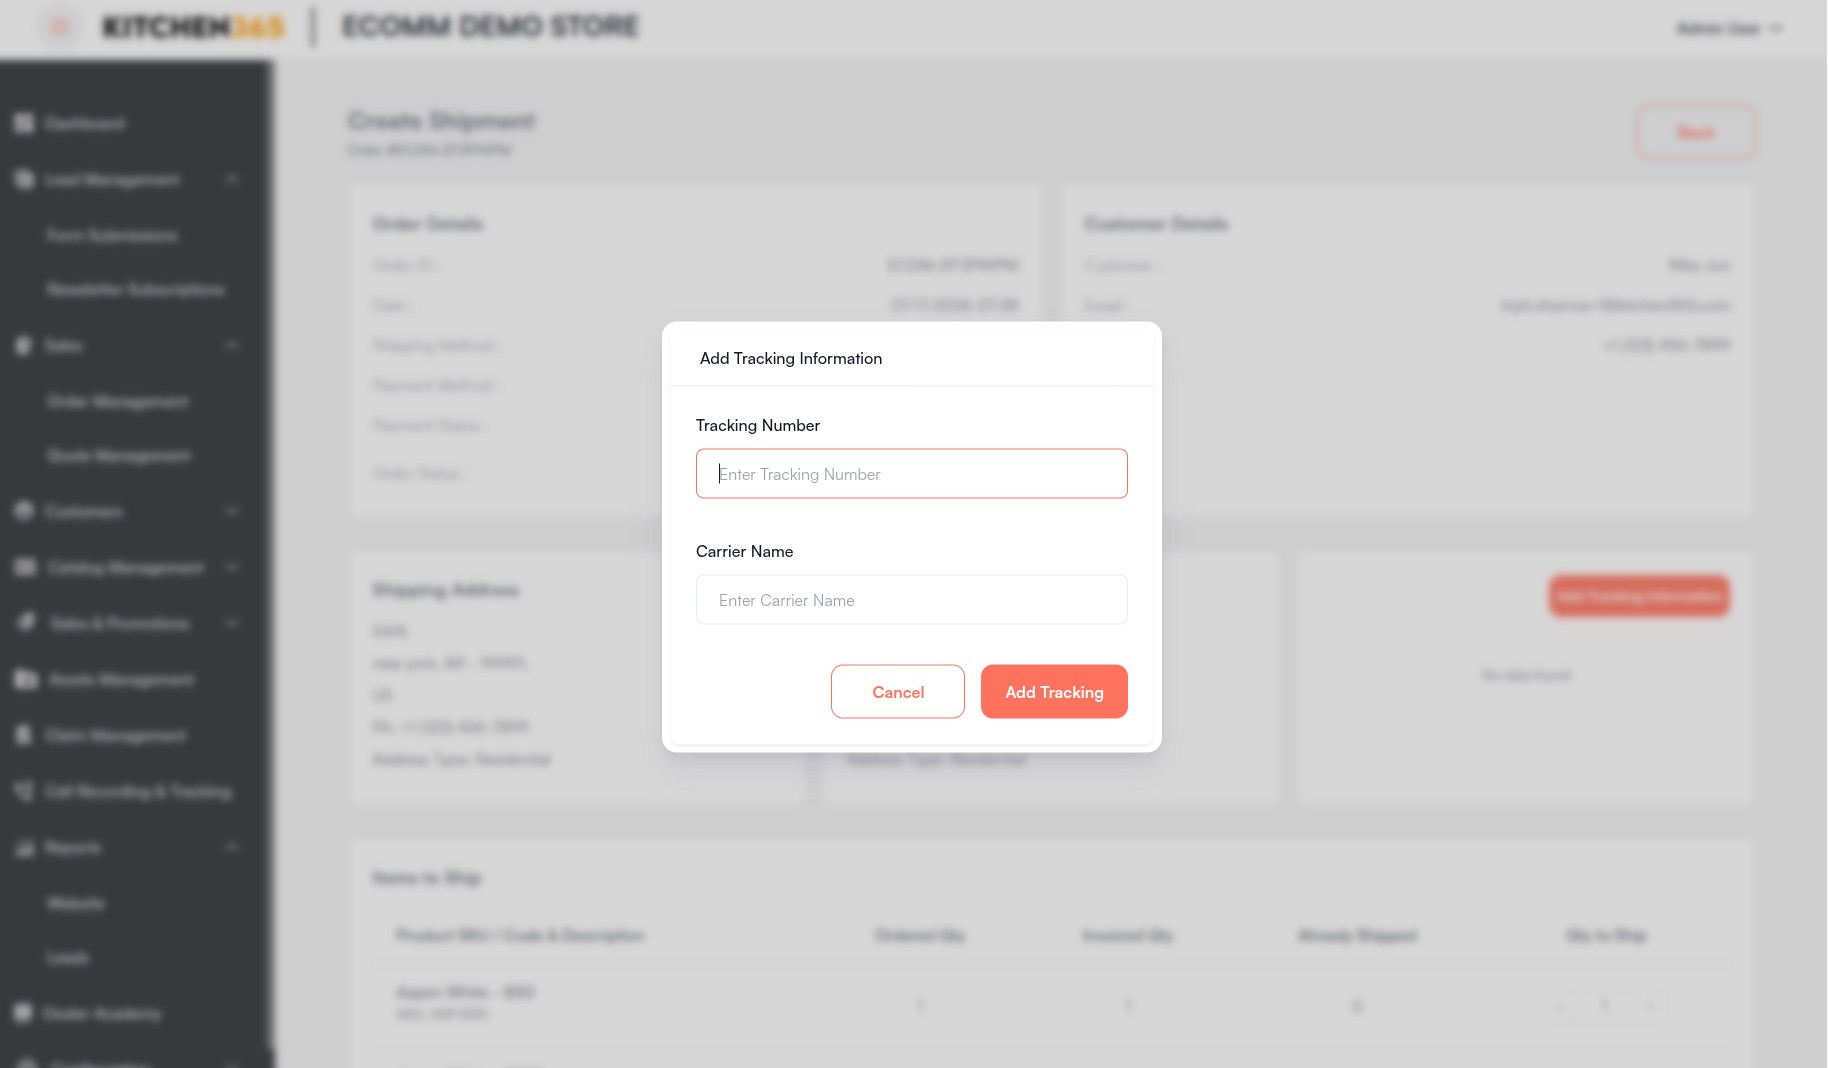
The Add Tracking Information popup opens.
-
Enter:
- Tracking Number — Placeholder: Enter Tracking Number
- Carrier Name — Placeholder: Enter Carrier Name
-
Click Add Tracking to save, or Cancel to close.
On success, the toast "Tracking information added successfully!" is displayed. Tracking entries appear in the table with columns Carrier, Number, and Action (delete icon).
- Unlinked tracking (not yet assigned to a shipment) is shown on the Create Shipment page.
- When a shipment is created, available tracking numbers are automatically linked to that shipment.
- Click the delete icon to remove tracking. A confirmation popup appears with Cancel and Confirm options.
View Shipment
- Go to Order Details → Shipments tab.
- Click View on the desired shipment row.
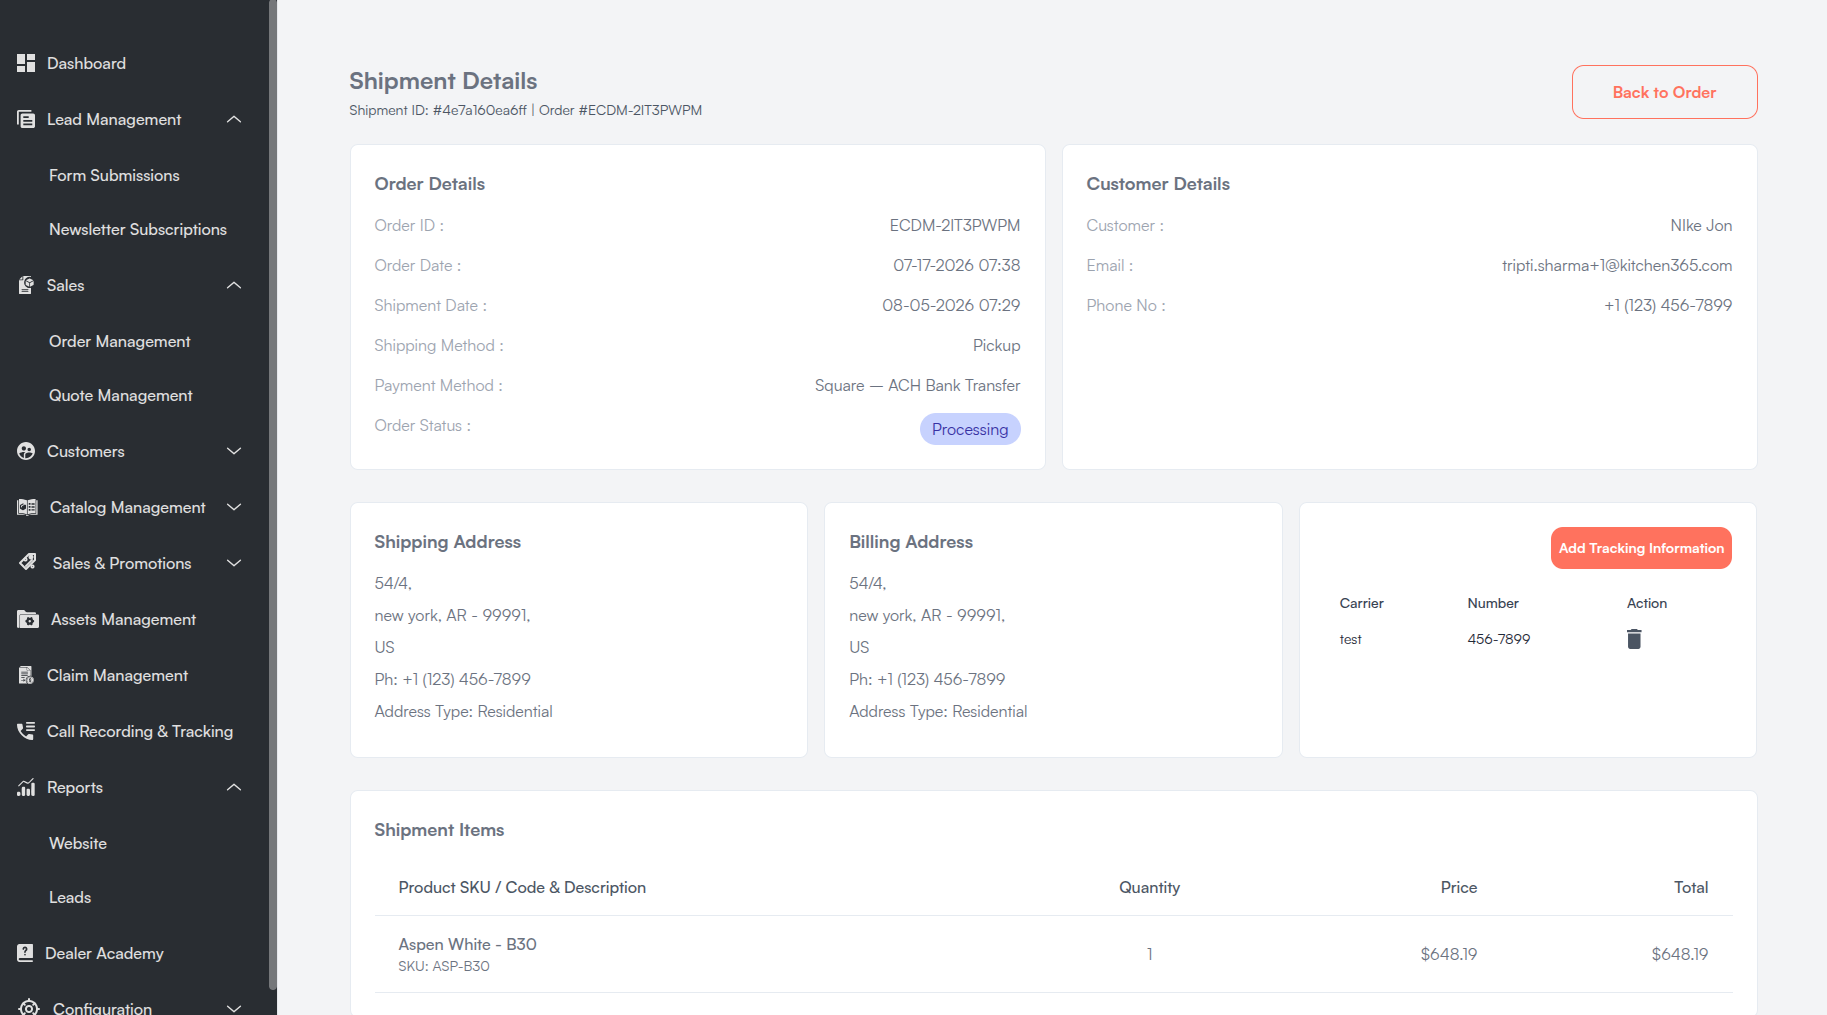
- The View Shipment page displays:
- Shipment and order information
- Shipping Address and Billing Address
- Tracking Information panel
- Shipment Items table (Product, Quantity, Price, Total)
Add Tracking Information (View Shipment Page)
Tracking can also be added directly on the View Shipment page:
- Click Add Tracking Information in the Tracking Information panel.
- Enter Tracking Number and Carrier Name in the popup.
- Click Add Tracking to save.
Tracking added here is linked to the specific shipment. The table shows Carrier, Number, and Action (delete). Empty state: "No tracking information for this shipment".
On successful add, a system-generated email notification is sent to the customer with the tracking details.
vi. Credit Memos — Create & View
Credit memos are used to process refunds for invoiced and paid orders.
Prerequisites
- Order status must be Processing or Completed.
- An invoice must exist for the order.
- Payment must be fully completed.
- If payment is incomplete, the Create Credit Memo button is disabled with tooltip: "Payment must be completed before creating credit memo."
Create Credit Memo
- Open Order Details for an eligible order.
- Click the Create Credit Memo icon in the header toolbar.
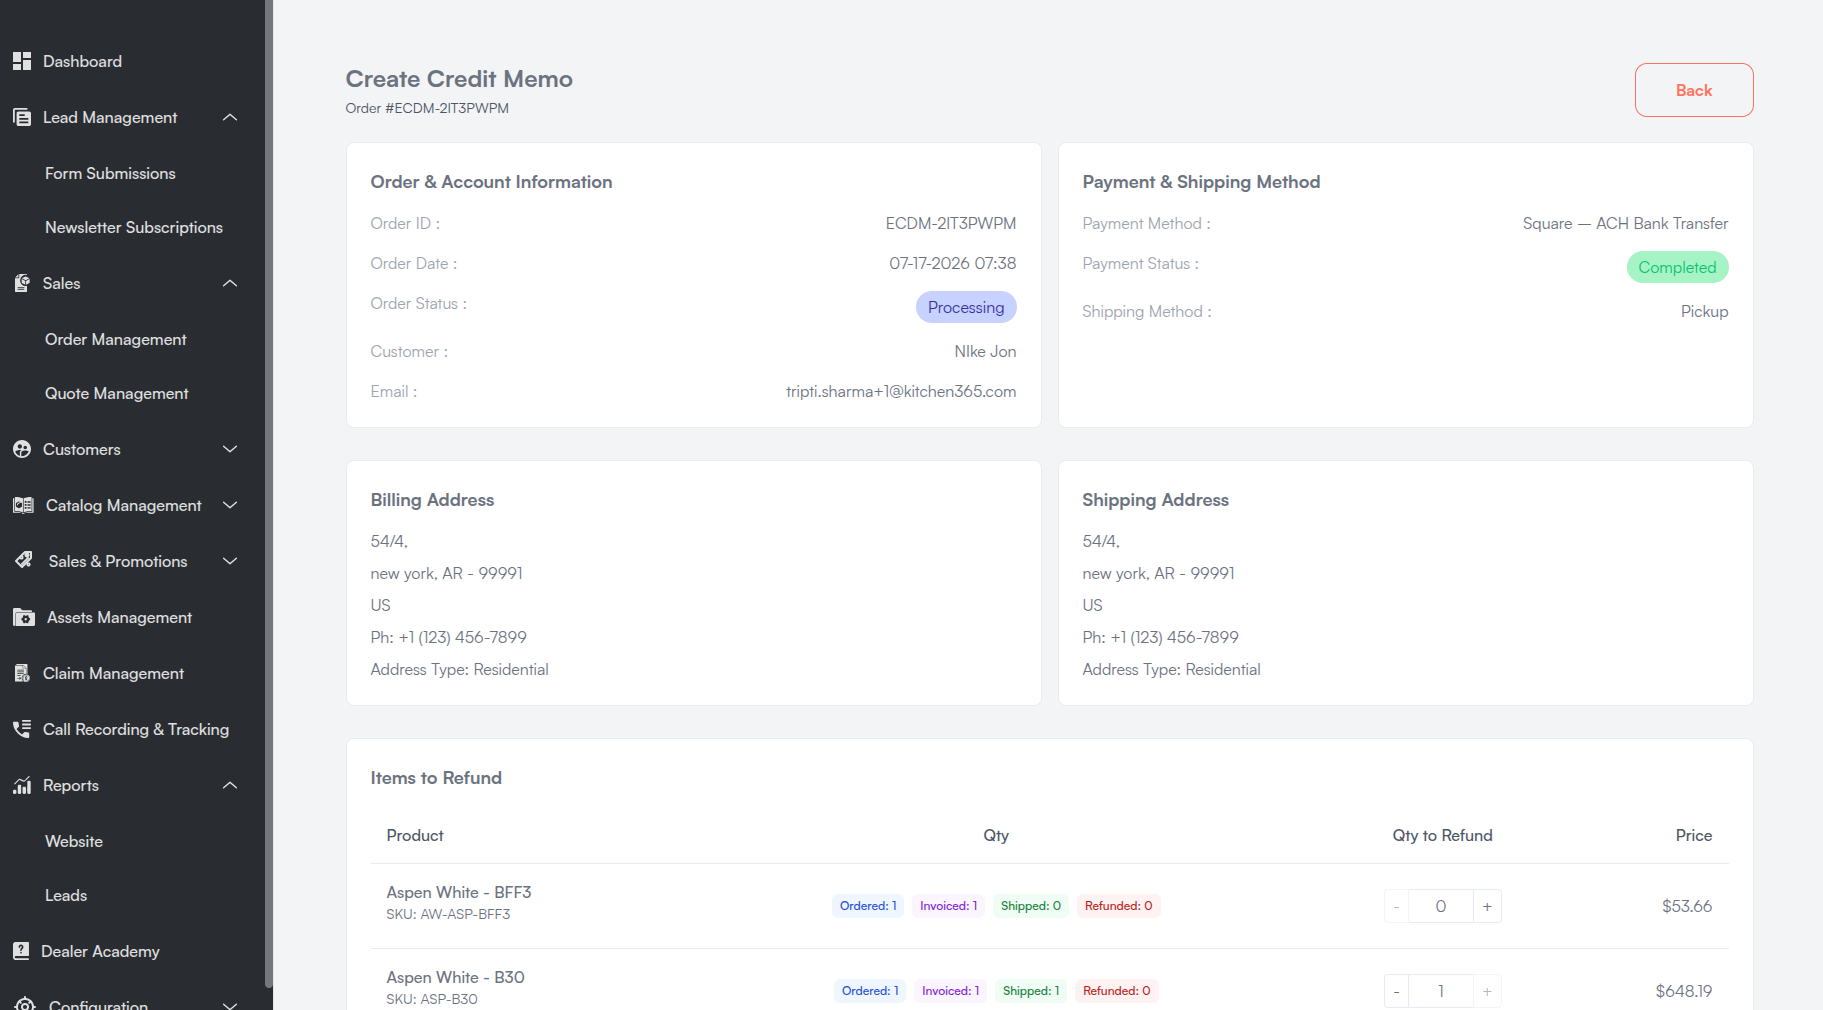
- The Create Credit Memo page opens showing:
- Order Details and Customer Details
- Shipping Address and Billing Address
- Items to Refund table
- Credit Memo Comments (placeholder: Add any comments about this refund...)
- Refund Totals panel
Items to Refund table columns:
| Column | Description |
|---|---|
| Product | Product name, SKU, and options. |
| Ordered Qty | Original ordered quantity. |
| Invoiced Qty | Quantity on the invoice. |
| Shipped Qty | Quantity already shipped. |
| Refunded | Quantity already refunded. |
| Qty to Refund | Quantity to refund in this credit memo (editable). |
Refund Totals fields:
| Field | Description |
|---|---|
| Grand Total (Order Price) | Read-only original order total. |
| Already Refunded | Amount previously refunded (if applicable). |
| Remaining Refundable Amount | Maximum amount still refundable. |
| Subtotal | Refund subtotal. |
| Refund Shipping | Shipping amount to refund. |
| Adjustment Refund | Additional refund adjustment. |
| Adjustment Fee | Fee adjustment. |
| Tax | Tax amount to refund. |
| Total Discount | Discount applied to refund. |
| Grand Total (Final) | Final refund total. |
- Adjust Qty to Refund and refund amounts as needed.
- Click one of the refund action buttons:
| Button | Description |
|---|---|
| Offline Refund | Creates the credit memo and records an offline refund. |
| Online Refund | Creates the credit memo and processes refund through the payment gateway (online payments only; not available for Authorize.Net). |
- Click Cancel or Back to Order to return without saving.
Validation warnings appear if Grand Total (Final) is negative or exceeds the remaining refundable amount.
On success, you are redirected to Order Details and the new credit memo appears in the Credit Memos tab.
View Credit Memo
- Go to Order Details → Credit Memos tab.
- Click View on the desired credit memo row.
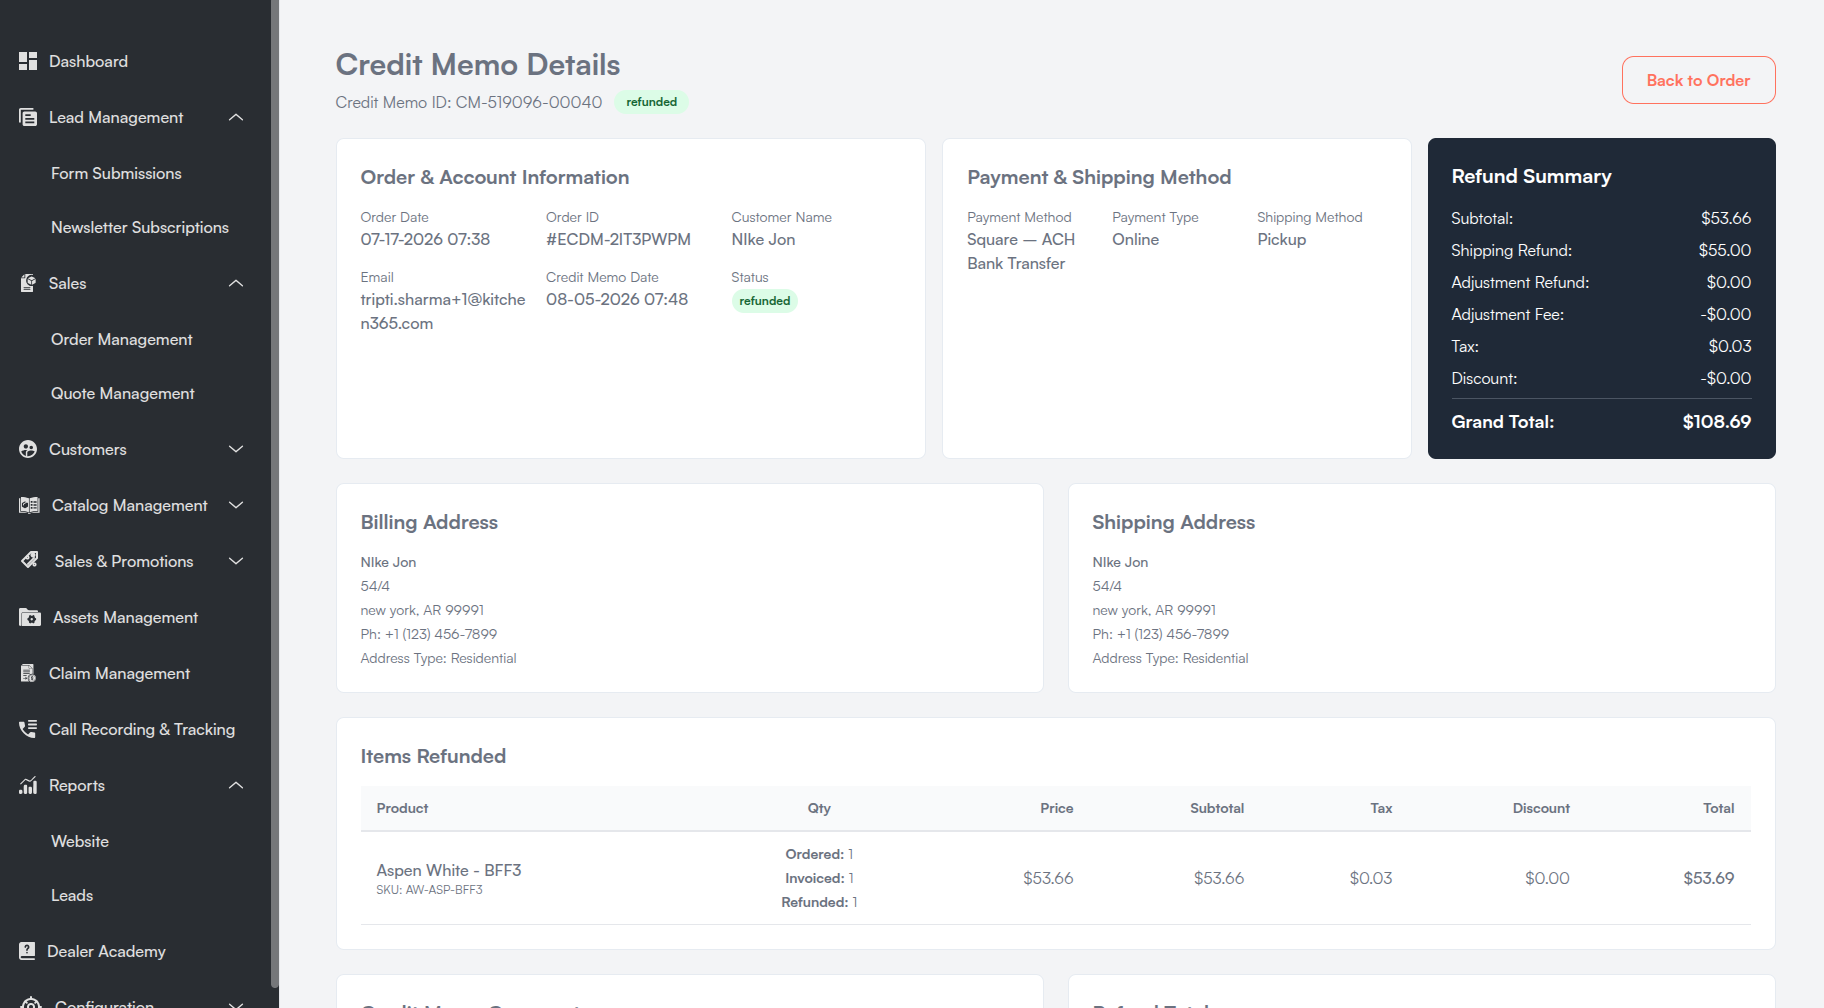
- The Credit Memo Details page displays:
- Credit Memo ID and status (pending, refunded, canceled)
- Order & Account Information — Order Date, Order ID, Customer Name, Email, Credit Memo Date, Status
- Payment & Shipping Method
- Billing Address and Shipping Address
- Refunded Items table
- Refund Summary — Subtotal, Shipping, Tax, Discount, Adjustment, Grand Total
- Click Back to Order to return to Order Details.
vii. Payment Retry
For orders with failed online payments, a Retry button appears next to the payment status on the detail page. Clicking it opens the payment method selector to attempt payment again.
viii. Offline Payment Recording
For orders with pending offline payments, the detail page provides an Offline Payment Method section to record payment details and mark the order as paid.
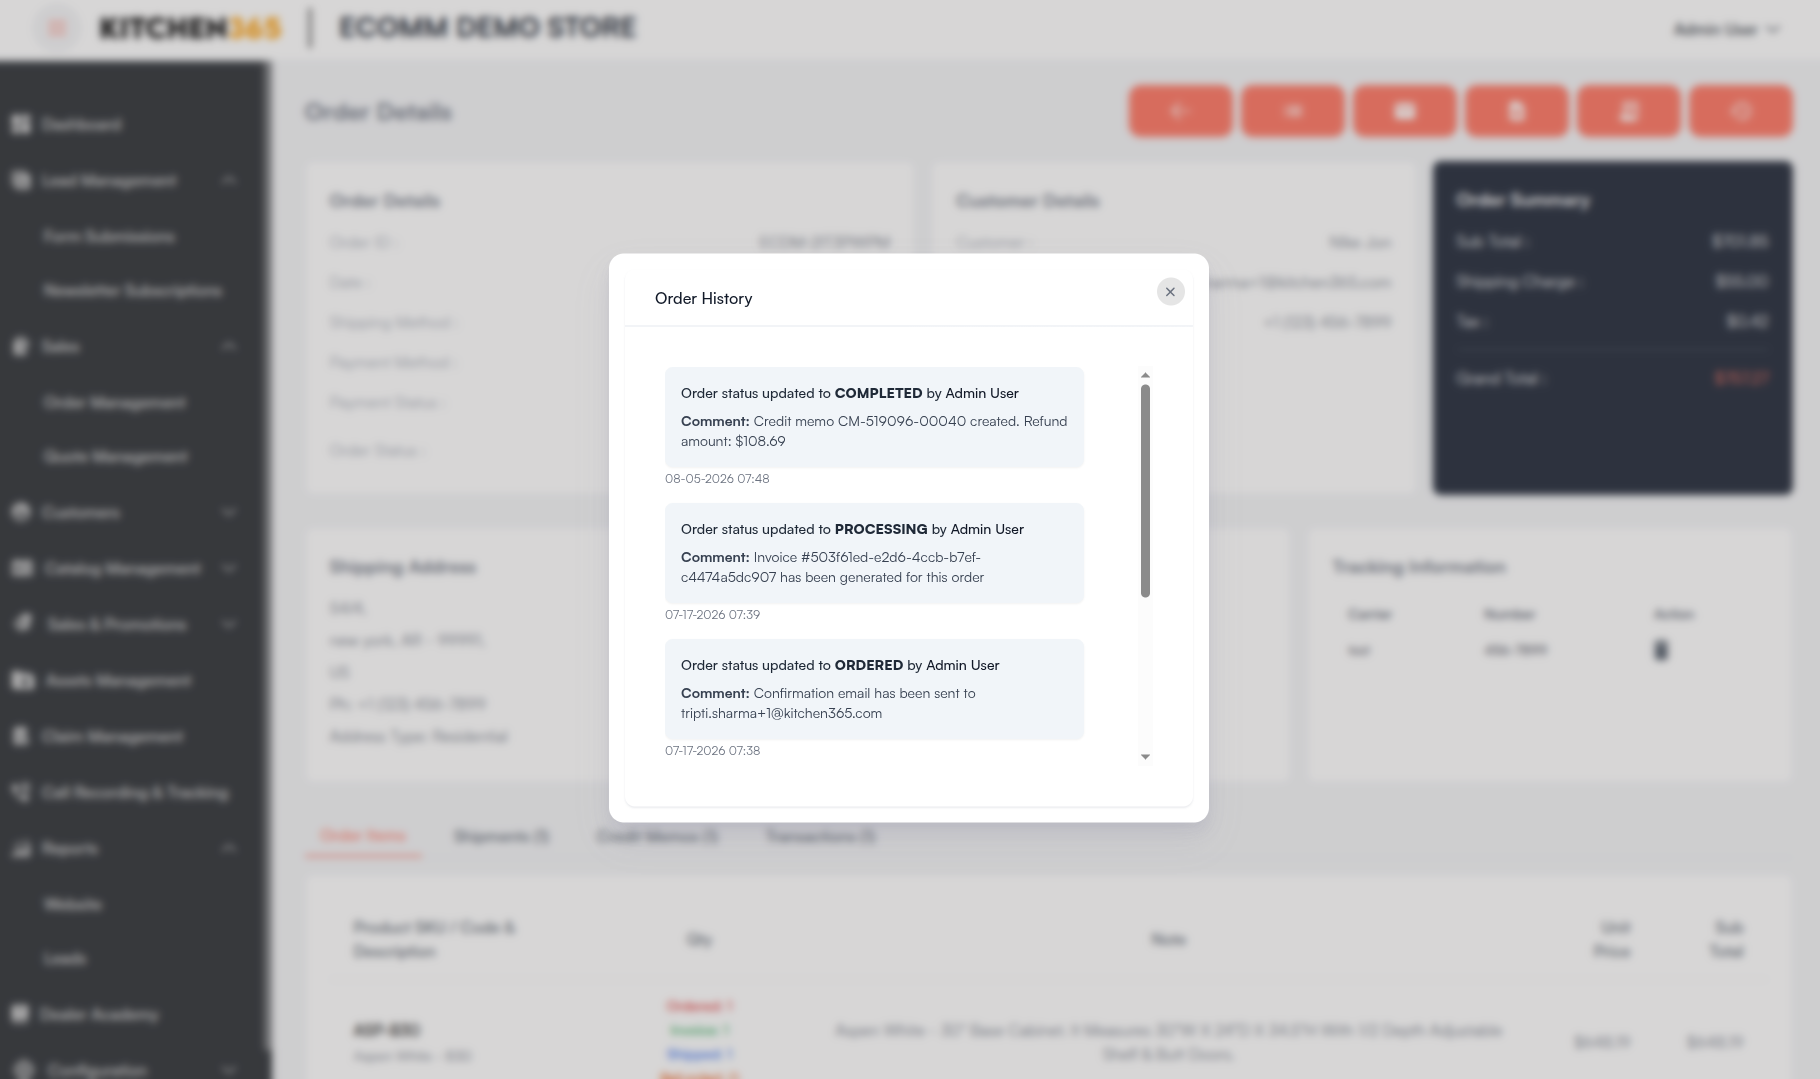
ix. Order History
Click Order History to view a log of all status changes. Each entry shows:
Order status updated to STATUS by User Name (or by Customer)
If a comment was added during the status change, it is displayed as:
Comment: comment text
e. Creating Orders from Quotes
Orders can also originate from the quote workflow:
- Navigate to Sales > Quote Management.
- Open a quote with status Ready to Order.
- Click Edit or View Quote to open the quote.
- Select a payment method and click Place Order.
Once converted, the quote status changes to Ordered and the new order appears in Order Management.
For full quote workflow details, see Quote Management.